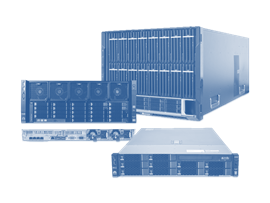
Database Server The suggested characteristics of an all in one server may vary for each installation according to the needs in the number of users, data size, subsystems that will be enabled etc. The below configurations are for typical occasions of 10–50 users.
Because of the critical role of an ERP or ERP/WMS system in a company, configuration of high availability is suggested for the uninterrupted operation of the application.
Intro The integration of a courier in EBS-RO encompasses several configurations, both on code and data.
If the code is already created, a set of files dealing with the courier’s API calls are already present in the software package. There is a standard set of automations for each of these integrations:
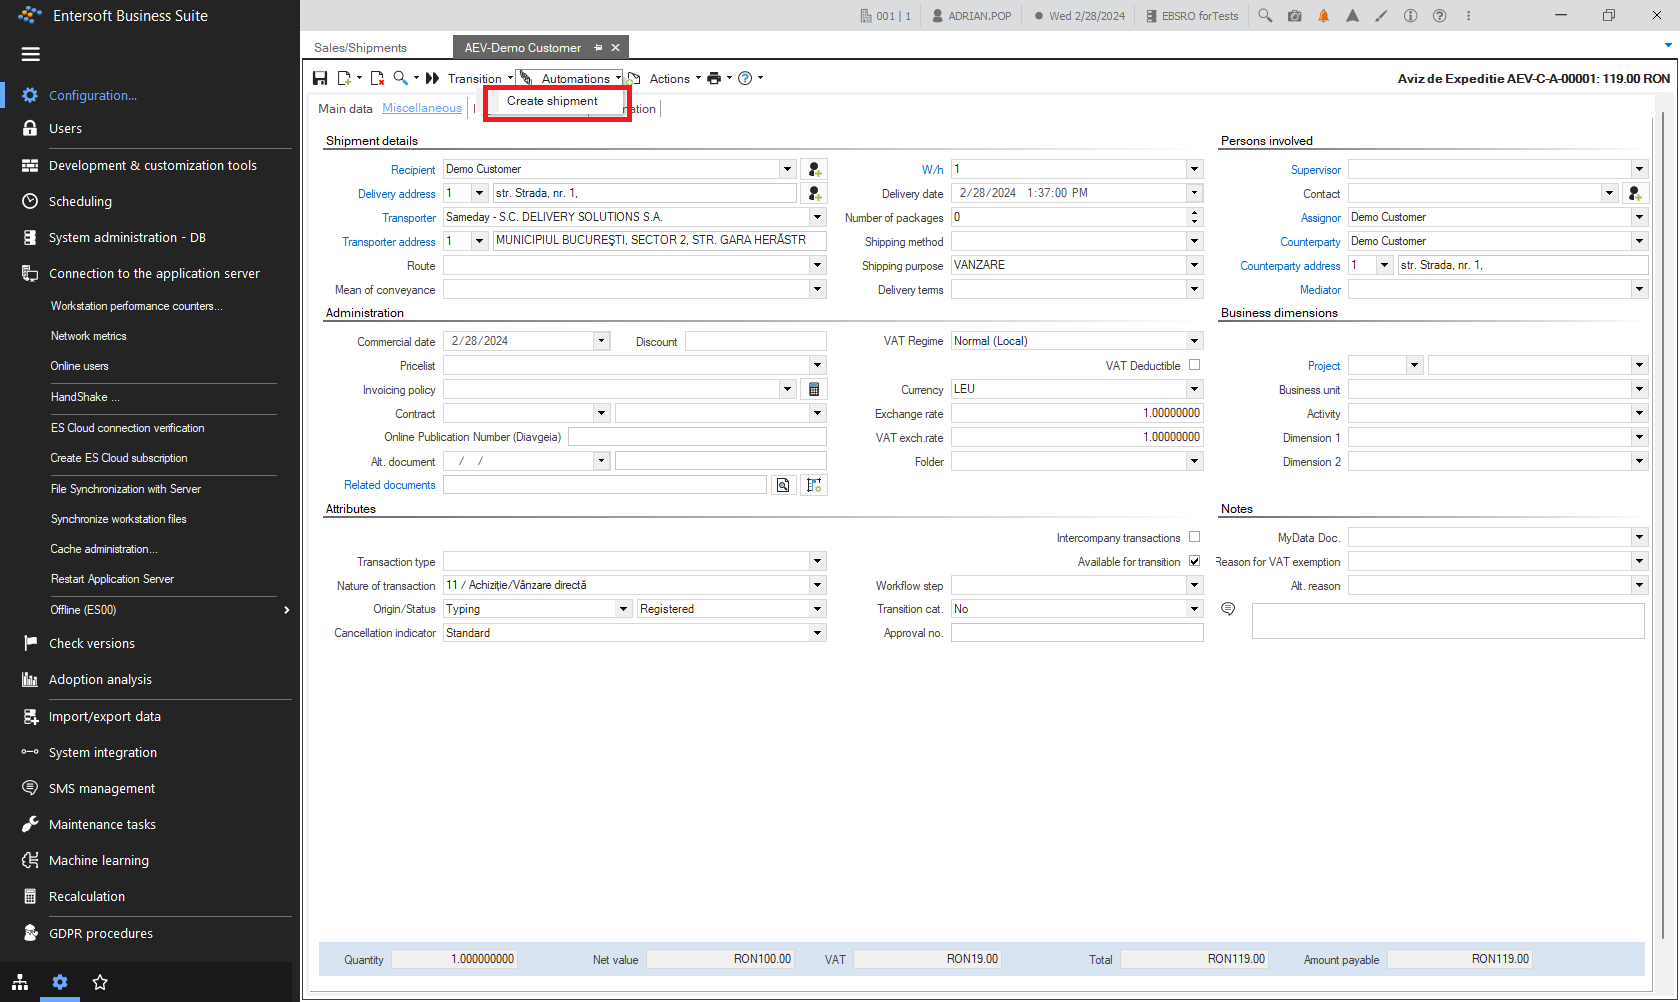
Create shipment,
and:
Print shipment,
Prerequisites The EBS-RO application version must be 5.13.0.0 or later, and the Retail module must be installed.
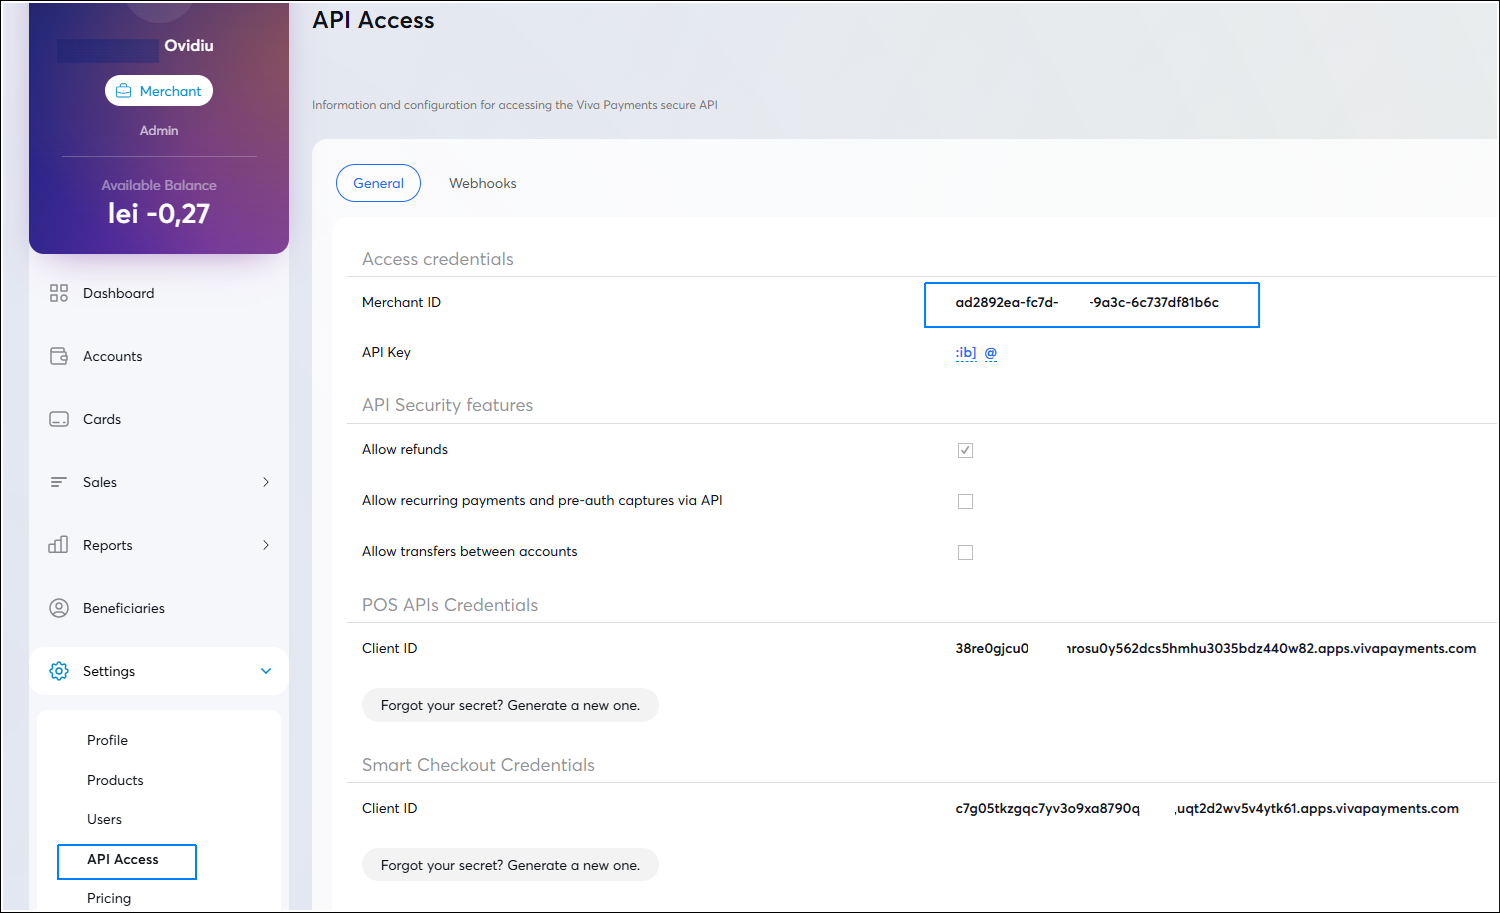
Ensure you have a VIVA merchant account on the viva.com website, where you will receive a Merchant ID available in the API Access section.
Ensure you have the POS terminal (or application—e.g., on Android) for which you identified the Terminal ID (POS Code) in Settings > About.
{class=“children children-type-tree children-sort-weight”}
Subsections of General
Installation requirements
1. Database Server
The suggested characteristics of an all in one server may vary for each installation according to the needs in the number of users, data size, subsystems that will be enabled etc. The below configurations are for typical occasions of 10–50 users. Because of the critical role of an ERP or ERP/WMS system in a company, configuration of high availability is suggested for the uninterrupted operation of the application.
Operating System Windows 2016 R2 Server Standard Edition with the latest Service Pack installed,
SQL Server 2017 Standard Edition with latest CU installed.
1.2. Recommended configuration
Physical Server
Intel Xeon 8 core CPU or better,
Two hot pluggable redundant PSUs,
Hot pluggable redundant cooling fans,
RAM >=16GB upgradable,
2-channel SAS RAID Controller,
2 hot-pluggable SAS disks in mirror (RAID1) >= 146GB each for system,
4 to 6 hot-pluggable SSD or SAS disks in mirror (RAID10) >=146GB each with 64K Allocation Unit Format for the ERP Database Files. In case of larger installations a special study is required - i.e. for big installations an SSD RAID or NVME RAID-10 (with 8–10 disks) storage system is suggested.
Operating System Windows 2022 R2 Server (or newer preferable) Standard Edition x64 with the latest Service Pack installed,
SQL Server 2022 Standard Edition with latest CU installed.
VM Server
8 vCPU,
Ram >= 16 GB,
Disks System VHD >= 146GB,
Data VHD >= 146GB with 64K Allocation Unit Format for Database Files; in case of larger installations a special study is required,
VHDs are suggested to be in an SSD RAID or SAS RAID-10 (with 8–10 disks) storage system
LAN card 1Gbps,
Back-up mechanism on host: Tape backup devices, storages, external disks, etc.
Operating System Windows 2022 R2 Server (or newer preferable) Standard Edition with the latest Service Pack installed,
SQL Server 2022 Standard Edition with latest CU installed.
.Net framework 4.8 must be installed.
As we mentioned, the uninterruptable operation of the application depends on the availability of the H/W platform. It is obvious that a failure on the Database Server (e.g., PSU failure, disk failure and more) that will take it out of operation equals to the interruption of the ERP system.
An UPS (Uninterruptible Power Supply) for the Database & Application Server is also necessary, so a UPS device must be connected for protection against power failures and voltage abnormalities.
2. Application Server
For the best performance of the installation a separate Application Server is suggested for installations at companies with more than 50 users. In smaller installations the Application Server coexists with the Database Server.
The Application Server also serves the remote users. Between the main server and the remote points, only the necessary data information is transferred to the end user, resulting to:
very low traffic on the communication lines;
ability of functionality through a simple internet connection;
no extra systems required (e.g. Terminal Server) adding more cost and management resources.
2.1. Minimum configuration
Physical Server
Intel Xeon CPU 2 core,
RAM 8GB,
Disk space 80GB,
LAN card 1Gbps,
Operating System Windows 2016 R2 Server Standard Edition with the latest Service Pack installed.
VM Server
2 vCPU,
RAM 8GB,
Disk space 80GB,
LAN card 1Gbps,
Operating System Windows 2016 R2 Server Standard Edition with the latest Service Pack installed.
2.2. Recommended configuration
Physical Server
Intel Xeon CPU 4 core or better,
Two hot pluggable redundant PSUs,
Ηot pluggable redundant cooling fans,
RAM 8GB,
Disk space >= 80GB,
LAN Card 1Gbps,
Operating System Windows 2022 R2 Server (or newer preferable) Standard Edition x64 with the latest Service Pack installed.
VM Server
4v CPU,
Ram >= 8GB,
VHD >= 146GB,
LAN card 1Gbps,
Operating System Windows 2022 R2 Server (or newer preferable) Standard Edition with the latest Service Pack installed.
.Net framework 4.8 must be installed.
An UPS (Uninterruptible Power Supply) for the Application Server is also necessary, for protection against power failures and voltage abnormalities.
3. Web Server (Mobiles and/or eCom)
The Web Server serves the mobile users and/or the web customers via a web service and/or web portal.
The Web Server requires the installation of the Internet Information Server (IIS) 6 or newer.
3.1. Minimum configuration
Physical Server
Intel Xeon CPU 2 core,
RAM 8GB,
Disk space 80GB,
LAN card 1Gbps,
Operating System Windows 2016 R2 Server Standard Edition x64 with the latest Service Pack installed.
VM Server
2 vCPU,
RAM 8GB,
Disk space 80GB,
LAN card 1Gbps,
Operating System Windows 2016 R2 Server Standard Edition with the latest Service Pack installed.
3.2. Recommended configuration
Physical Server
Intel Xeon CPU 4 core or better,
Two hot pluggable redundant PSUs,
Ηot pluggable redundant cooling fans,
RAM 8GB,
Disk space >= 80GB,
LAN Card 1Gbps,
Operating System Windows 2022 R2 Server (or newer preferable) Standard Edition x64 with the latest Service Pack installed.
VM Server
4 vCPU or better,
RAM 8GB,
Disk space 80GB,
LAN card 1Gbps,
Operating System Windows 2022 R2 Server (or newer preferable) Standard Edition with the latest Service Pack installed.
An UPS (Uninterruptible Power Supply) for the Application Server is also necessary, for protection against power failures and voltage abnormalities.
4. Clients
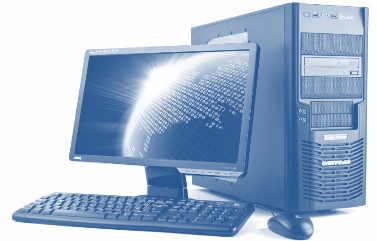
The user’s workstations must have the following characteristics:
4.1. Minimum configuration
CPU 2 cores with multithread,
RAM 4GB,
Disk space 80GB,
LAN card 1 Gbps,
Operating System Windows 10 with the latest Service Pack installed.
4.2. Recommended configuration
Intel Core 4 cores with multithread,
RAM >= 8GB,
Disk space >= 80GB,
LAN card 1Gbps,
A good but not too expensive VGA Card will provide better speed on the users and the workstations functionality,
Operating System Windows 11 with the latest Service Pack installed.
On all clients .Net framework 4.8 must be installed.
5. Mobile Devices
5.1. iOS Devices
iPad Air, iPad Mini3, iPhone 6 Plus and above,
Network: Wi-Fi + Cellular (Optional),
Capacity: >= 16GB,
Operating System >= iOS 13.
5.2. Android Devices
Cross Platform (ES Mobile),
Dual Core (or higher),
RAM >= 2GB,
Storage Capacity: >= 16GB,
OS >= Android 8 (with Google Play services),
Wi-Fi + Cellular (Optional),
Notes: In case of device replacement for an existing installation:
Screen resolution should be the same as the old device (otherwise there is a chance that parametrization may be required).
Screen size should match (otherwise there is a chance that parametrization may be required).
Operating System: Windows Mobile 6.5 / 7, Android 4.1 (or higher),
RAM Memory 256MB - 2GB,
Display Resolution min. 640 x 480,
Scanner Type min. 2D Imager.
Screen size is a choice based on user comfort. RF application has settings that adopt fonts and objects to relevant screen resolution and size. PDAs functionality is based on Wi-Fi connectivity.
6.2. Recommended Devices
The following list presents some of the devices that have been tested and work correctly with ES Apps.
Honeywell CK65,
Honeywell CK65 Long Range,
Honeywell EDA61K,
Honeywell CK65 Long Range 4G,
Zebra MC93,
Zebra MC33.
There are peripheral devices to extend or support the above devices:
Pistol grip handles,
Battery chargers,
Holsters,
Rubber boots,
Spare batteries,
Device bases.
6.3. Printers
Native printing Engine for maximum performance & capabilities,
Zebra, Datamax,
Printing Stations, Sharing, through LAN infrastructure.
The following list presents some of the devices that have been tested and work correctly with ES Apps.
Zebra ZT231,
Zebra ZT411.
7. Network Infrastructure
On installations where remote clients or branches are involved a WAN or VPN network may be needed to create. A very important factor for a successful installation is the communication quality and speed between remote desktops and the main Application Server. For the connection between them, there are many choices like Dial-Up connections, DSL, DSL / VPN, GPRS, 3G and more. The choice for the best solution technically and economically is made according to each customer’s demands.
The minimum requirements needed for the correct operation of Entersoft products are as follows:
The wiring must fulfill the requisites of category UTP 5e or 6.
If we consider the increased traffic and the need for fast responses from the workstations, the main network must be segmented with Ethernet switches >=100 Mbps.
The basic workstations and the servers network cards must be >=100Mbps.
Communication Protocol TCP/IP.
8. Compatibility Specifications
8.1. Telephone switchboards for CTI integration with Entersoft CRM®
The CTI module communicates with TAPI v2.0 and later. An indirect compatibility criterion is to check if the center can make calls through MS-Outlook by TAPI and if it gives call recognition capability.
The CTI functionality comes with each PC and is client based.
This means that the TAPI driver must be installed on each PC that needs this functionality. Recording capabilities are available only if the phone center’s TAPIdriver provider can support such features.
The following list presents the phone centers that have been tested and work correctly with Entersoft CRM - CTI.
List of tested phone centers:
(This list will be renewed whenever new information is available.)
Alcatel
Alcatel-Lucent Omni PCX (Office & Enterprise)
Asterisk
Successfully Tested with the XTelsio TAPI driver
Avaya
AVAYA ΙP 403
AVAYA s8500
AVAYA G350
Cisco
CISCO 2800
CPI-FIT
Tested with local TAPI driver
Samsung
All OfficeServ centers; more specifically: OS SOHO MASTER, OS 12, OS 100, OS 500, OS 7030, OS 7100, OS 7200, OS 7400.
The POS systems have various processors (eg Intel Atom CPU) that all work properly with our application. Depending on the customer’s requirements and the peripherals of each POS, better systems are suggested for maximum performance.
POLE DISPLAY
POSIFLEX PD2100S,
WD-202A(B),
EPSON DM-D210,
TOSHIBA TEC,
TOSHIBA FISCAL DISPLAY.
SCANNERS
POSIFLEX 3830U,
OPR2001 COMPACT LASER,
DATALOGIC MAGELAN 2300HS (ICS),
METROLOGIC ORBIT MS7180 (ICS).
Scanners connected to a serial port need their own program to communicate with windows, while USB ones work immediately when connected to the PC.
TOUCH SCREENS
ELO 1515L from CPI,
ELO 1715L from CPI.
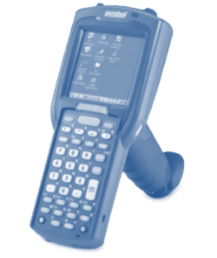
RF Devices
ZEBRA MC33 (Android),
HONEYWELL EDA60K (android),
CIPHERLAB RK25 (Android),
INTERMEC CK71, CK3X, CK3R (Windows),
DATALOGIC Skorpio X4 (Windows),
MC3200 Variants (Windows).
DRAWERS
Our applications work with the following drawers and those that can be connected directly to a PC are preferred for better management by our application. The most drawers are opened during the issuance of the receipt when connected to printers:
YEICOM EC-35 (ΤΑΜΕΙΑΚΗΣ),
POSIFLEX CR3100,
GALEO.
WEIGHTING MACHINES
For the purpose of integrating weighing functionality, a module was developed which provides an interface through a serial port (COM), without the need to install a driver in the system and has been tested with:
DIGI DS-980.
TAX MECHANISMS
Our applications work with Type A tax mechanisms and we are proven compliant with the following:
**) It also works online with an unlimited number of terminals that can be served as well as in case of damage to the fiscal mechanism, it automatically sends the signature to a back up second Fiscal Box, without human intervention.
***) Installation instructions in the relevant documents.
CAUTION: Digital copies should always be checked and approved for correctness by the company’s accountant.
TAX PRINTERS
Epson Fiscal DM210 & DM220,
Epson Fiscal 4000 – 8000,
Star Fiscal 300,
Posiflex (CPΙ) / All the models,
Ergospeed (ELMI) / All the models,
LD 628 (Logicdata),
MRS Fazy FPU,
Arcadia,
Samsung Fiscal 350,
Ditron Zip258 (Trias),
Easy Fiscal (ICS),
Epson FP-81F (through OPOS drivers),
TEpsonTM81.
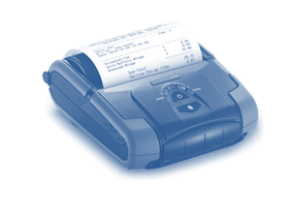
THERMAL PRINTERS
All thermal printers are supported via Windows printing.
Whether to automatically cut the paper at the end of printing after the mark string depends solely on the capabilities of the printer and Driver.
Such printers are below:
Smice (MRS electronics),
All Epson TM88 series,
WTP-150 (ICS),
LK-T21 (ICS).
Couriers integration
1. Intro
The integration of a courier in EBS-RO encompasses several configurations, both on code and data.
If the code is already created, a set of files dealing with the courier’s API calls are already present in the software package. There is a standard set of automations for each of these integrations:
Create shipment, and:
Print shipment,
Update shipment,
Cancel shipment,
View shipment information.
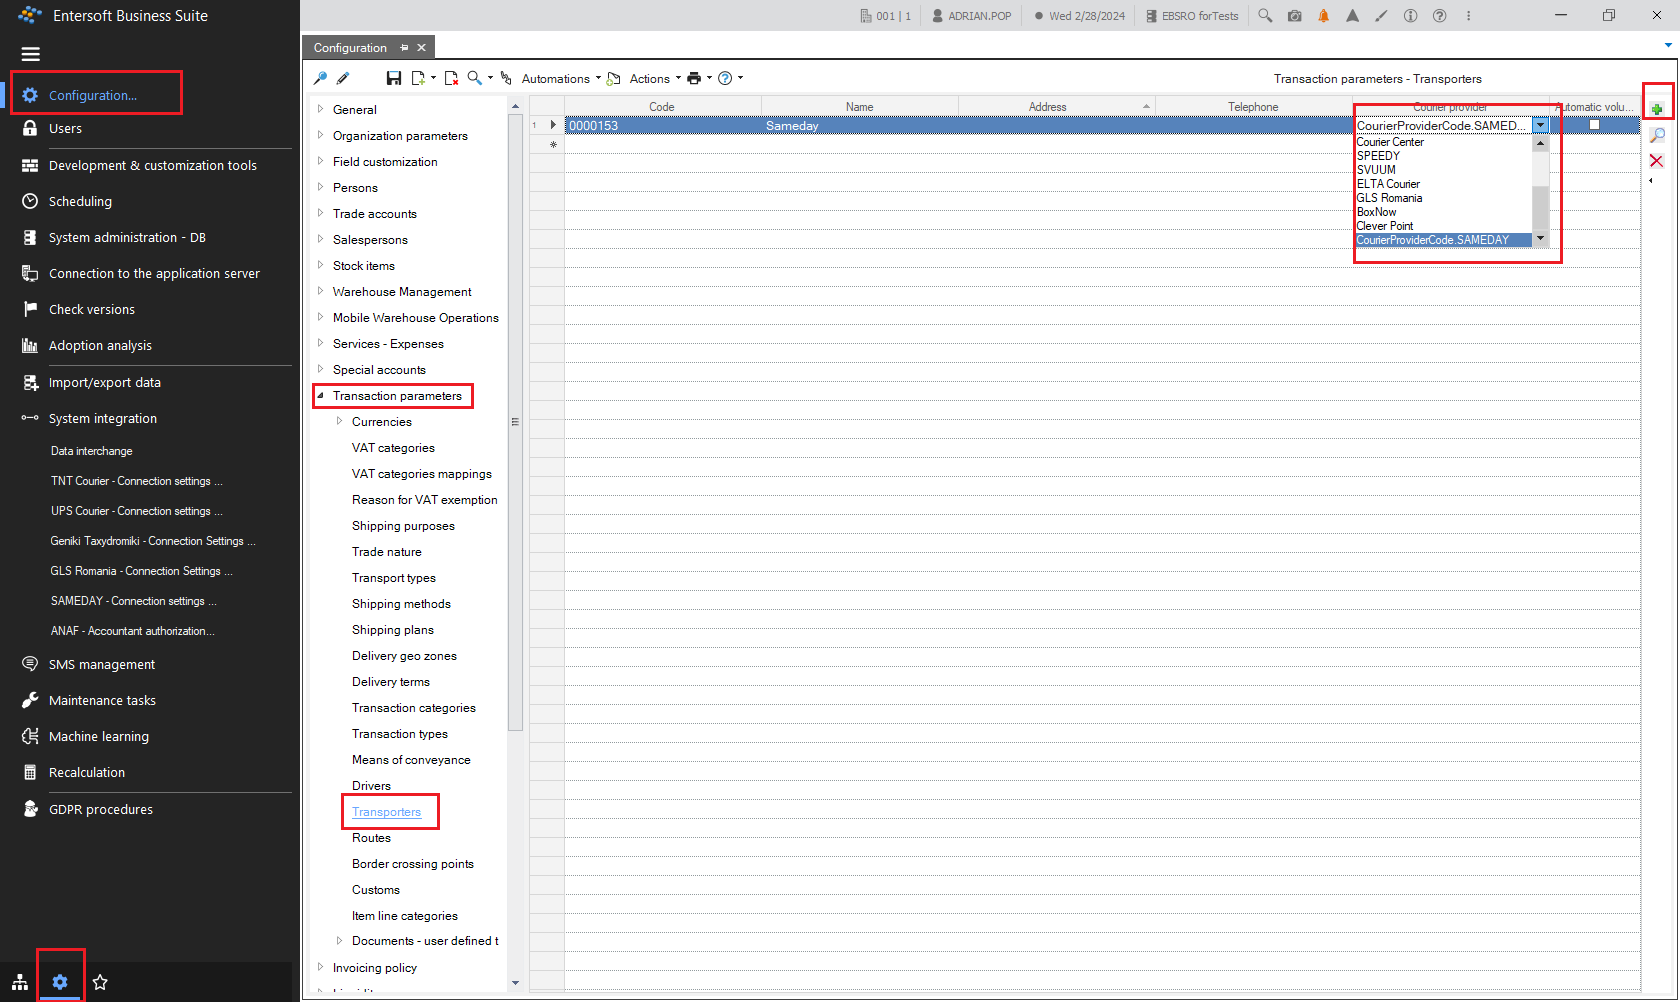
These automations are present in the menus of documents or scrollers that deal with shipments via couriers. These couriers are called Transporters, and a list of all the couriers that are integrated in any country specific EBS package is available if you open the menu Configuration and Tools > Configuration… > Transaction parameters > Transporters to add (+) a courier with which you want to work with.
2. Configure the courier
In the transporters list available in menu Configuration and Tools > Configuration > Transaction parameters > Transporters, you should add (+) the new courier, if it is not present in the scroller, by selecting it from a list of available couriers. On the line entry you can add some specific info such as Name, Address, Telephone and then Save it.
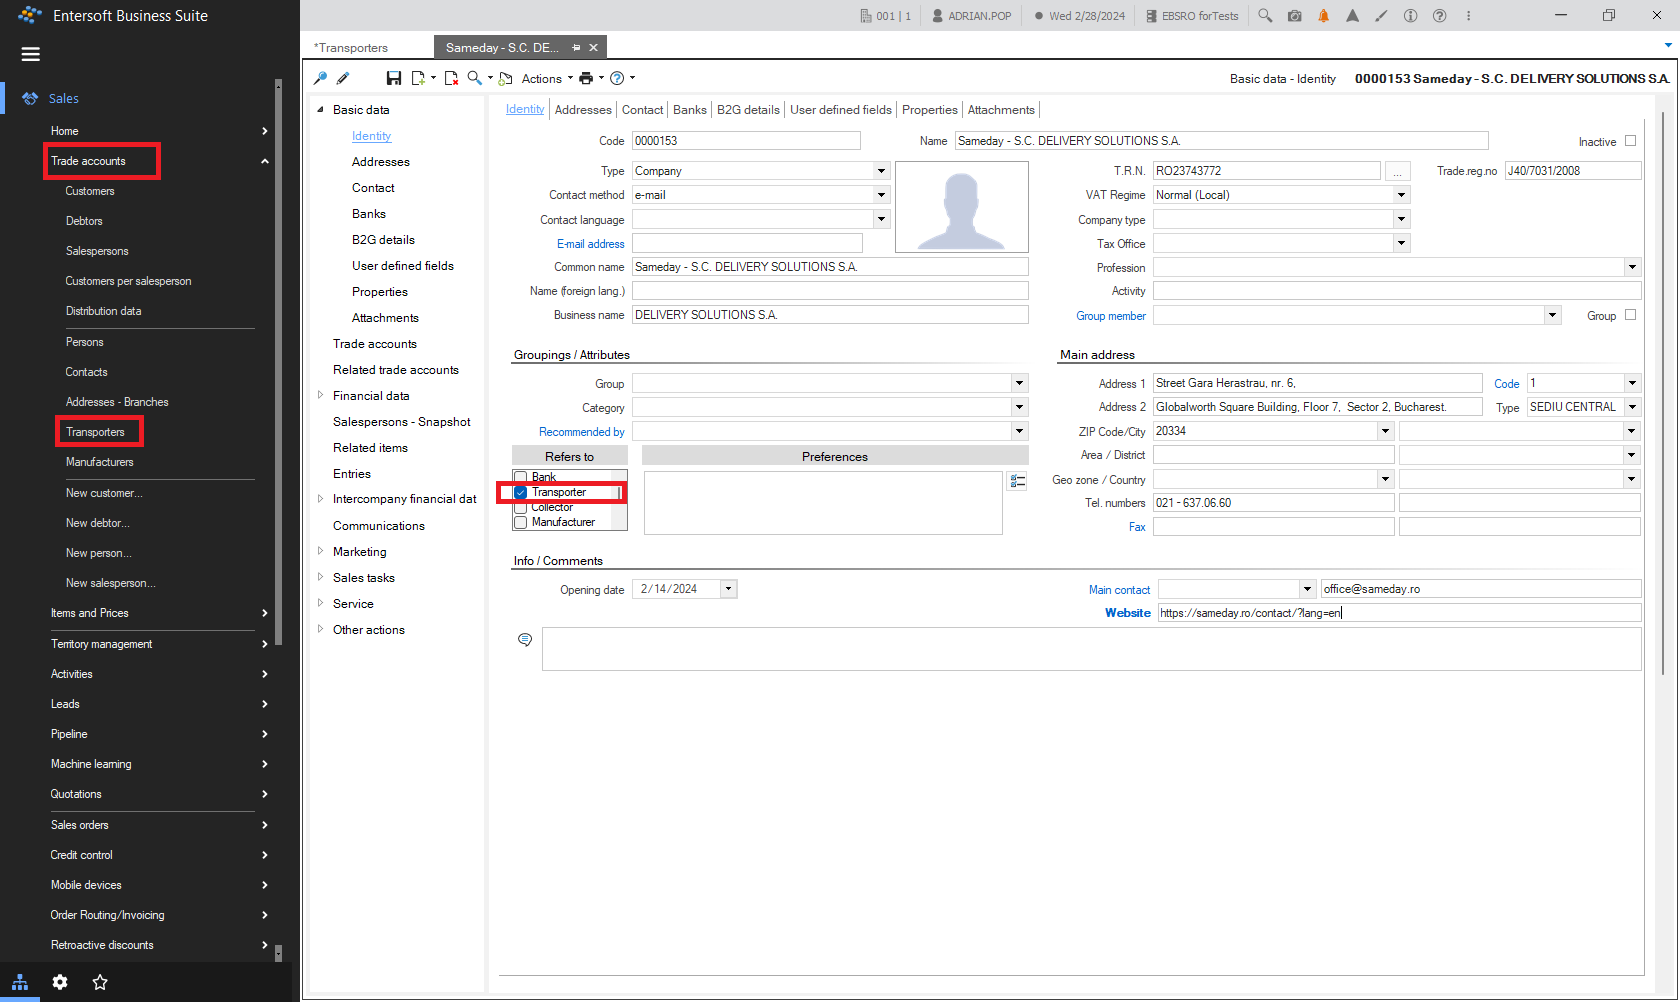
A complete data card for the transporter can be found in the Main Menu > Sales > Trade Accounts > Transporters.
Here you can edit all the information regarding the courier specific trade account partner, by double-clicking the transporter’s line to open its card form.
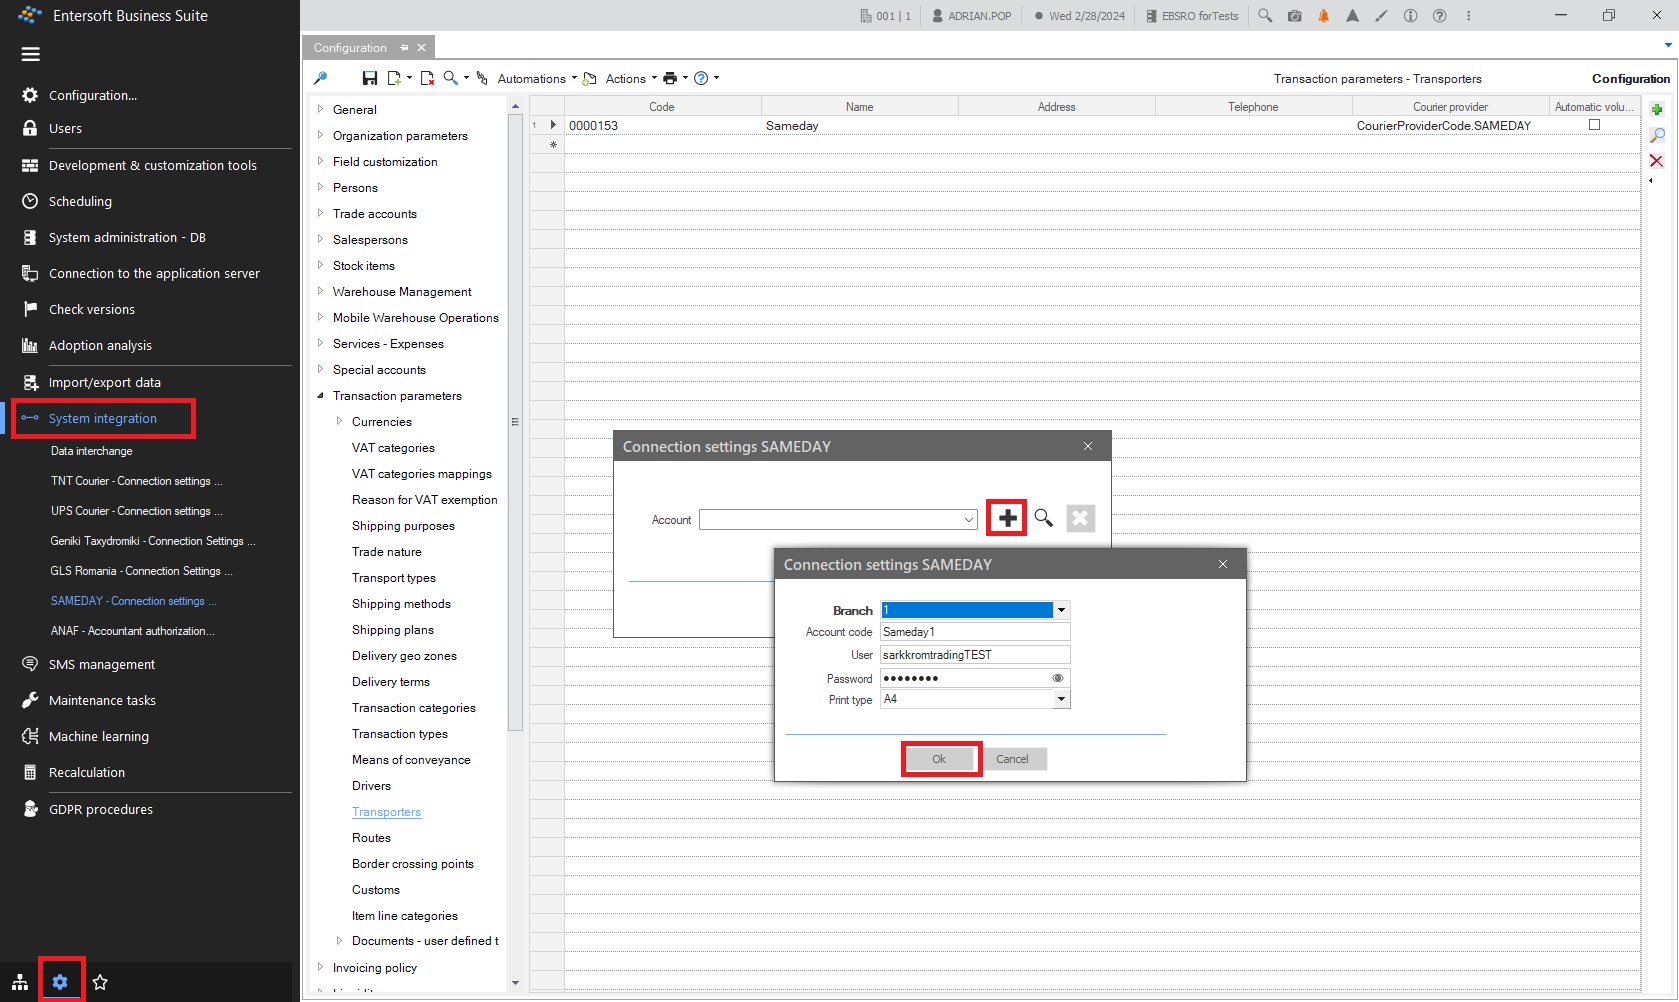
After filling all the necessary info for it, all that remains to configure is the actual account on behalf of which the courier will operate the shipments.
From the contract that you have to have with the courier you will have the account(s)’ credentials that you have to fill in the Connection setting menu here Configuration and Tools menu > System Integrations for Connection settings.
If there are multiple accounts contracted with the courier, each of them should be added here.
3. Shipments via courier
3.1 Create shipment
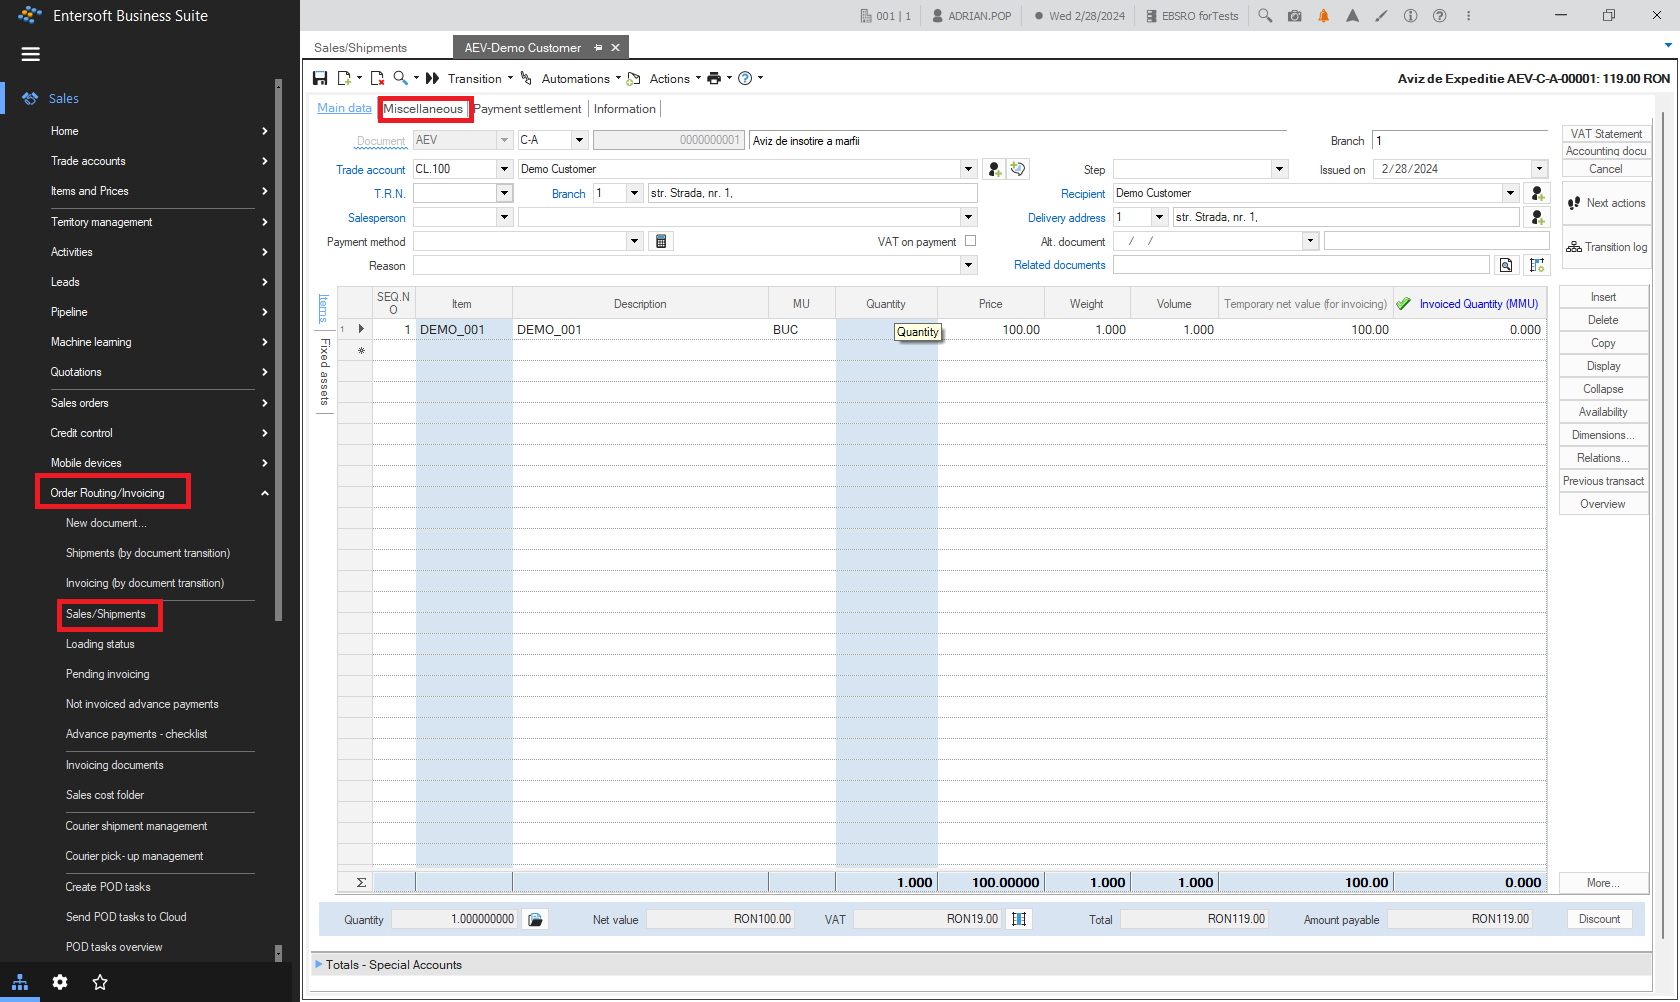
In order to create a shipment, first create a new Invoice or a Shipment Note document. Then on its second tab - Miscellaneous, select the courier in the Transporter field. After saving the document, in the Automations menu list you will see the Create shipment automation.
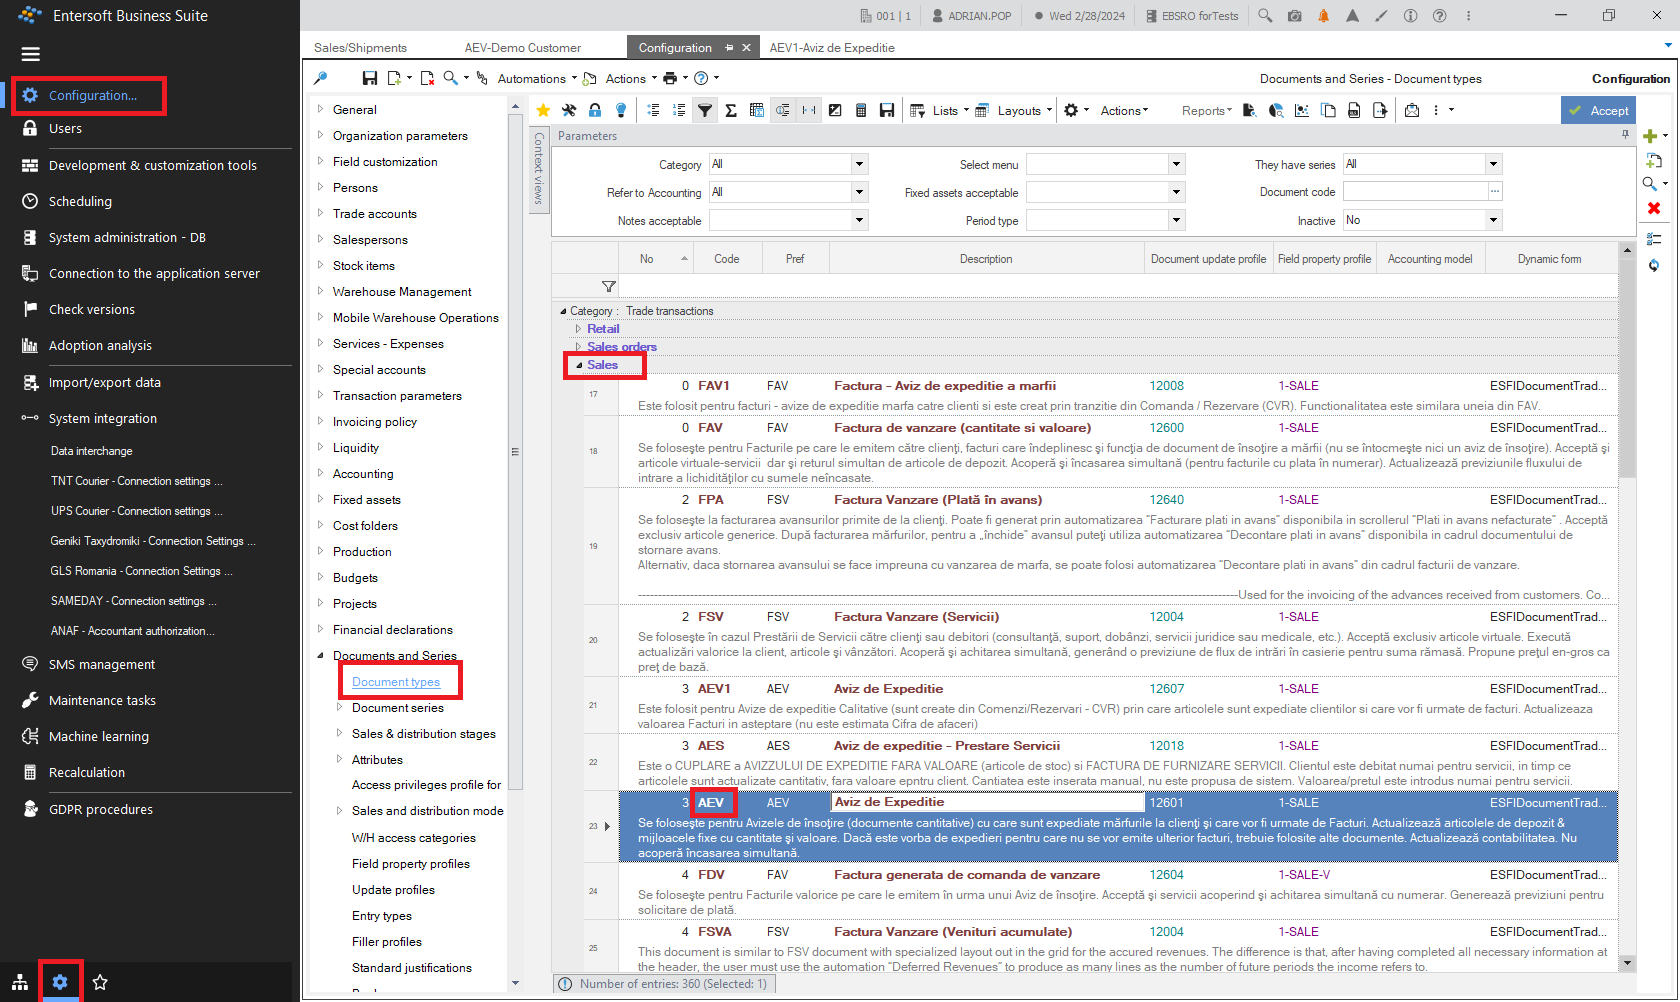
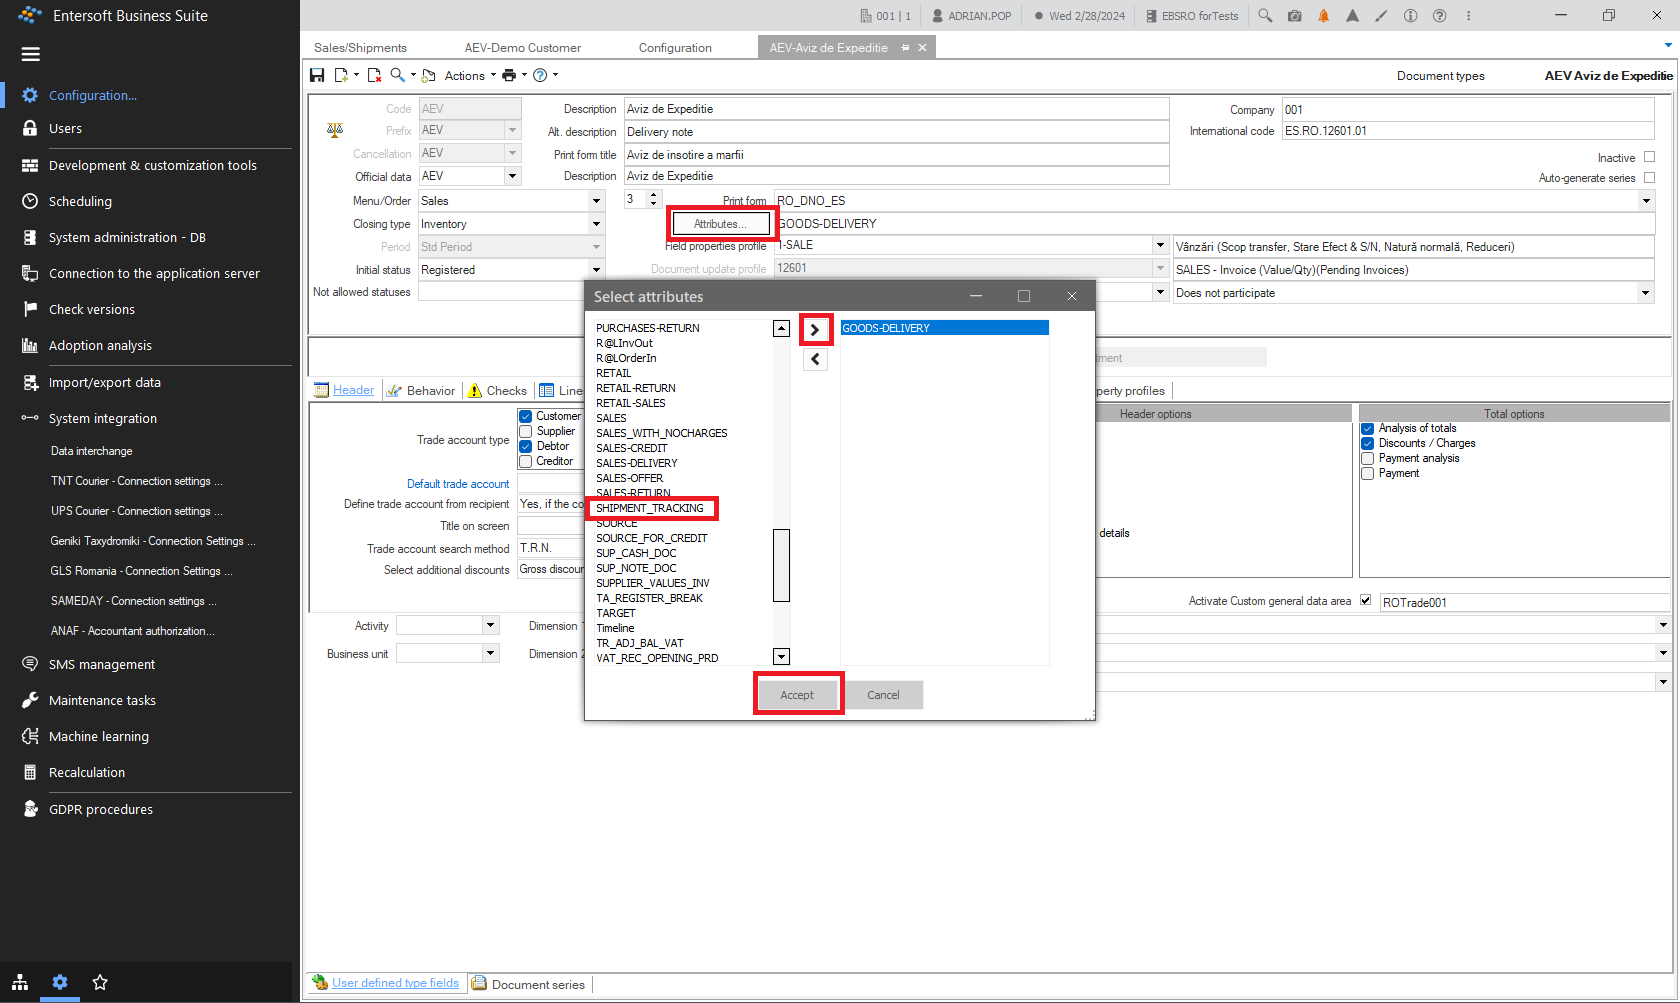
Note: For a document to have the Create shipment automation it must have had set the attribute SHIPMENT TRACKING.
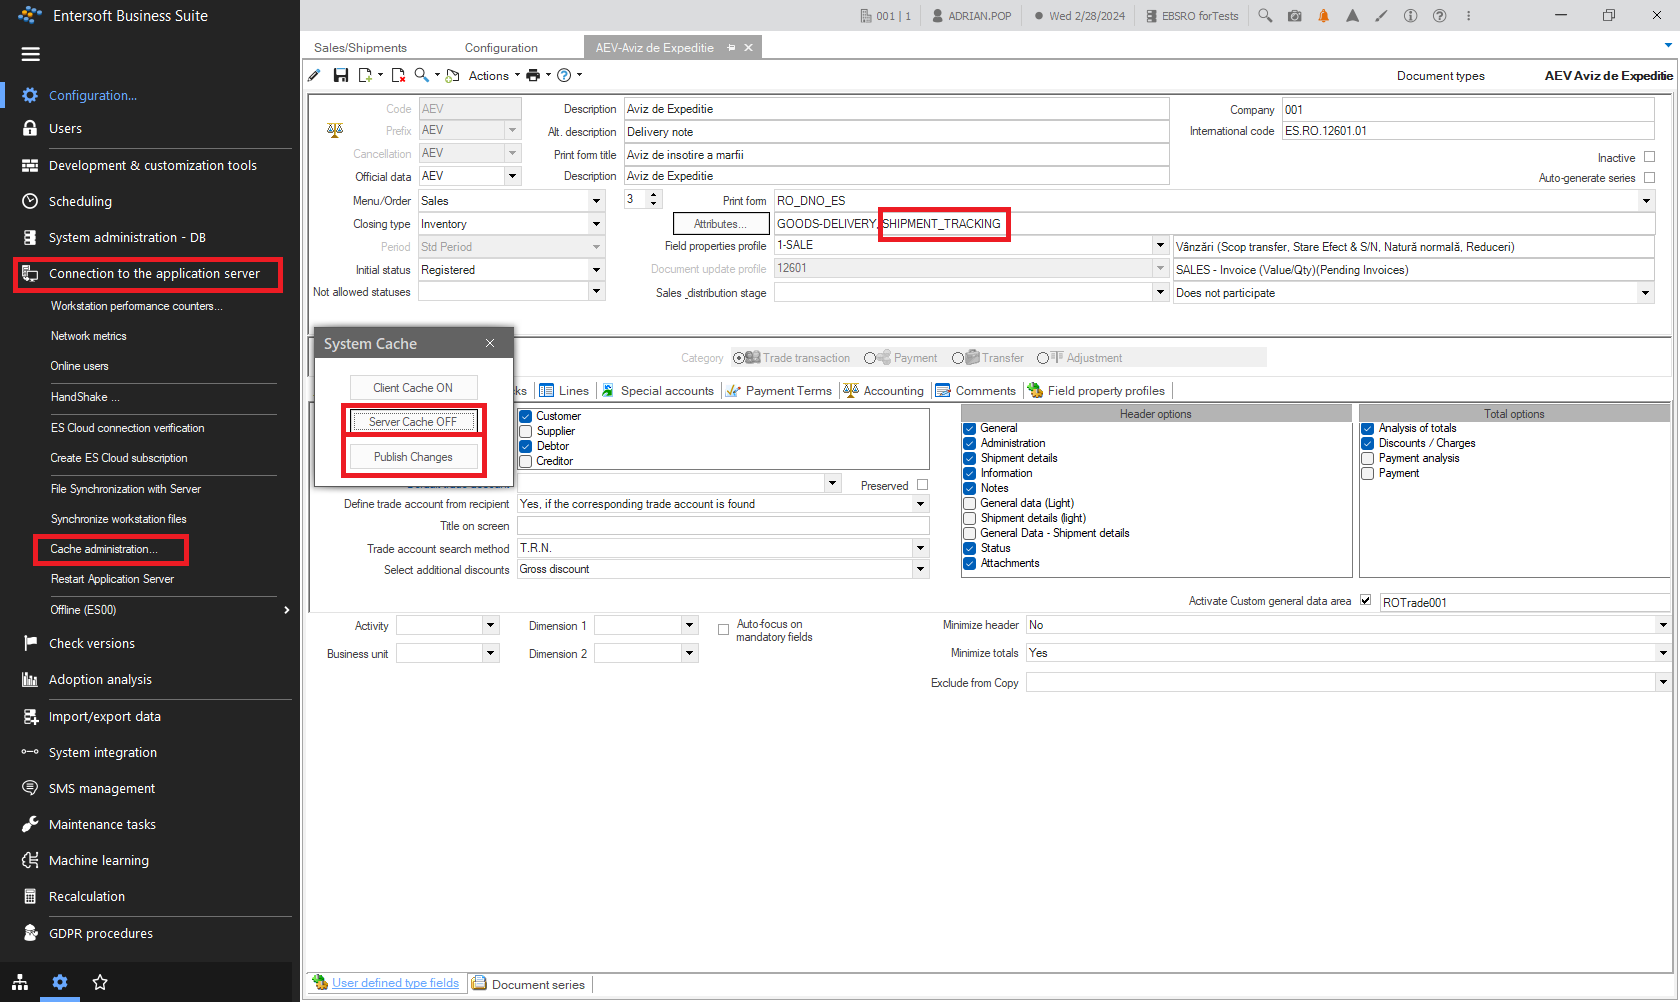
After such a parameterization the cache has to be cleared in order for this to be taken into account. Go to the menu Configuration and tools > Connection to the application server and select Cache administration. In the popup press the button Server cash OFF/ON to clear it and then Publish changes.
Now, going back to our shipping document we can select Create shipment from the Automation menu of our document.
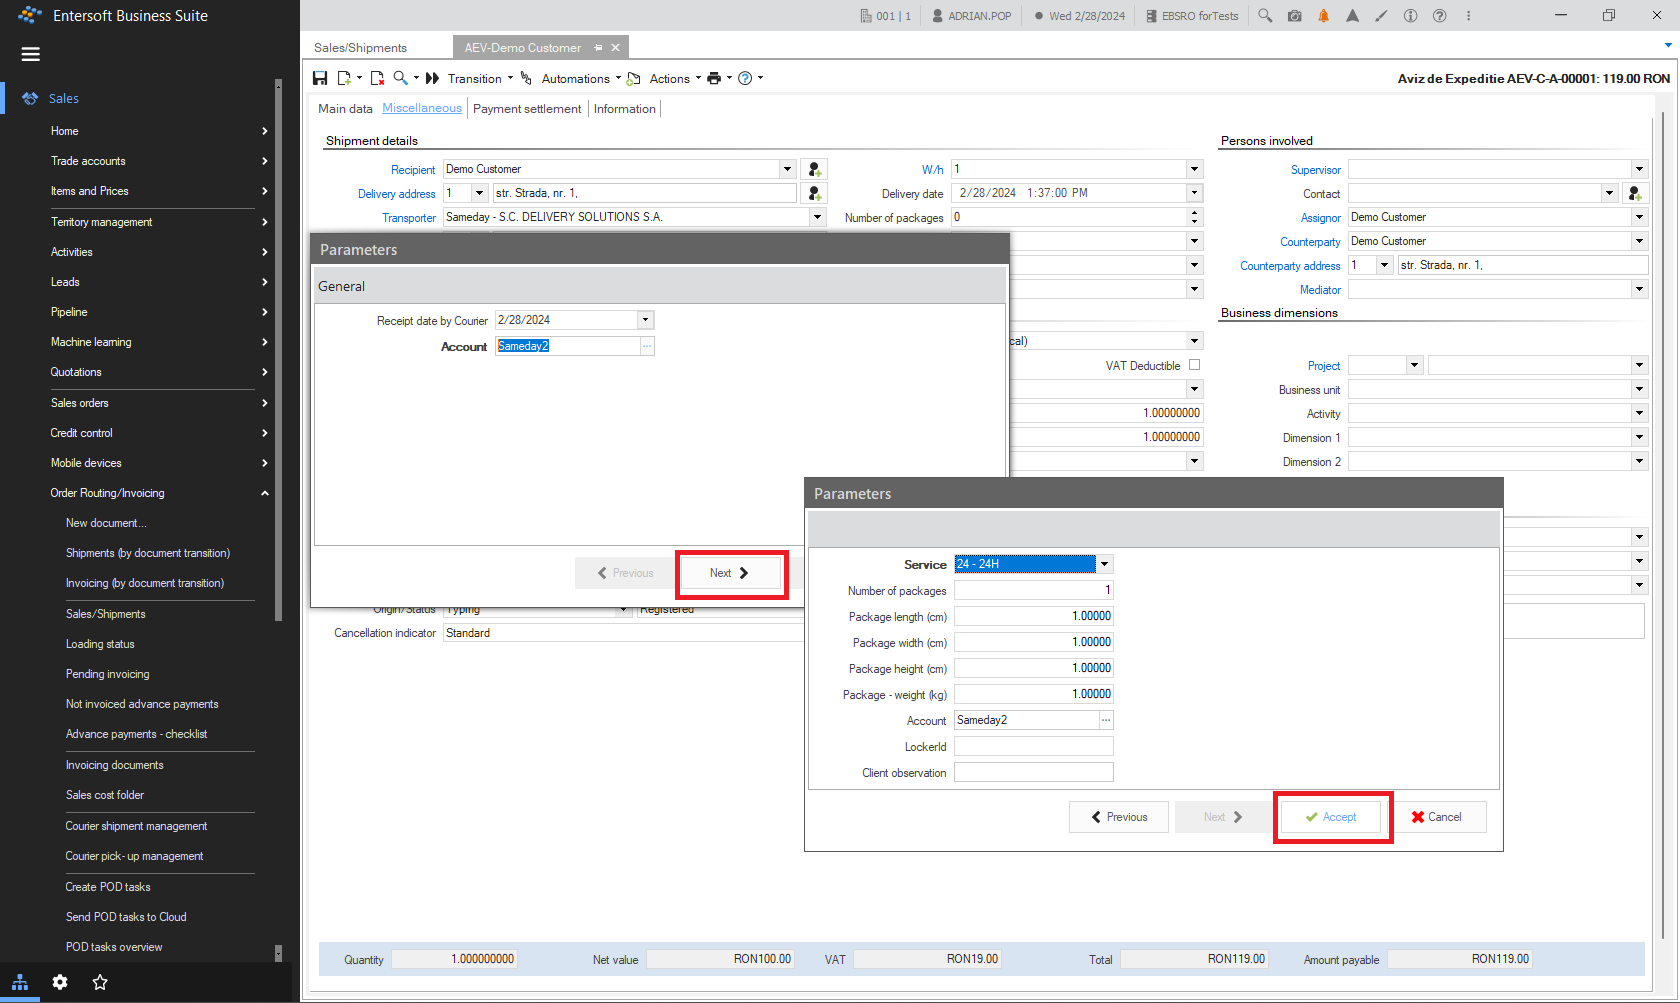
When launching the Create shipment automation You will have to fill in some parameters regarding the specifics of it.
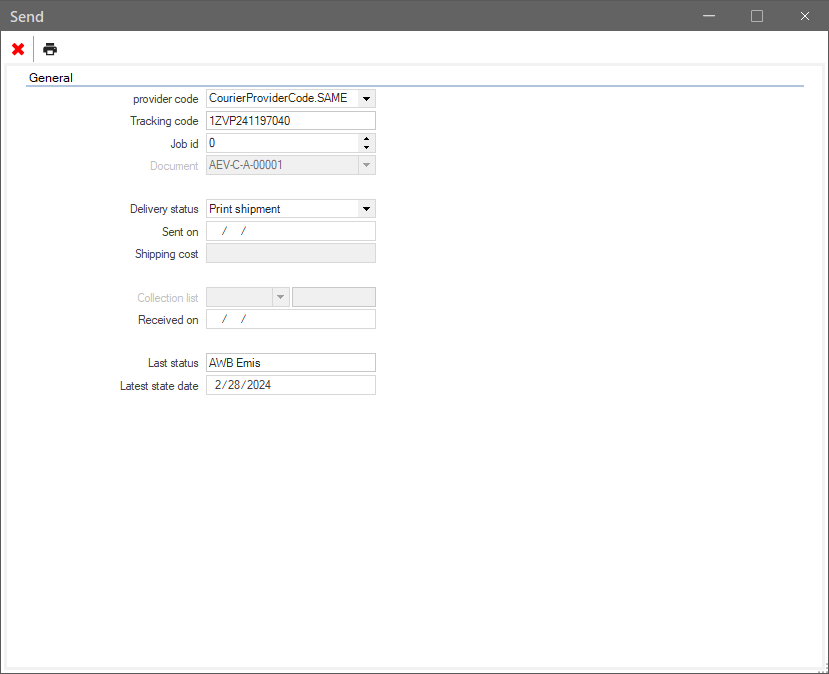
After Accepting, the shipment is actually created, by calling the courier’s API for that specific account used to create the shipment order (AWB).
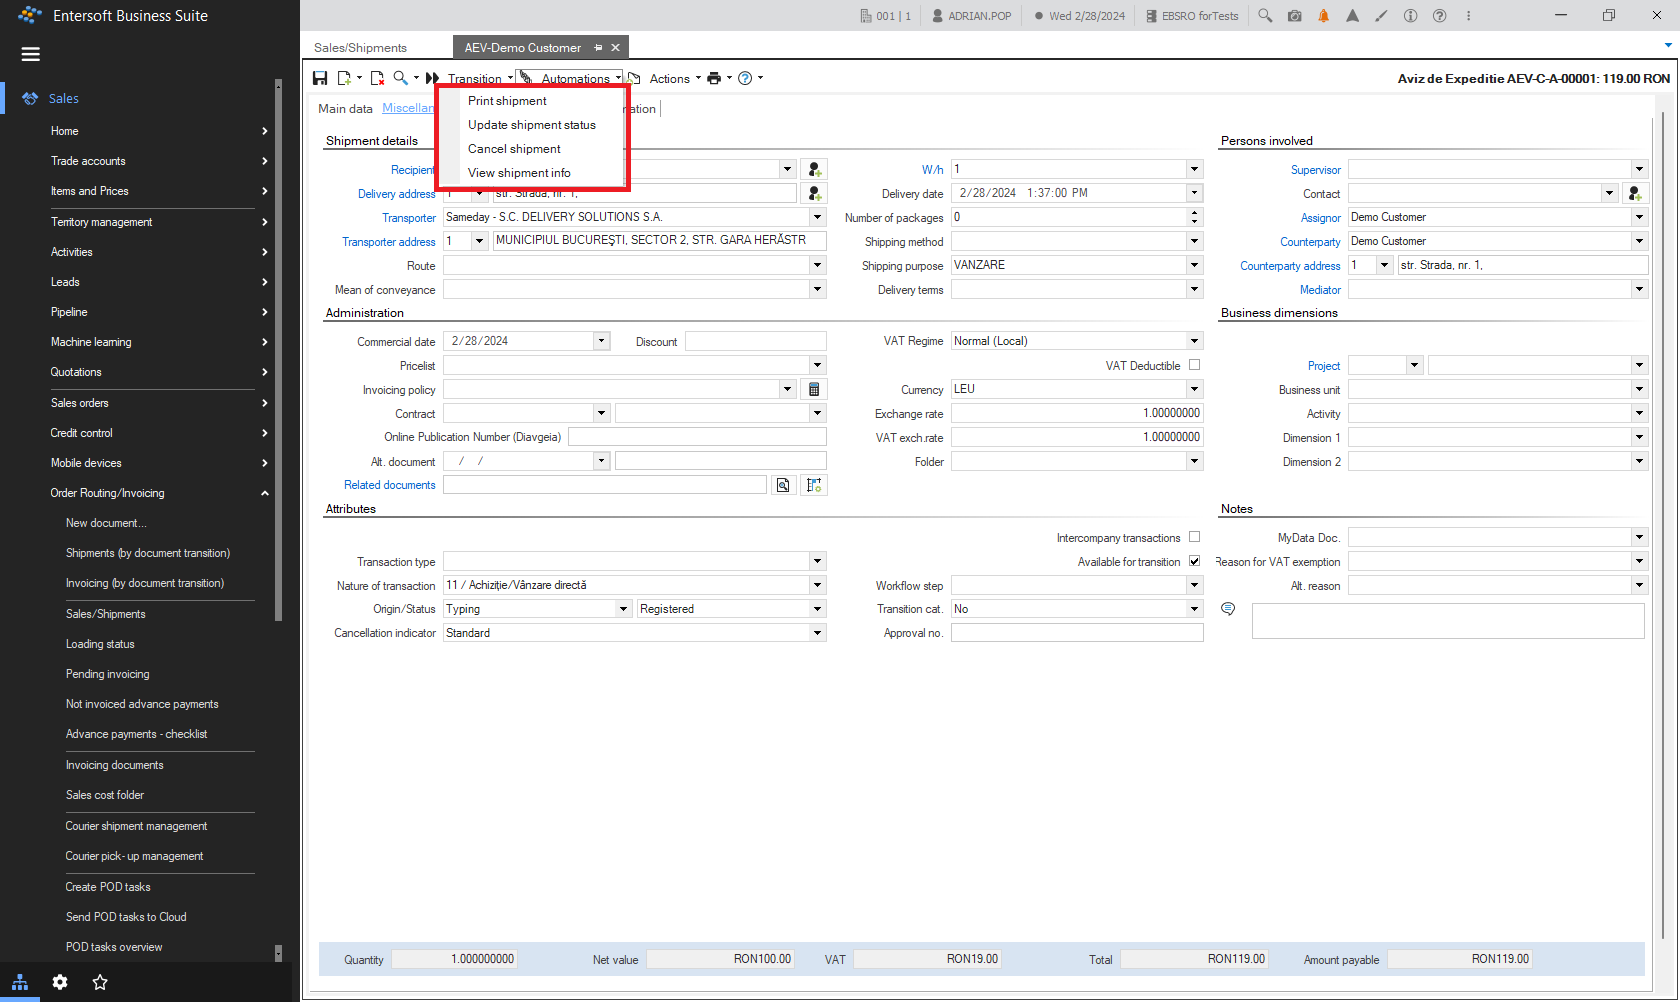
After this was successfully created, there are several automations available for the created shipment:
Print shipment
Update shipment status
Cancel shipment
View shipment Info.
The first of them is used to print the shipment label for the package.
3.2 Print shipment
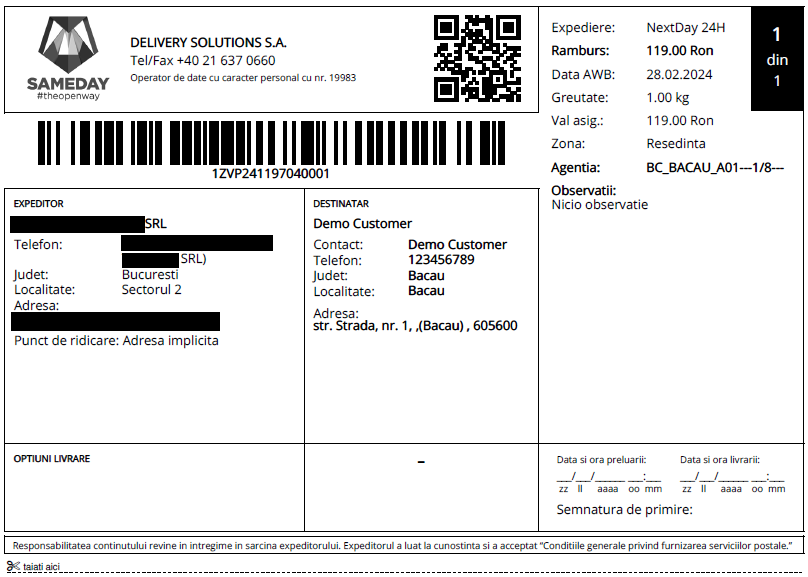
After selecting the print device it will generate the shipment label for the package.
If there are errors, a popup will display the error. If there are errors regarding the API call on creating the shipping order, the API response is in the latest xml file in the \ESNoSync\SamedayClient folder.
3.3 Update shipment status
This automation is not allowed for newly created shipments. Relates to already finalized shipments.
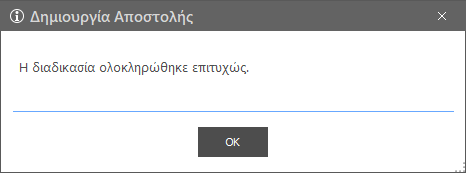
Δημιουργία Αποστολής -> Create shipment
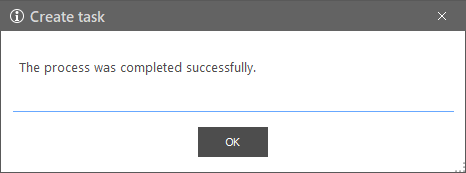
Η διαδικασία ολοκληρώθηκε επιτυχώς. -> The process completed successfully.
3.4 Cancel shipment
This automation deletes the associated shipment to the document.
3.5 View shipment Info
This automation presents the associated shipment information related to the document.
4. Shipments management
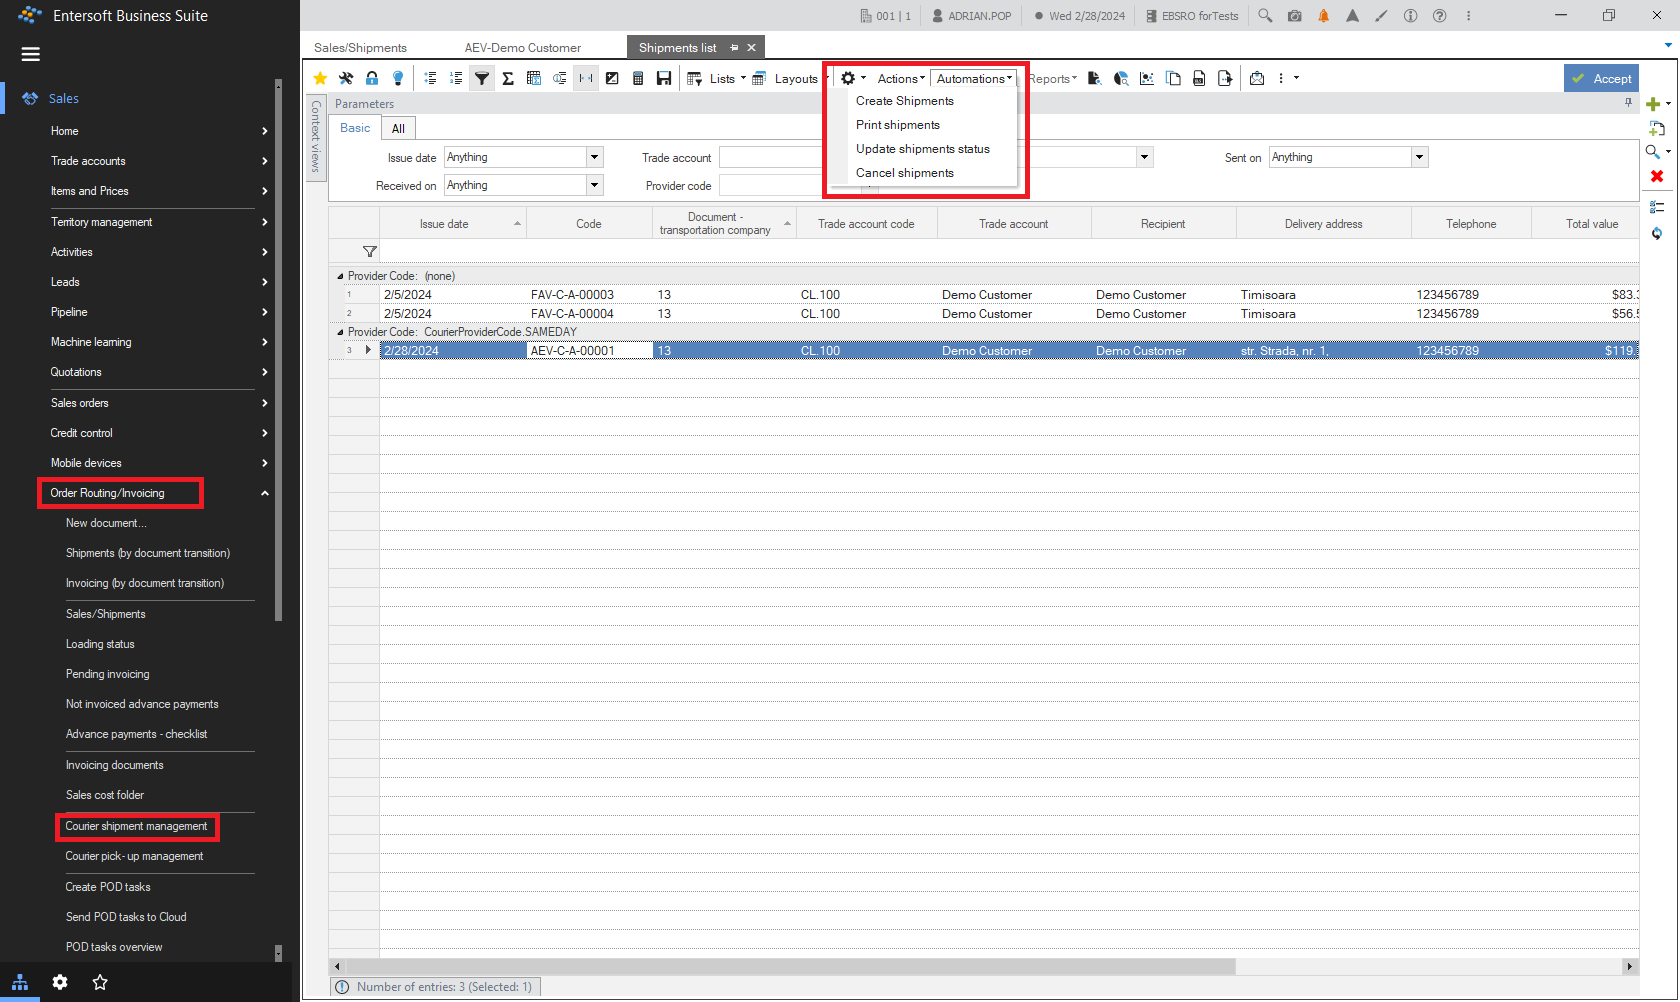
Shipments can be managed via two scrollers under the menu Sales > Order Routing/Invoicing:
Courier shipment management - is a scroller that presents all the shipments via courier.
Courier pick-up management - this is a scroller for managing the pick-ups.
In this scrollers for the selected lines (documents with shipments) we can apply the shipments’ automatizations:
Create shipments
Print shipments,
Update shipments status,
Clear shipments.
5. Field mapping
A complete shipment field mapping is presented in the following file,
for all the couriers integrated in the EBS-RO - Geniki, TNT, GLS, UPS and Sameday - each on a separate sheet.
Viva Wallet integration
1. Prerequisites
The EBS-RO application version must be 5.13.0.0 or later, and the Retail module must be installed.
Ensure you have a VIVA merchant account on the viva.com website, where you will receive a Merchant ID available in the API Access section.
Ensure you have the POS terminal (or application—e.g., on Android) for which you identified the Terminal ID (POS Code) in Settings > About.
Ensure that the POS terminal is connected to the internet.
2. Settings
2.1. Company parameters
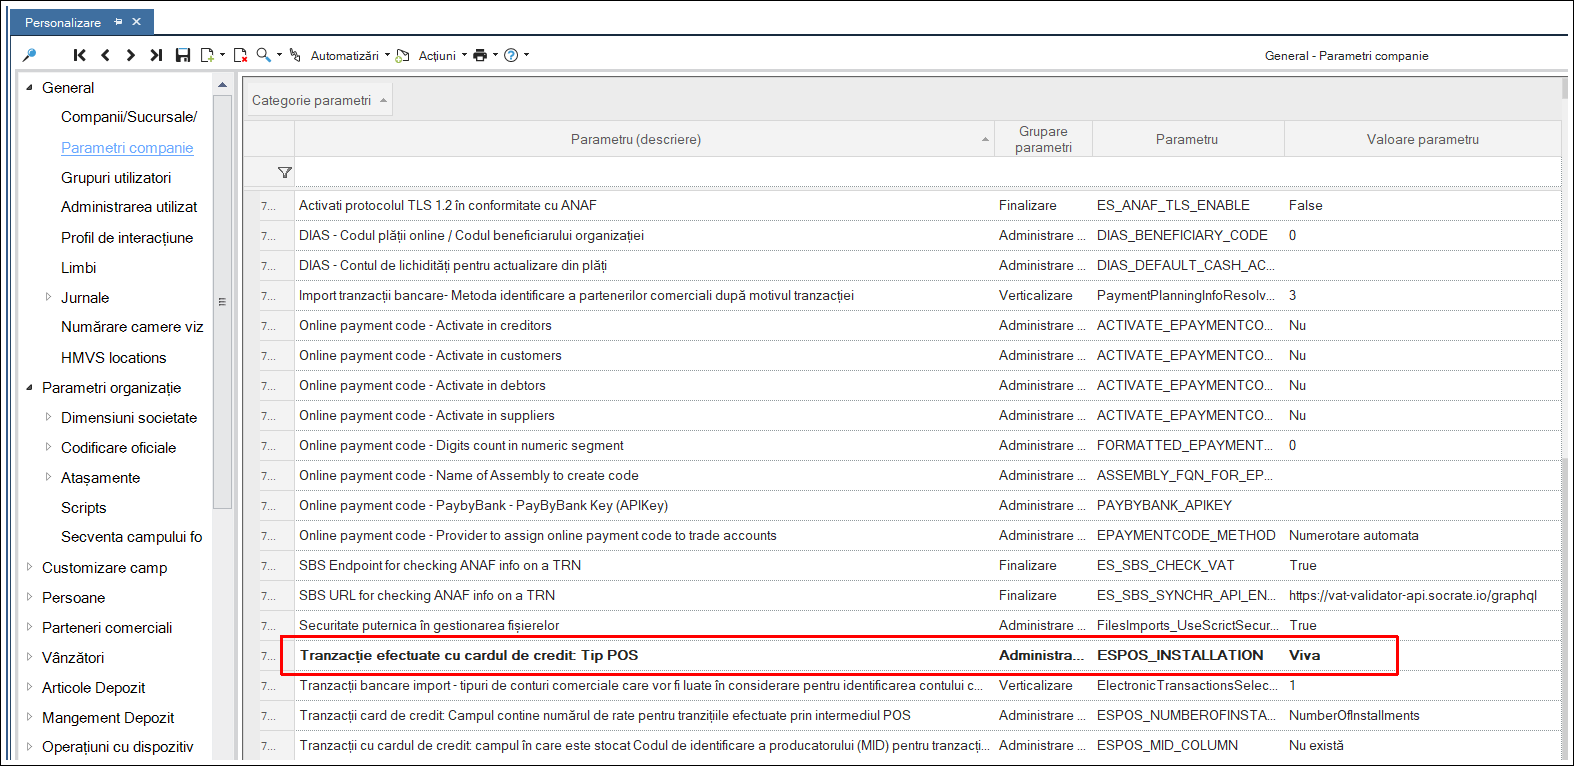
Go to Configuration and Tools > Configuration… > General > Company Parameters
Look for the section Online transaction parameters.
In Credit card transactions: POS type, select: Viva.
Save.
2.2. Bank parameter
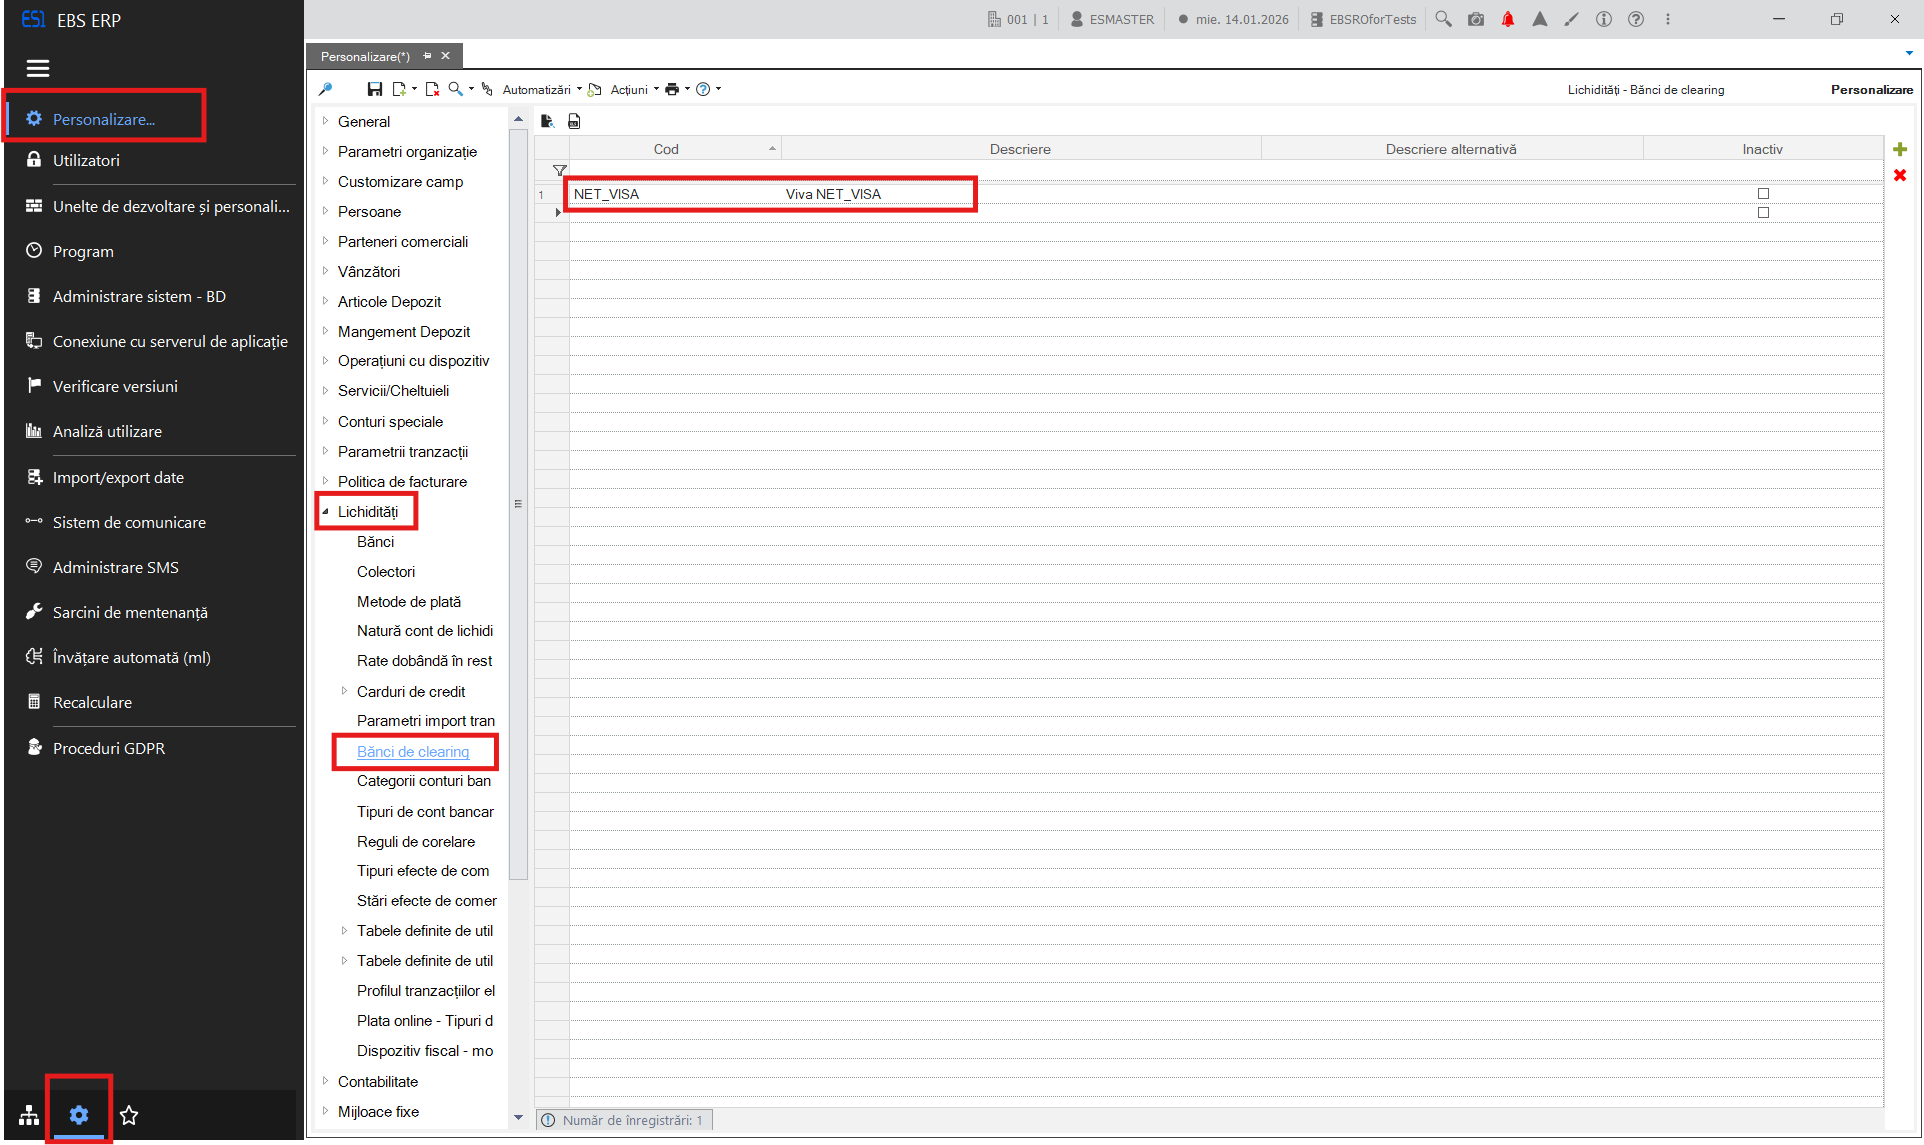
Go to Configuration and Tools > Configuration… > Liquidity > Clearing Banks
Add:
Code : NET_VISA
Description: Viva NET_VISA
Save.
2.3. Communication profile
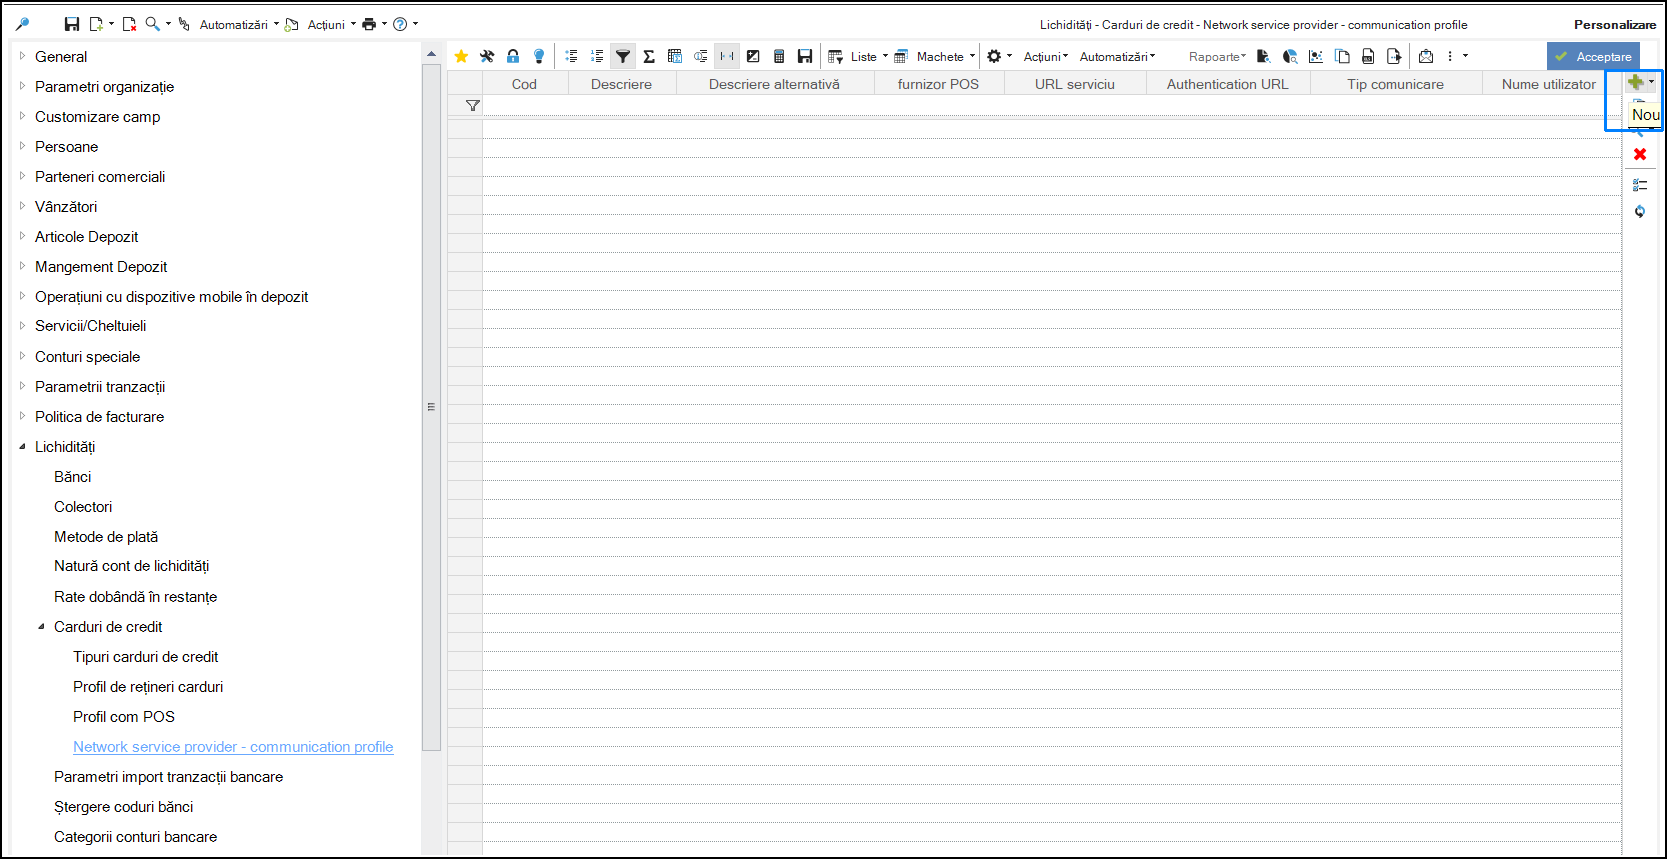
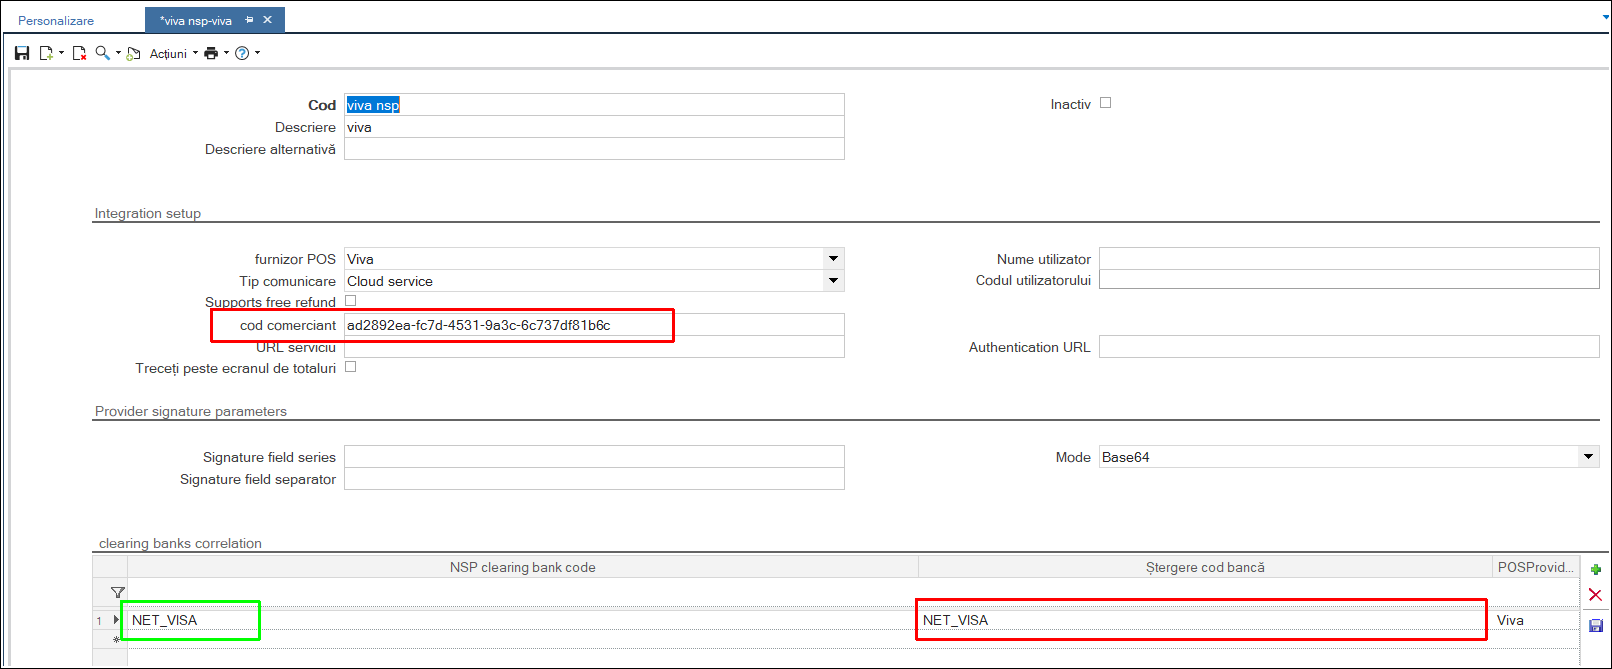
Go to Configuration and Tools > Configuration… > Liquidity > Credit Cards > Network service provider – communication profile and Add a new profile (using the + button).
Set:
Code: Code NSP
Description: Viva network service provider
Merchant code: enter the merchant code from your Viva account, section API Access
Mode: Base64
Clearing bank code: NET_VISA - select from the line (arrow to the right of the field)
NSP Clearing bank code: NET_VISA - enter manually.
Save.
2.4. Configure POS
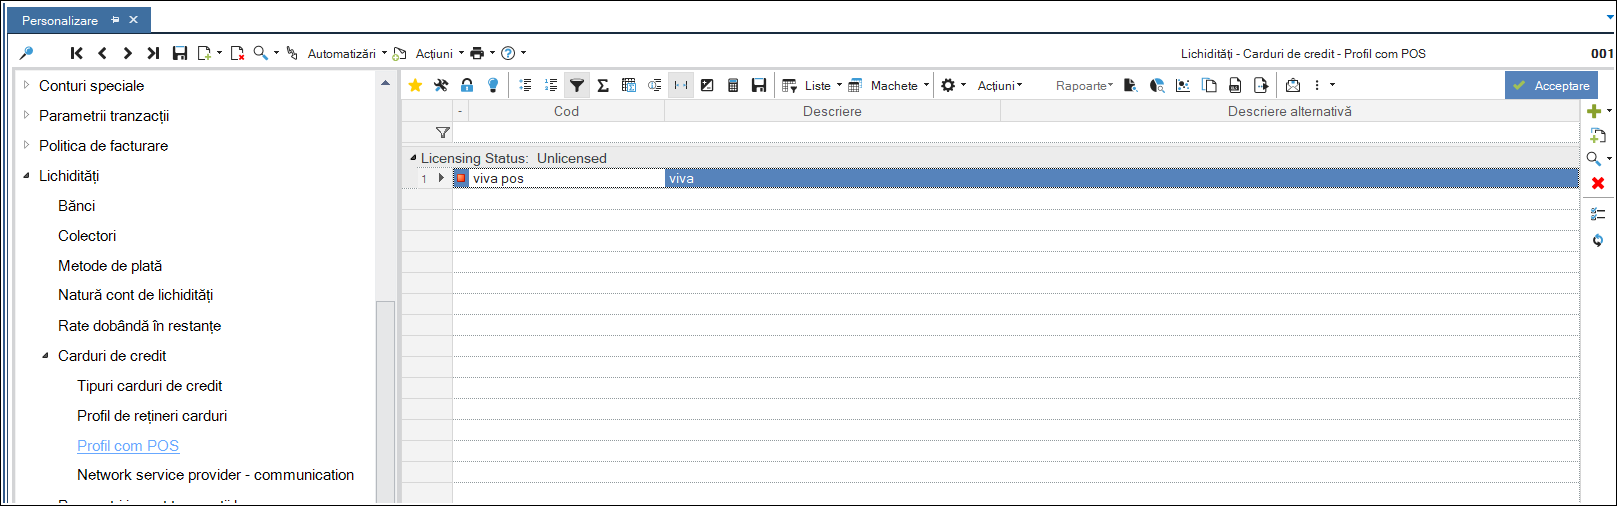
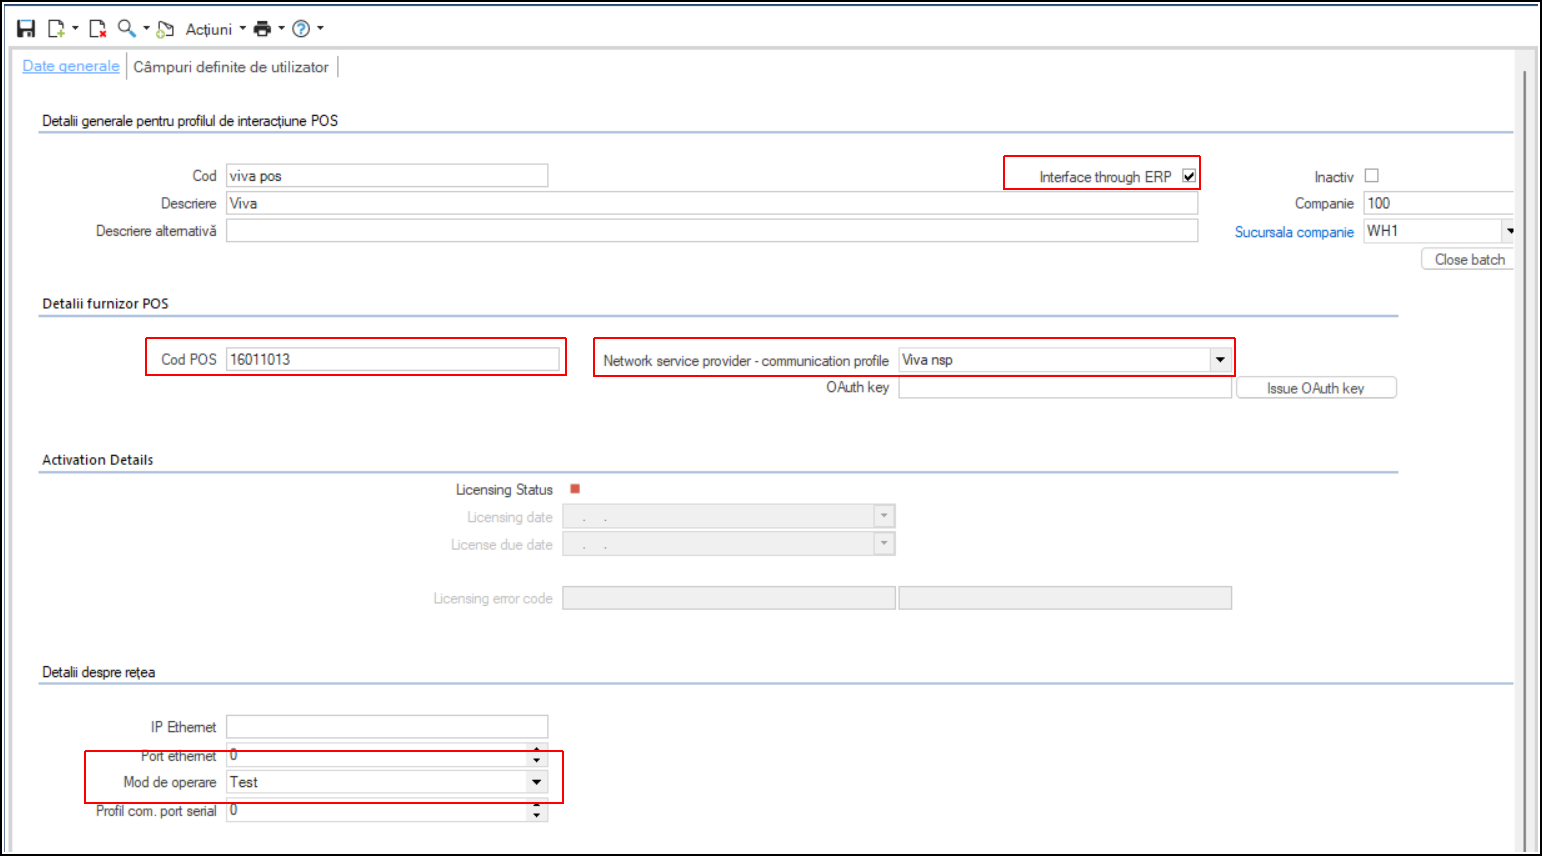
Go to Configuration and Tools > Configuration… > Liquidity > Credit Cards > COM POS Profile
Set:
Code: Viva POS
Description: Viva
POS code: Terminal ID from the POS terminal.
Save.
2.5. Settings Retail document series
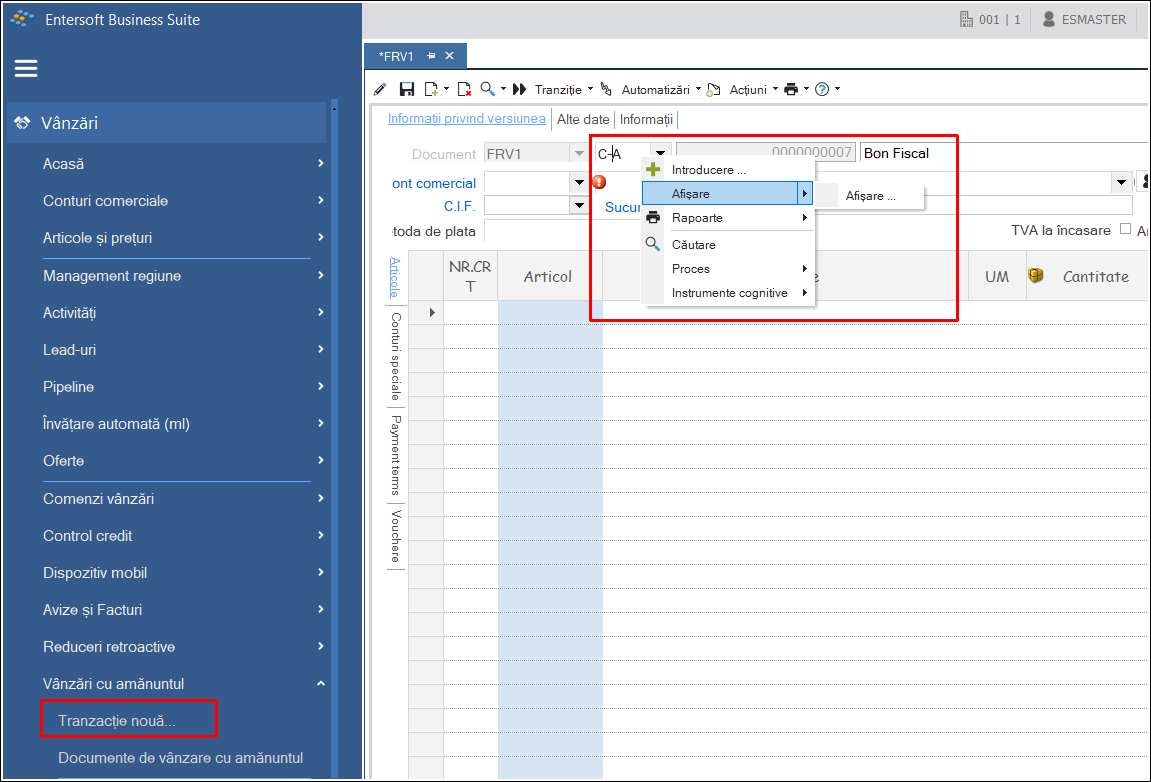
Go to the Sales > Retail Sales > New Transaction section.
From the Document Series field, right-click, Display:
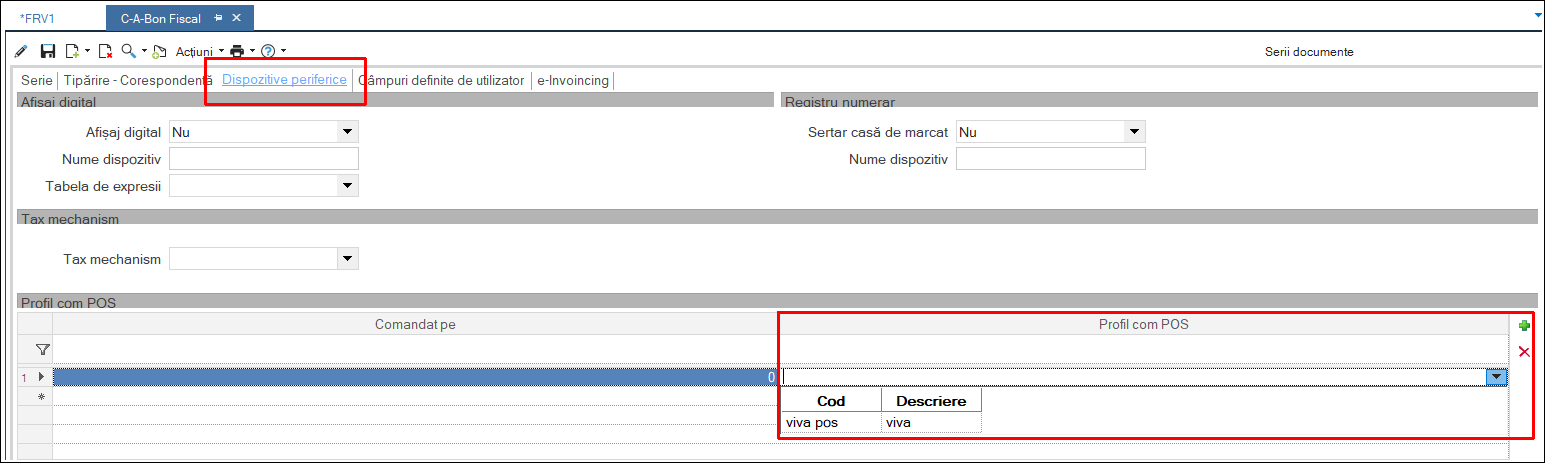
In the document settings, under the Peripheral Devices tab, select the previously defined profile (viva pos) in the COM POS Profile section, and then save.
3. Sales interface update
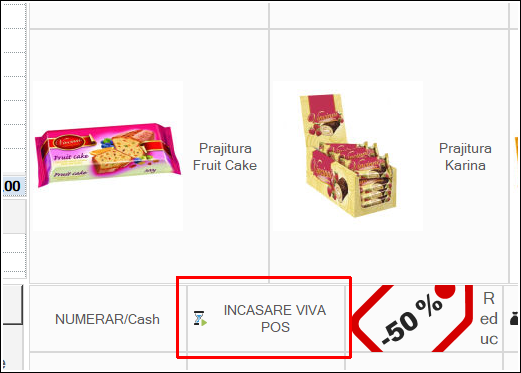
After completing the settings in the application, it is necessary to add a VIVA POS Collection button to the sales interface. Please request this from a support consultant.