Introduction The main role of SAF-T is to standardize the transfer of information between tax authorities and large taxpayers, providing benefits to both parties. The SAF-T involves the regular reporting of a set of information that facilitates the tax authorities’ review of taxpayers’ transactions.
In order to realize the SAF-T declaration, it is necessary to make some settings (coding) so that the information is transmitted according to the indications provided.
Settings 1.1. Company settings In order to run the Intrastat declaration several fields need to be filled in the company parameters:
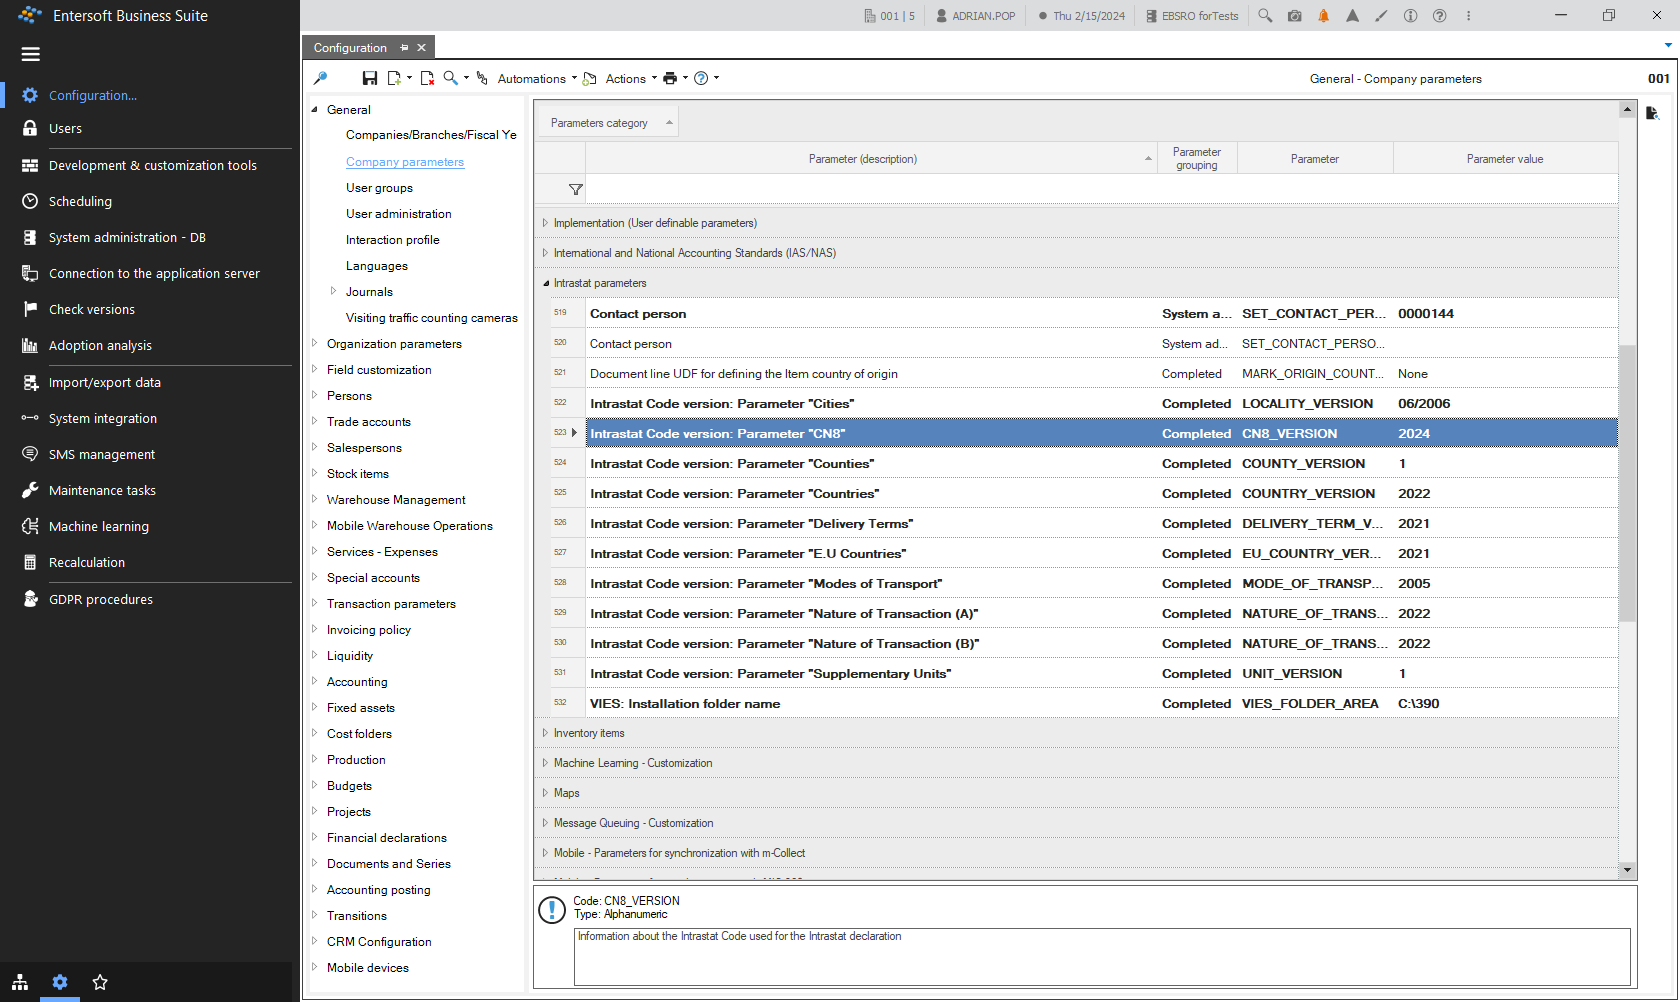
Go to menu (Configuration and tools) > Customization… in General > Company parameters Category: Intrastat parameters
In the parameter field CN8 fills in the year in which the declaration is made (2022, 2023, etc.)
{class=“children children-type-tree children-sort-weight”}
Subsections of Declarations
D406 - SAF-T
1. Introduction
The main role of SAF-T is to standardize the transfer of information between tax authorities and large taxpayers, providing benefits to both parties. The SAF-T involves the regular reporting of a set of information that facilitates the tax authorities’ review of taxpayers’ transactions.
In order to realize the SAF-T declaration, it is necessary to make some settings (coding) so that the information is transmitted according to the indications provided.
These encodings and settings will be detailed below.
2. Required information on the company card
A first step is to check the information entered on the company card. In order to avoid errors when validating the declaration, it is advisable to make sure that the following details are mentioned:
Company CIF
Address: city/sector/town/postcode
E-mail address
Telephone number
Bank account - as applicable, one or more, one of which must be ticked as main account
Legal entity, attached to the company, on whose card the e-mail address and telephone number must be mentioned;
3. SAF-T Scrollers
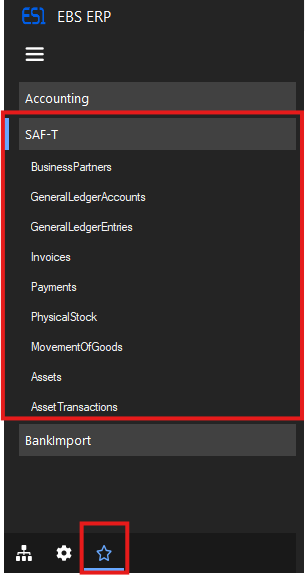
The following list of scrollers, in the list of shortcuts, represents all the information to be transmitted to the Tax Authorities, through the SAF-T declaration.
In the following, we will exemplify the content of each scroller.
3.1. Business Partners
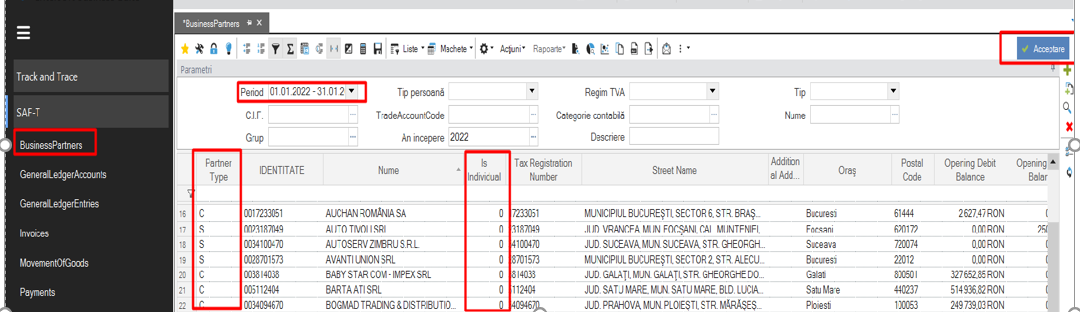
Here you can find information about all partners (customer/suppliers/debtors/creditors) for a selected period.
Very important, before starting the process of running the declaration for a given month, is to check if all the partners have the following details mentioned on their cards (either export the details generated from the scroller to an excel file or filter the information directly from it):
CIF (if it is a legal entity) For individuals, who do not have their CNP added in the EBS, the ID number will be composed in the system by concatenating the country code (TRN) and its unique code in the EBS. The TRN code is automatically assigned to the partners in the system, there is no need for manual processing.
Country
City
County (valid only for partners in Romania)
Accounting Category
Accounting Account (not a summary, but an analytical one, taken from the chart of accounts).
Is Individual “0” means that the partner is a natural person and “1” a legal person.
Attention! For situations where there are partners such as: Sundry Creditors, Sundry Debtors, State Budget, it is advisable to set them as individuals to avoid errors that may occur when running the return.
Attention! Avoid using special characters when creating a partner, e.g. quotation marks, *.
From this scroller, with a double-click you can access the partner’s card, in order to make the necessary changes in an easy way.
3.2. General Ledger Accounts
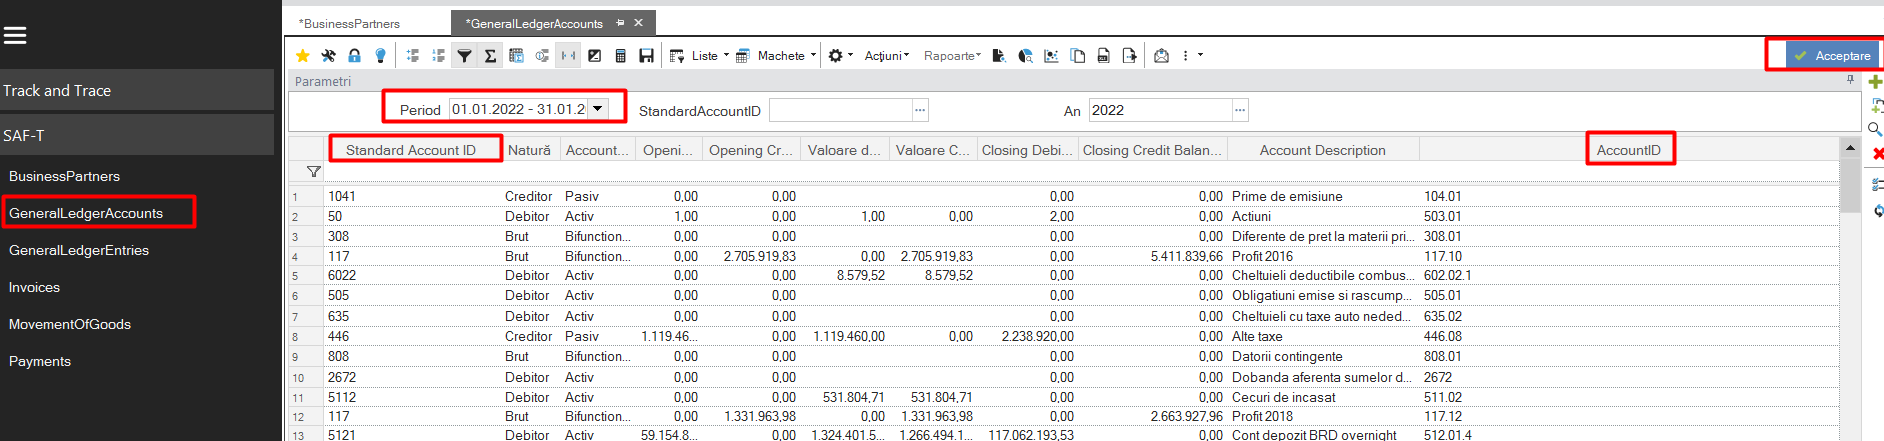
Contains information about the company’s chart of accounts, as well as its mapping to the SAF-T chart of accounts.
In case a new analytic is created, it will have to be mapped according to its SAF-T correspondent.
The Standard Account ID column represents the corresponding SAF-T account.
With a double-click, the account card can be accessed directly from this scroller.
3.3. General Ledger Entries
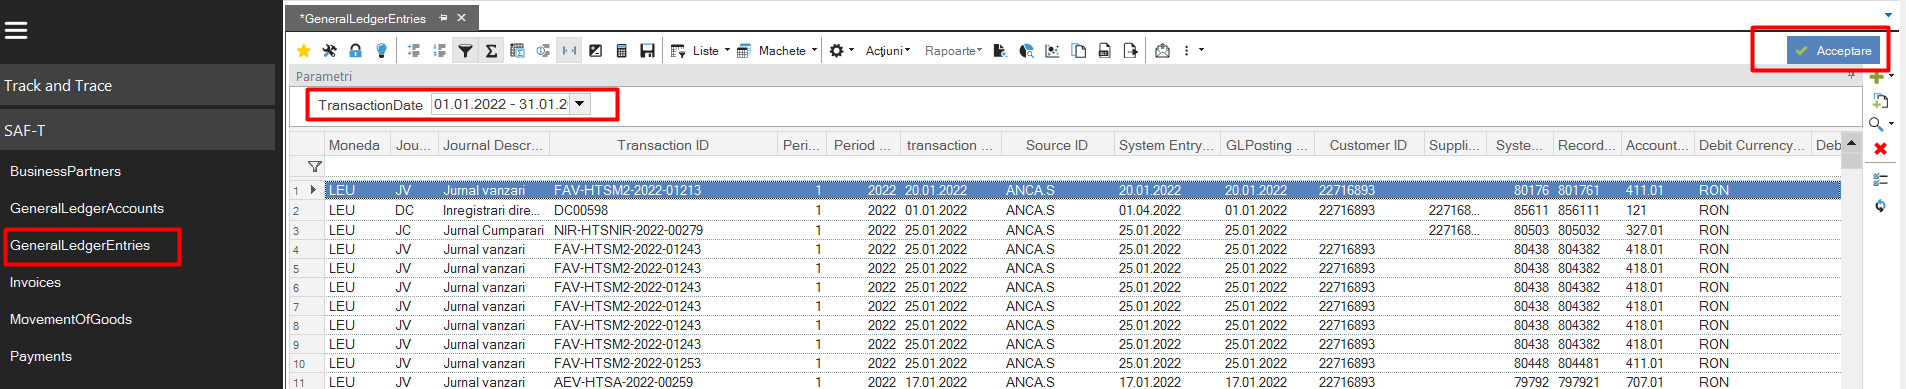
This scroller extracts the totality of the accounting notes obtained by registering the documents of the chosen month to analyze.
Attention! A very important aspect that can generate errors in the declaration process is the fact that the items (either stock or generic) do not have mentioned on their card the Categories and Accounting (analytical) Accounts.
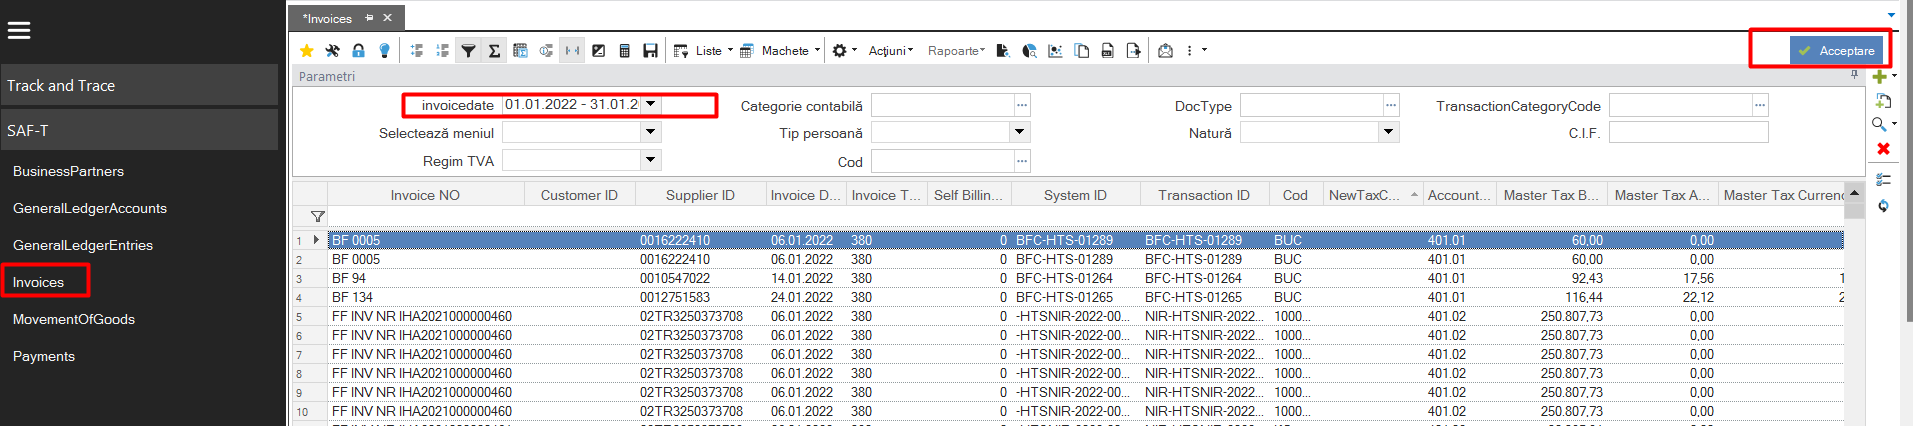
3.4. Invoices
Includes all the lines of the documents issued/received during the time period selected for analysis.
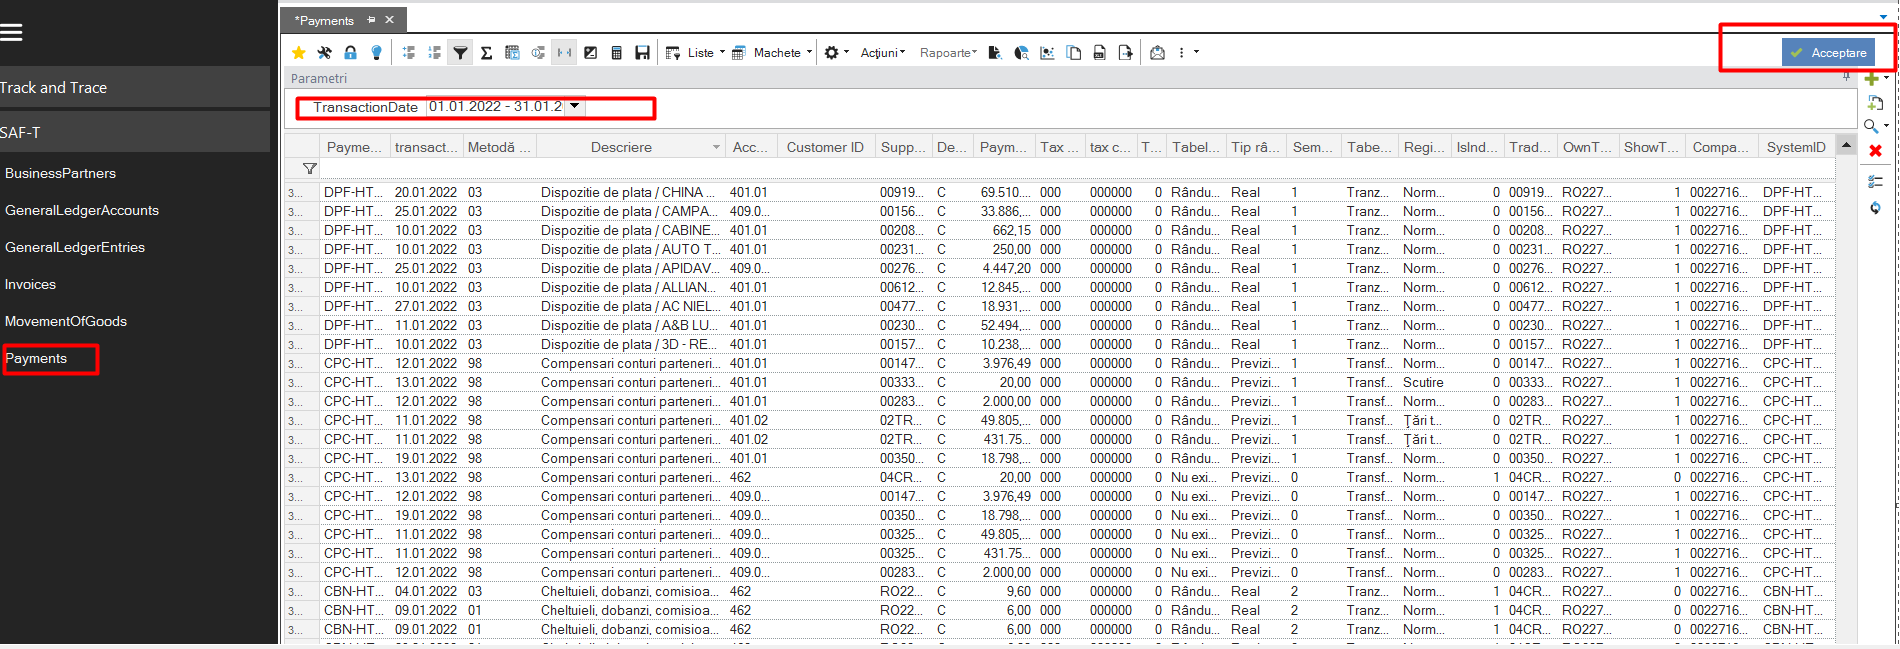
3.5. Payments
It contains payment and collection documents from the analyzed period.
This is the required information to be submitted through the SAF-T return, other scrolls will be submitted only upon request.
It is intended to map the information in the system to be consistent with the data provided by the Tax Authorities.
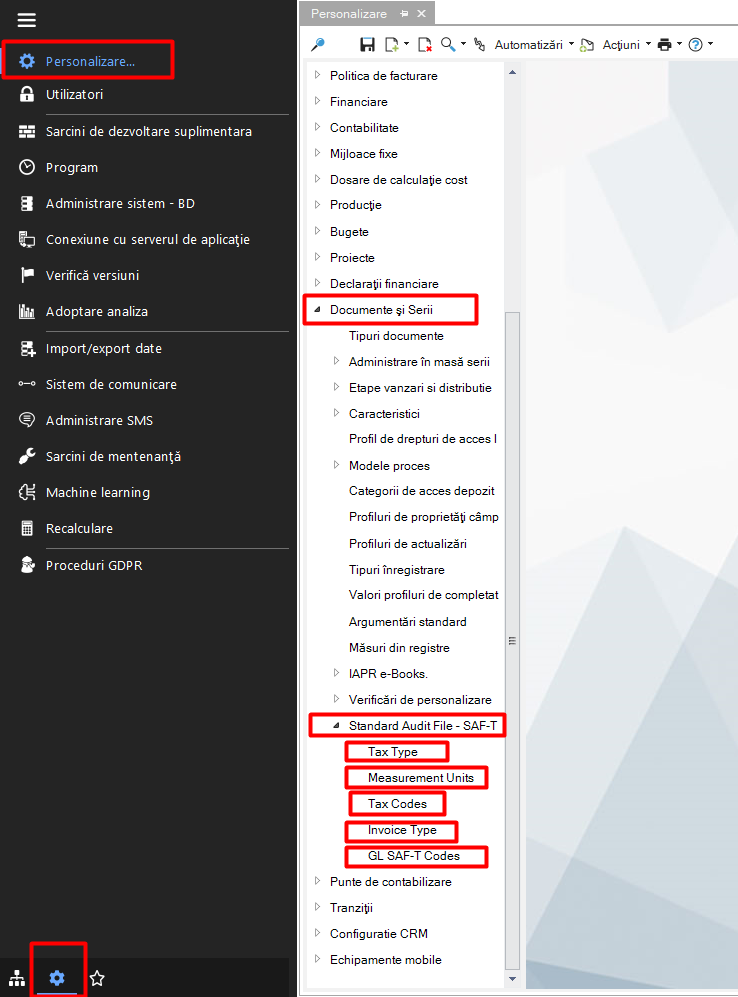
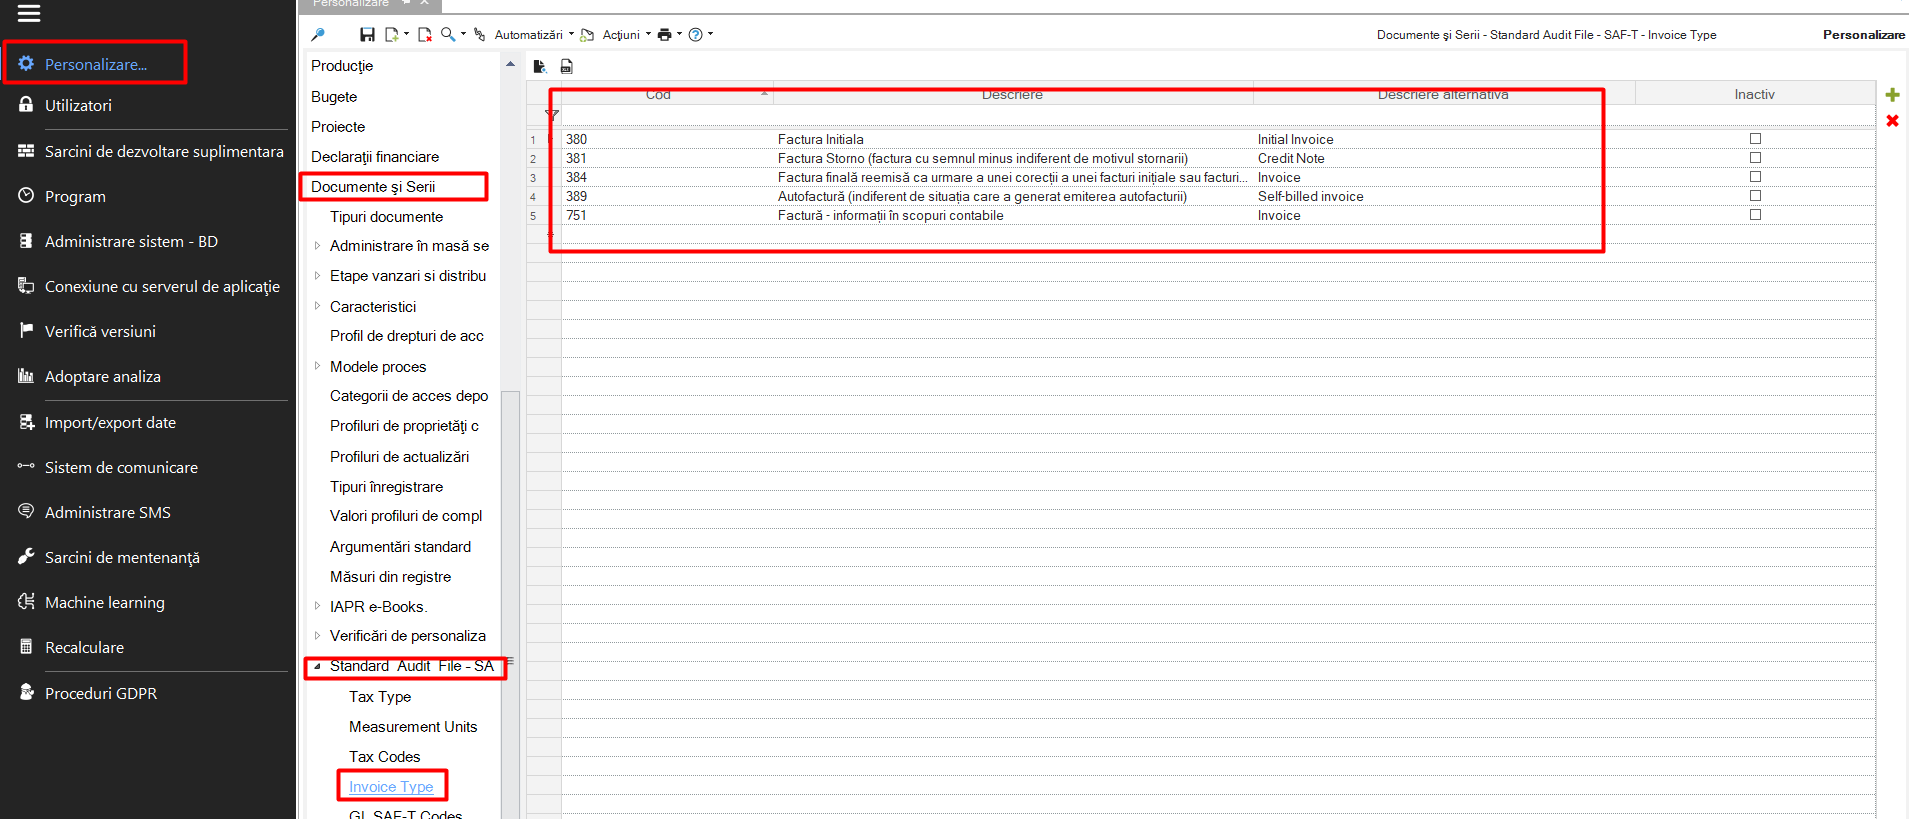
In order to standardize the information, the following nomenclatures have been added in version 5 of the application, which can be visualized as follows:
From the menu Tools and Configuration > Customize > Documents and Series > Standard Audit File - SAF-T.
4. Units of measurement
Units of measurement are part of the list of settings that need to be made in order to realize the SAF-T declaration.
The list of codifications taken from the information from ANAF, which must be taken into account for parameterization, can be found as follows:
Tools and configuration > Personalization > Documents and series > Standard Audit File - SAF-T > Measurement Units
According to this coding list, the units of measurement used in transactions for each company will have to be mapped according to the ones taken from the ANAF list.
An easy way to retrieve the list of units of measurement used in the records is to run the Invoices (Shortcuts -> SAF-T ->Invoices) scroller, filtering the desired period of analysis, because in the information extracted from here there is the “Code” column, which gives indications on the units of measurement used in the documents.
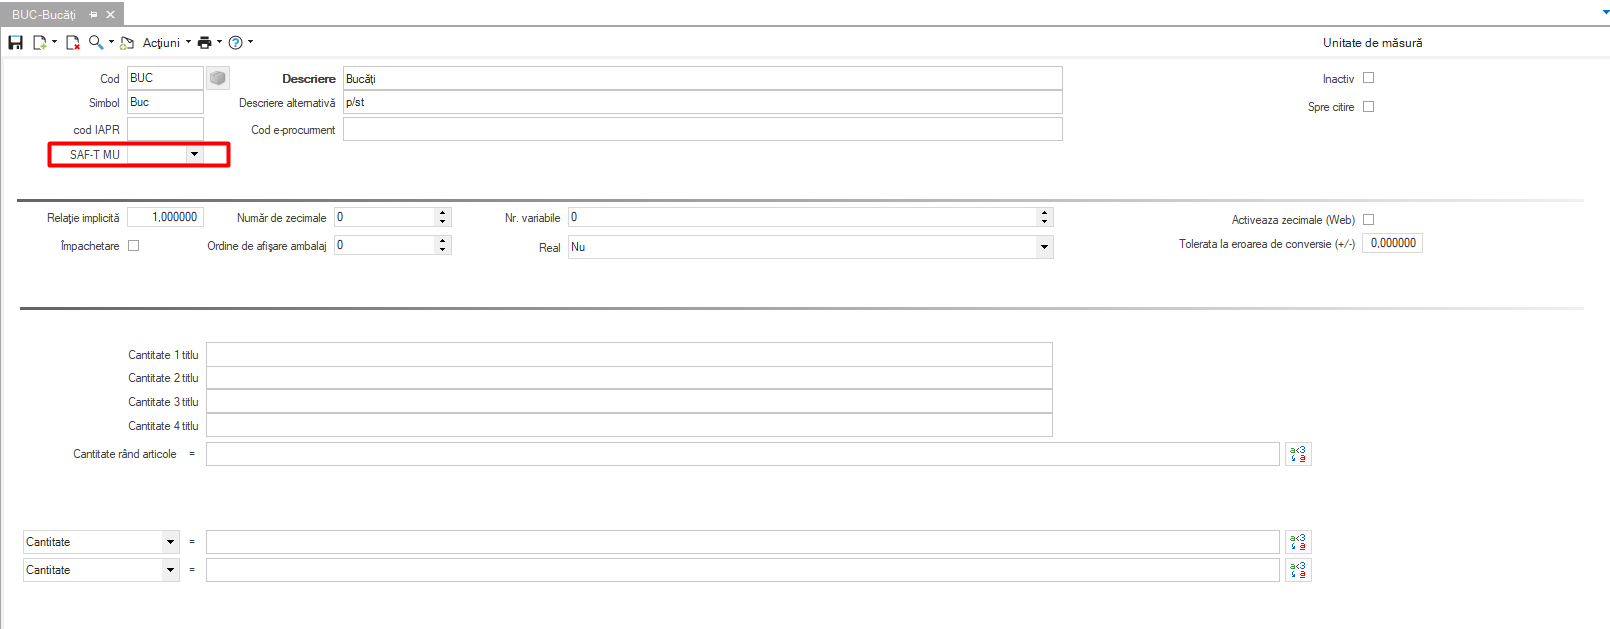
Each unit of measurement here should be mapped using the SAF-T code. In case of using a new measurement unit, this mapping must be done.
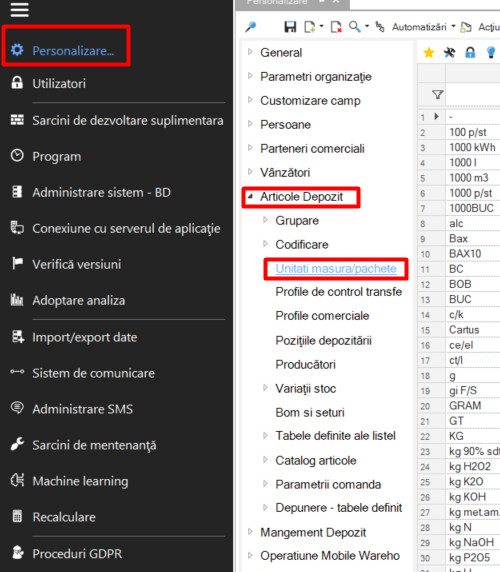
This setting is done by entering on the card of each unit of measurement, from:
Personalization > Warehouse Items > Units of Measure/Packages
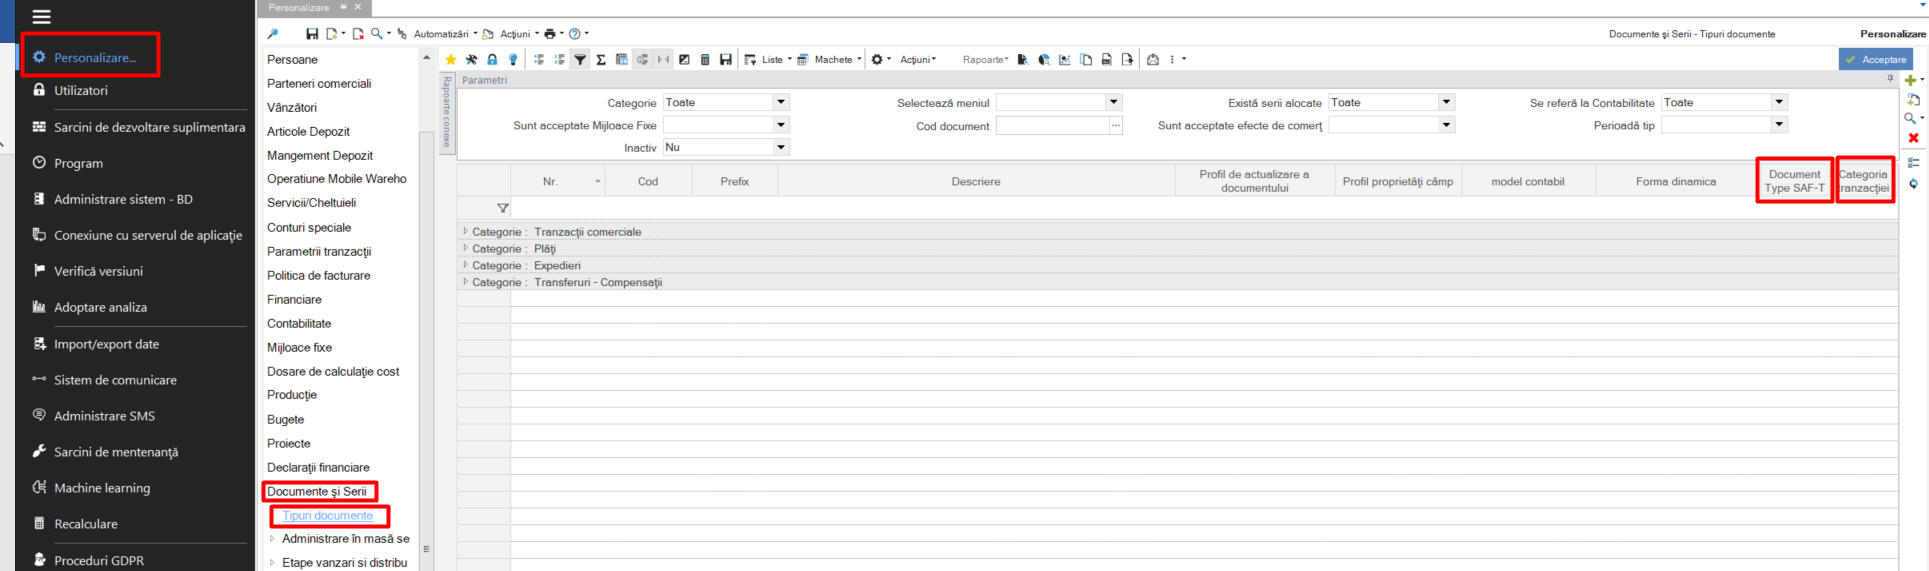
5. Document types
For each type of document, it is necessary to codify it, so that the SAF-T declaration can be executed accordingly.
Before mapping by document type, depending on the transaction category, it will be necessary to manually enter the codes below:
To complete the field, select one of the four codes below:
code 380 - Initial invoice,
code 381 - Revert invoice (invoice with a minus sign regardless of the reason for the reversal),
code 384 - Final invoice reissued following a correction of an initial invoice or revert invoice,
code 389 - Self-billing invoice (irrespective of the situation which led to the issue of the self-billing invoice)
code 751 - Invoice - information for accounting purposes
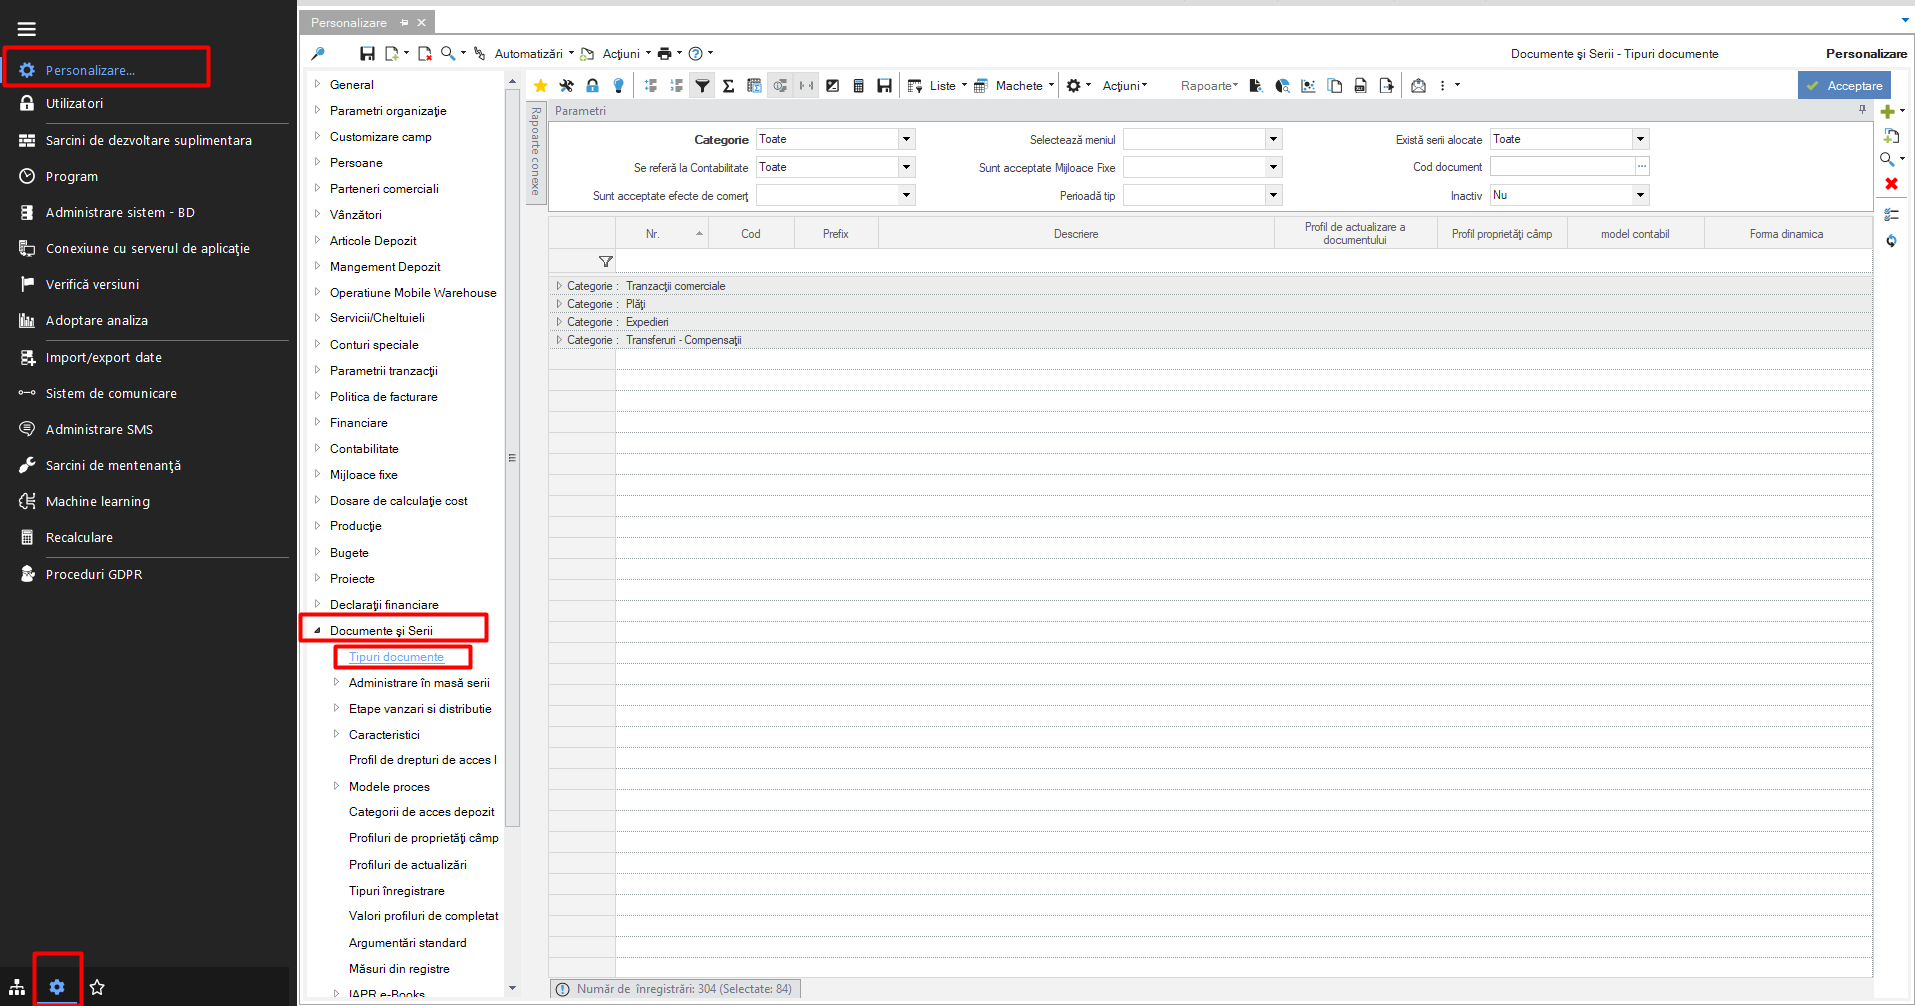
So, the way documents can be coded is as follows:
Tools and Configuration > Customize > Documents and Series > Document Types
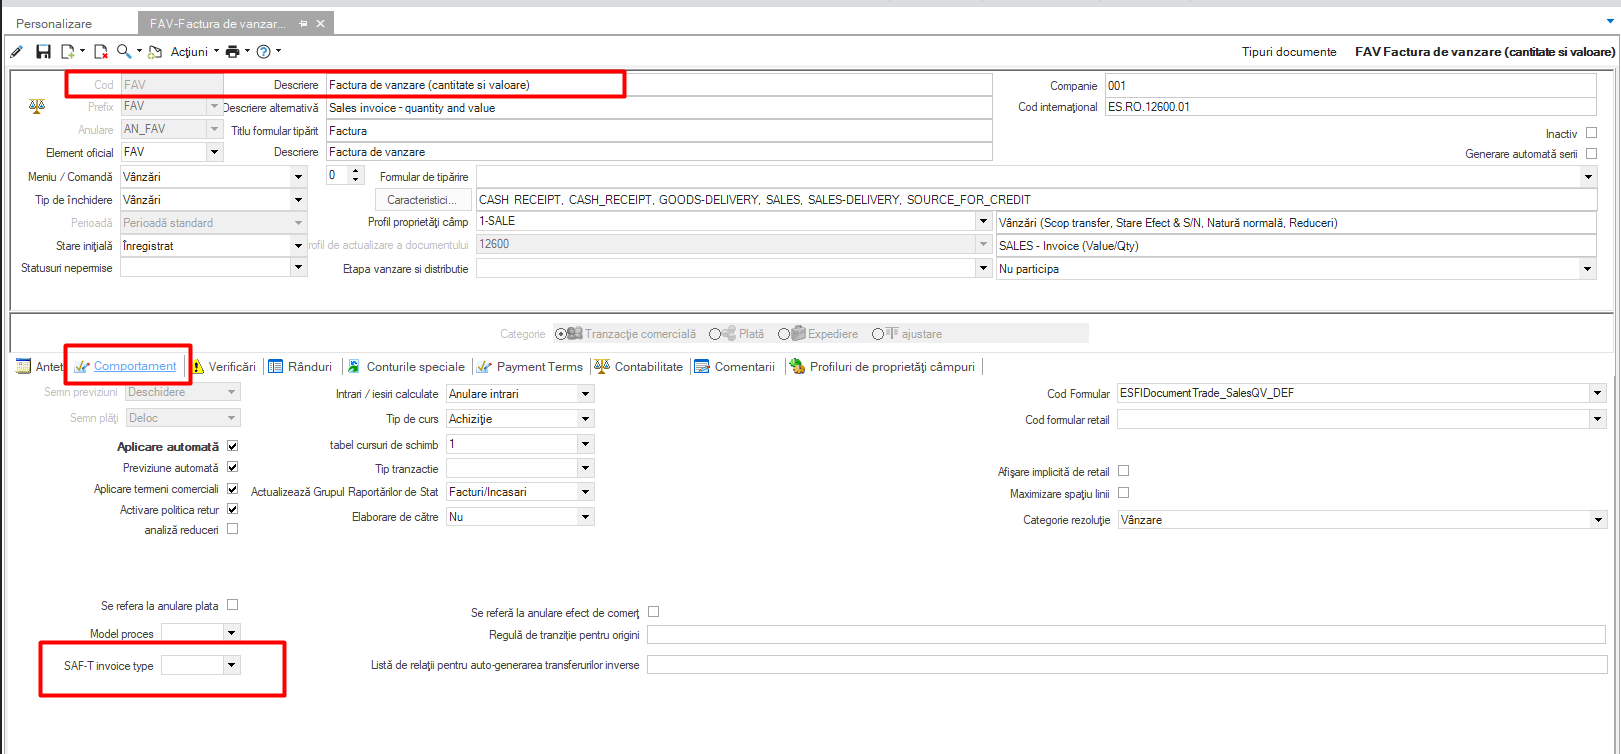
The setting is done in the document type card > Behavior tab > SAF-T Invoice type field
For the SAF-T declaration were mainly used codes 380 for standard invoices, 381 for credit notes.
The documents can be mapped either individually, or by calling the Global Modification taking into account the Transaction Category, as follows:
For the Transaction Category 01 the invoice code 380 (Document type SAF-T) will be used. The exception are SCCT type documents which have Transaction Category 01 but are not declared in SAFT, being the initial balance of the partners with VAT on receipt.
For Category 03384 will be used. This is confirmed by ANAF as appropriate for SAFT.
For the use of the other codes, it is recommended to access the appropriate documents individually.
6. Types of taxes
Coding is also required for tax categories. The list of codes is as follows:
Tools and Configuration > Personalization > Personalization > Documents and Series > Standard Audit File - SAF-T > Tax Codes.
Through the statement run process, at the tax information preparation/update stage, the SAF-T Tax Code field will be populated according to the tax category that applies.
These codes can be identified when running the General Ledger Entries scroller, “TaxCodeCalc” column
The following code has been added to the list of Tax Codes, for the exempt VAT regime:
7. Chart of accounts
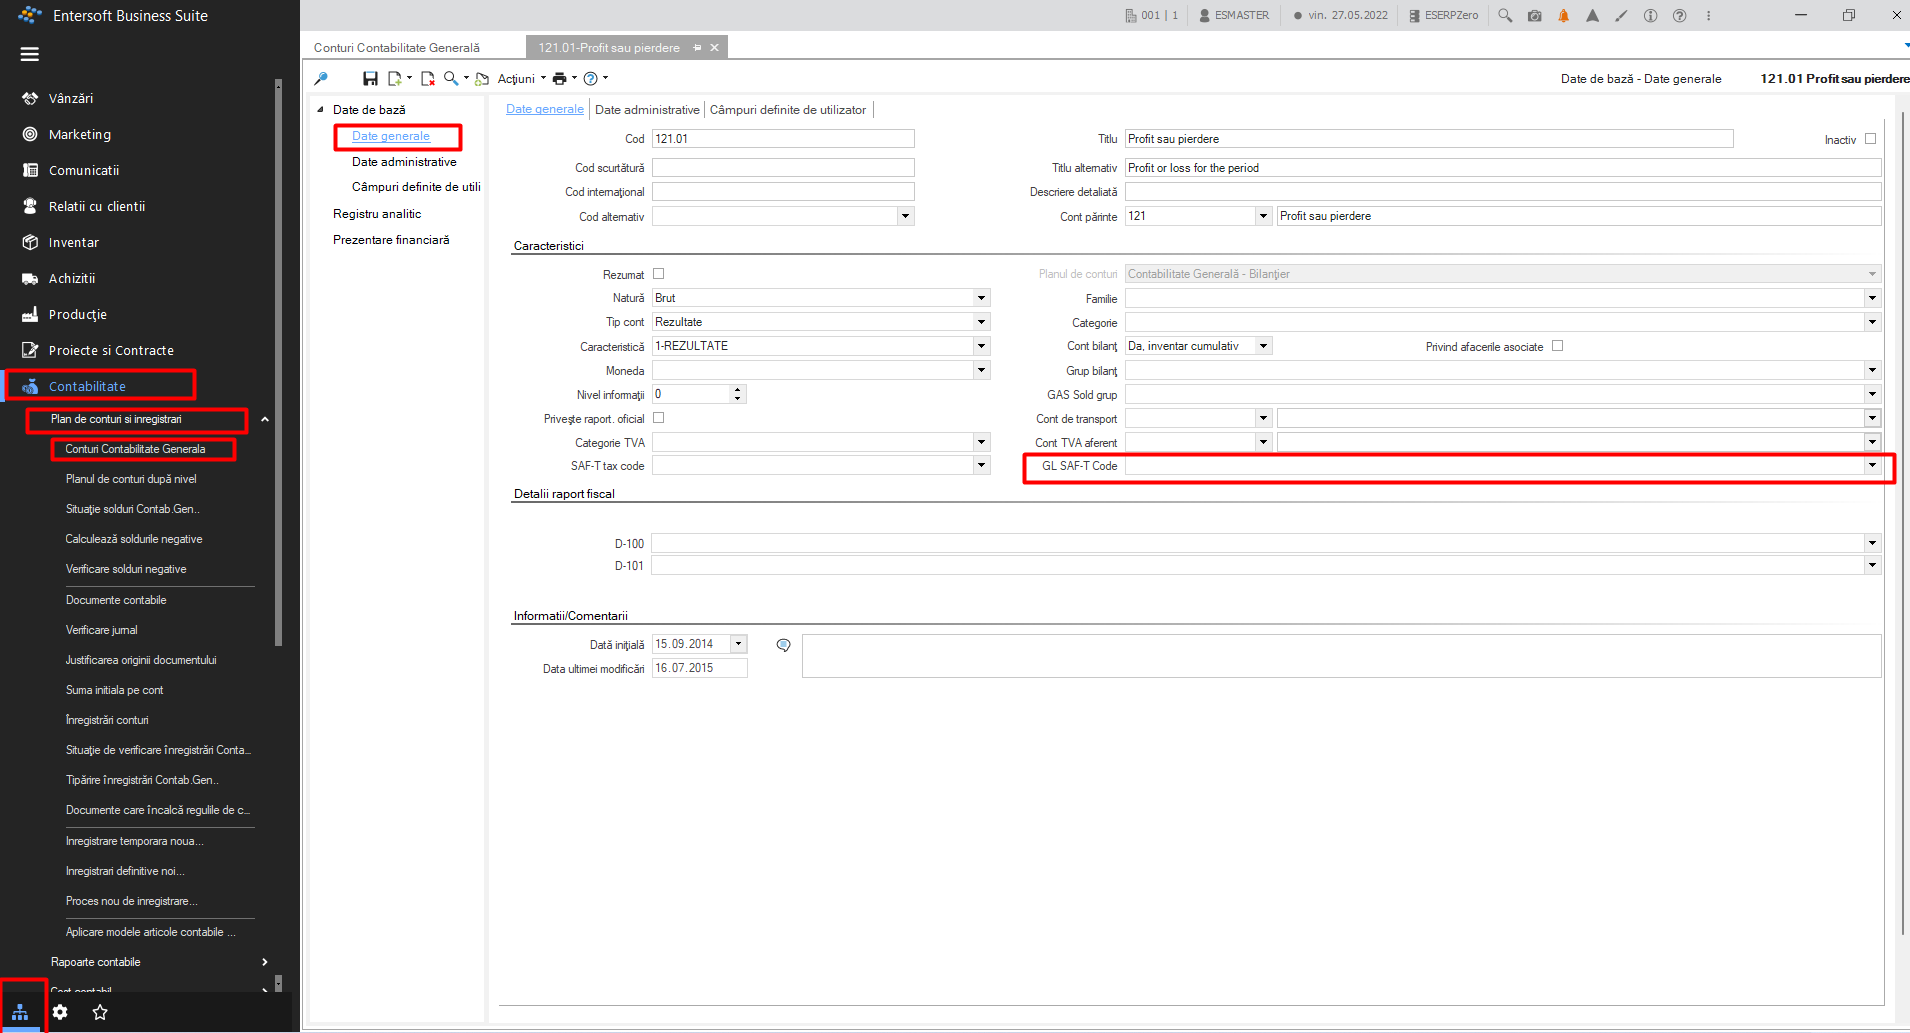
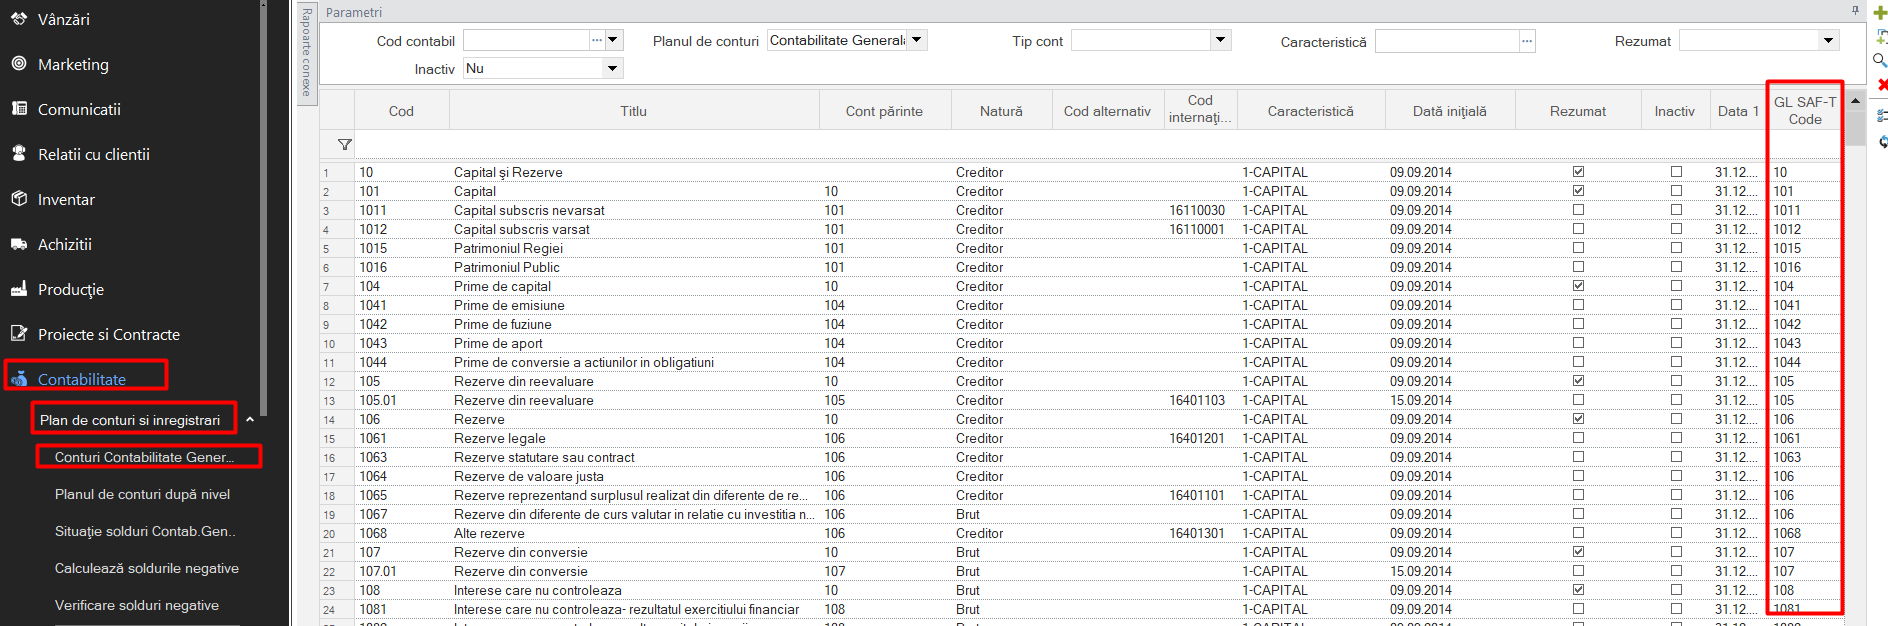
The necessary coding instructions for the chart of accounts accounts can be found as follows:
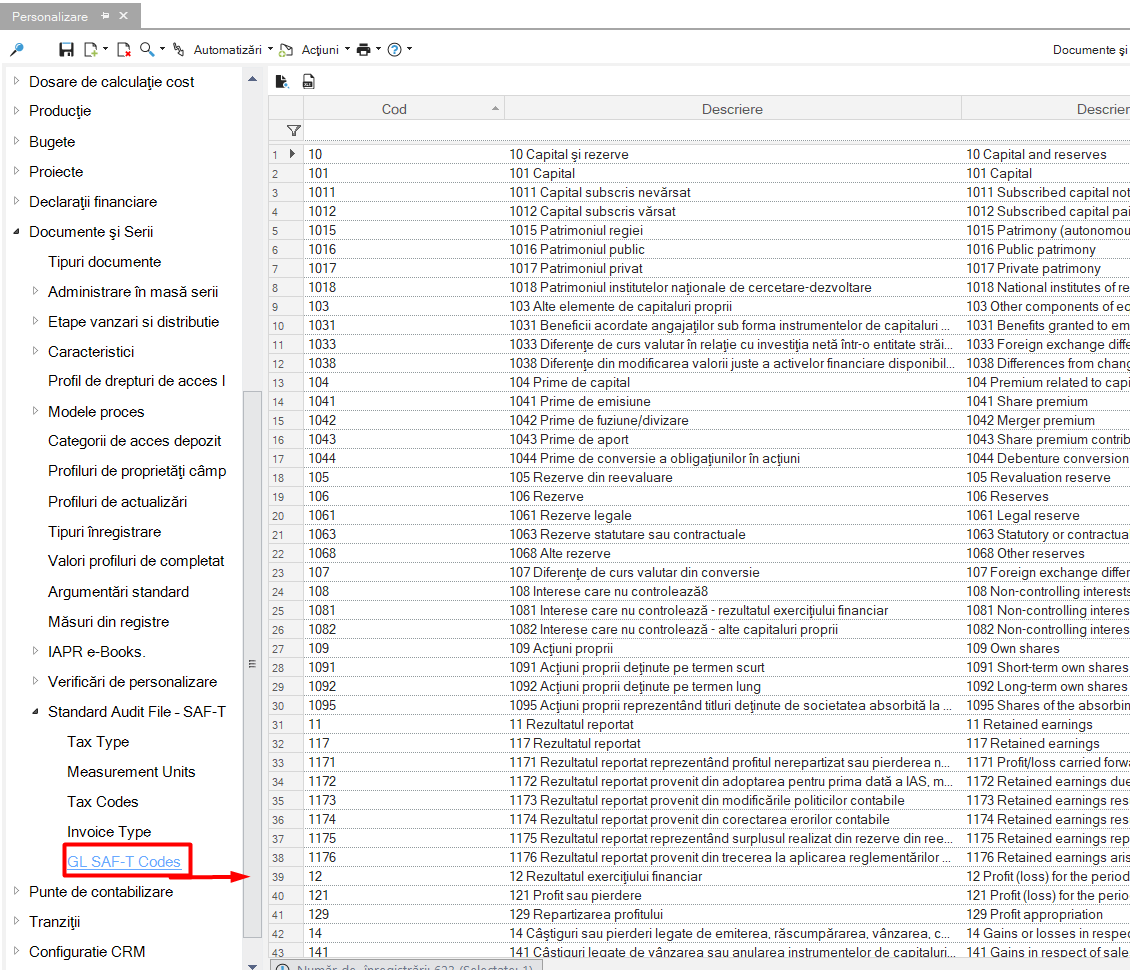
Tools and Configuration > Customize Documents and Series -> Standard Audit File - SAF-T > GL SAF-T Codes
Following the SAF-T chart of accounts import process, the field below will be populated by the corresponding SAF-T account.
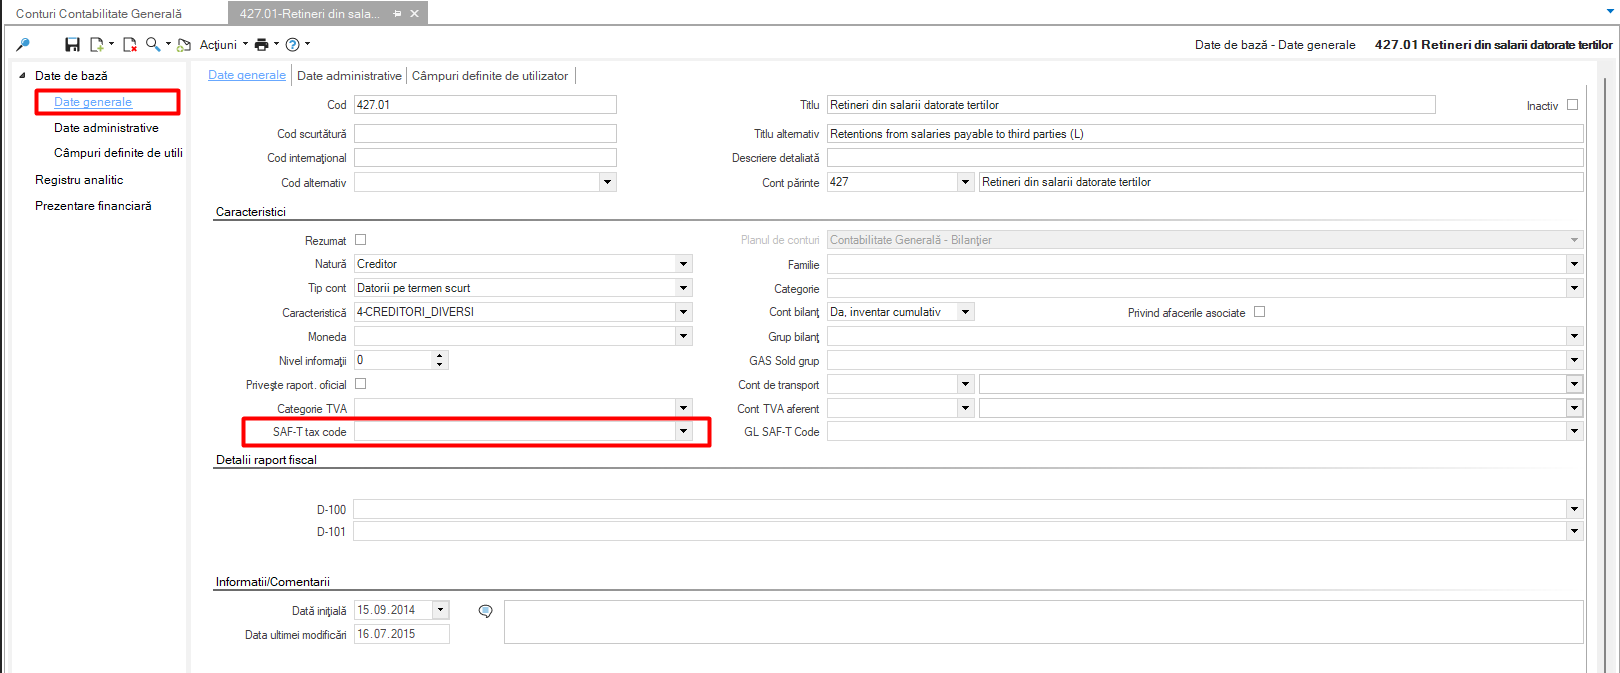
Attention! When creating a new analytic, it must be mapped according to the SAF-T chart of accounts.
8. Special accounts
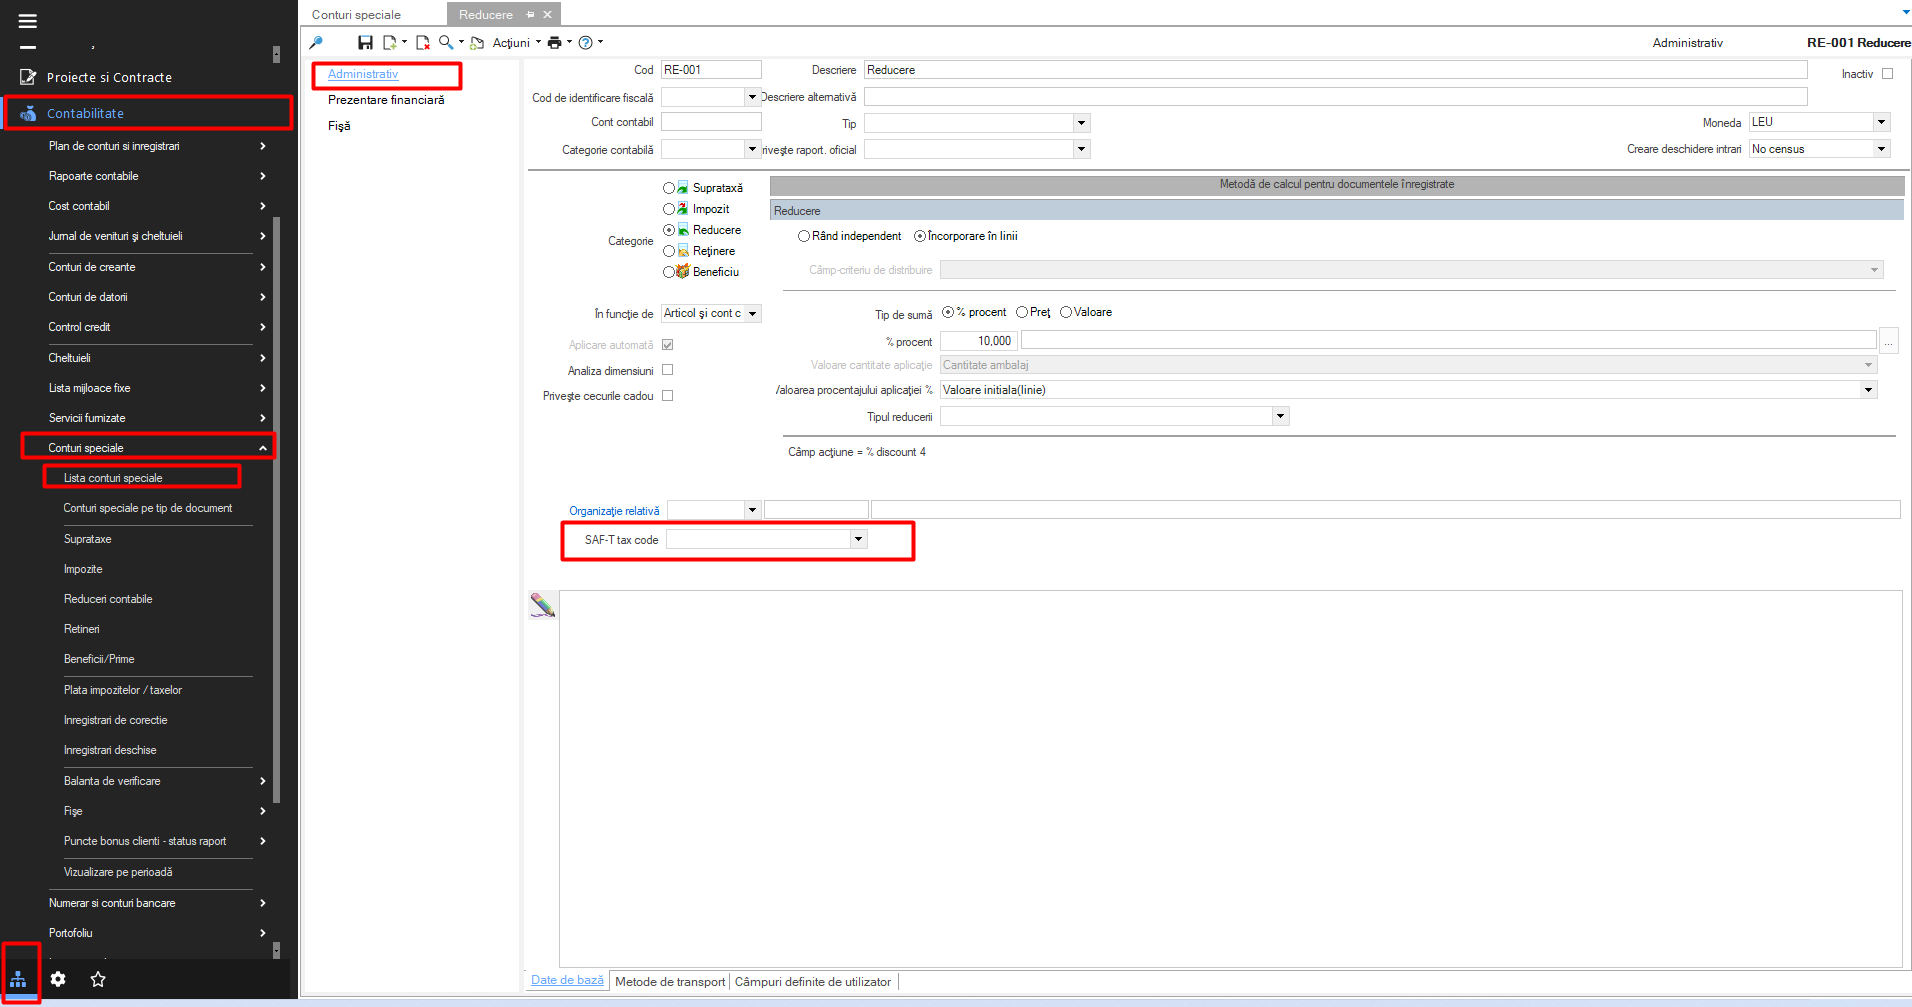
Like bookkeeping accounts, special accounts will have the same treatment. They will be mapped using the corresponding account in SAF-T.
Their mapping can be found by entering on the card, as follows:
Accounting > Special accounts > Special accounts list
Or it can be accessed from the chart of accounts, directly on the account card:
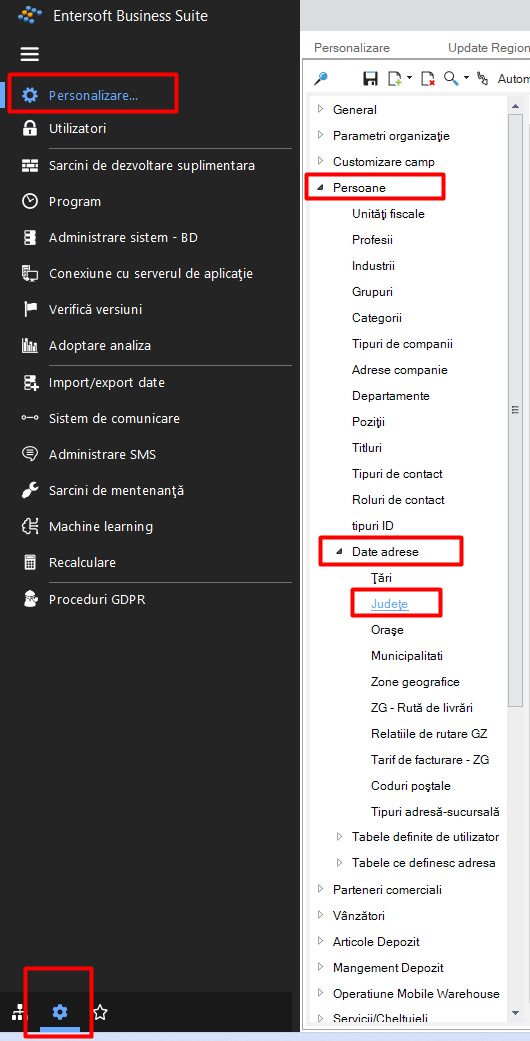
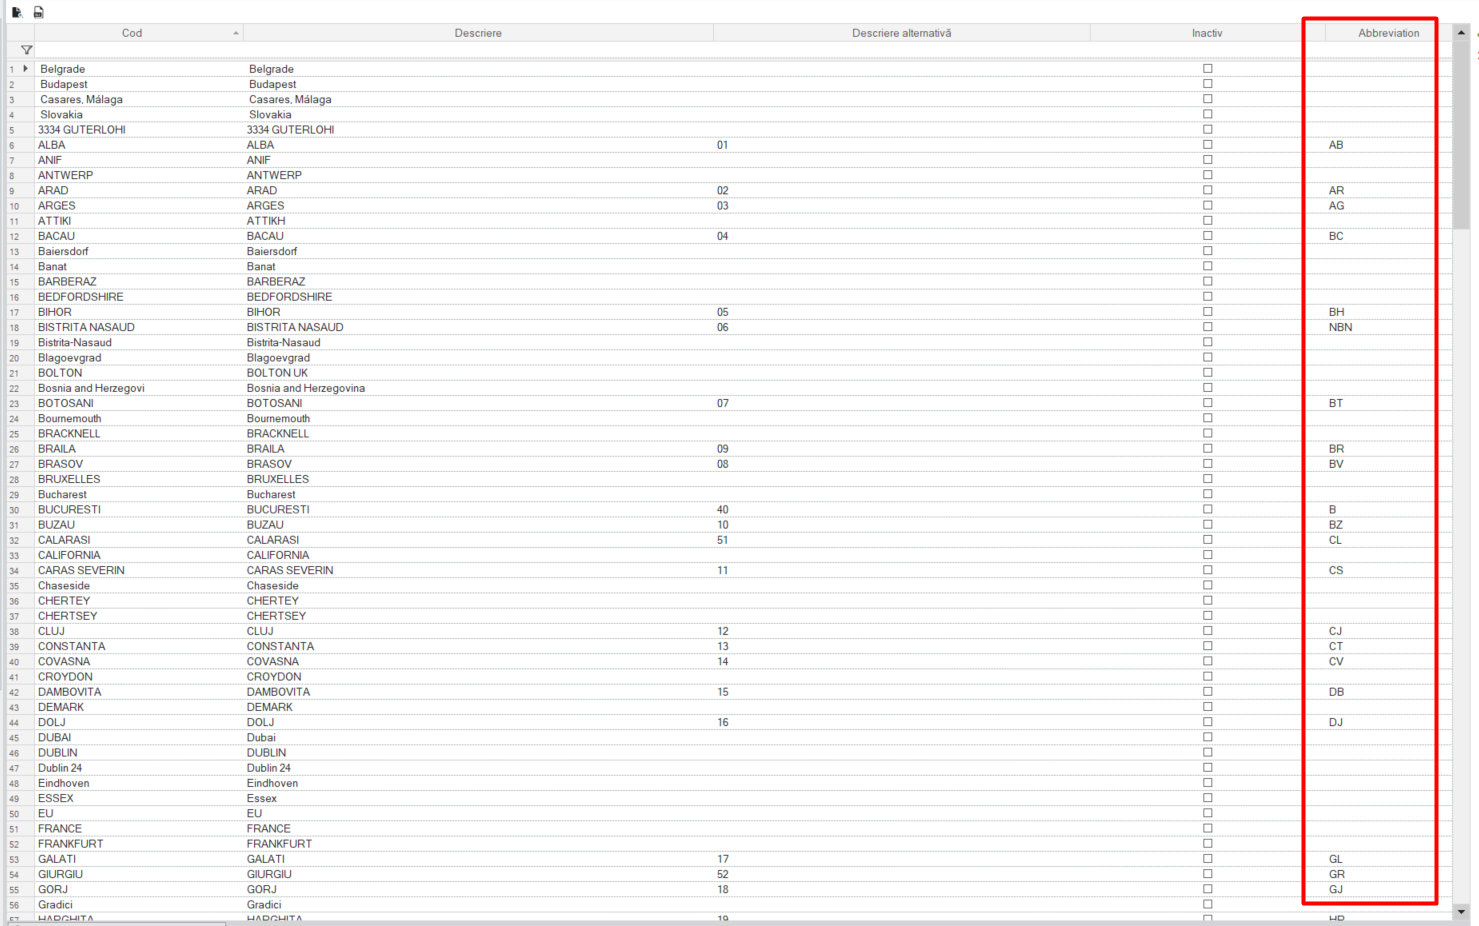
9. County codes
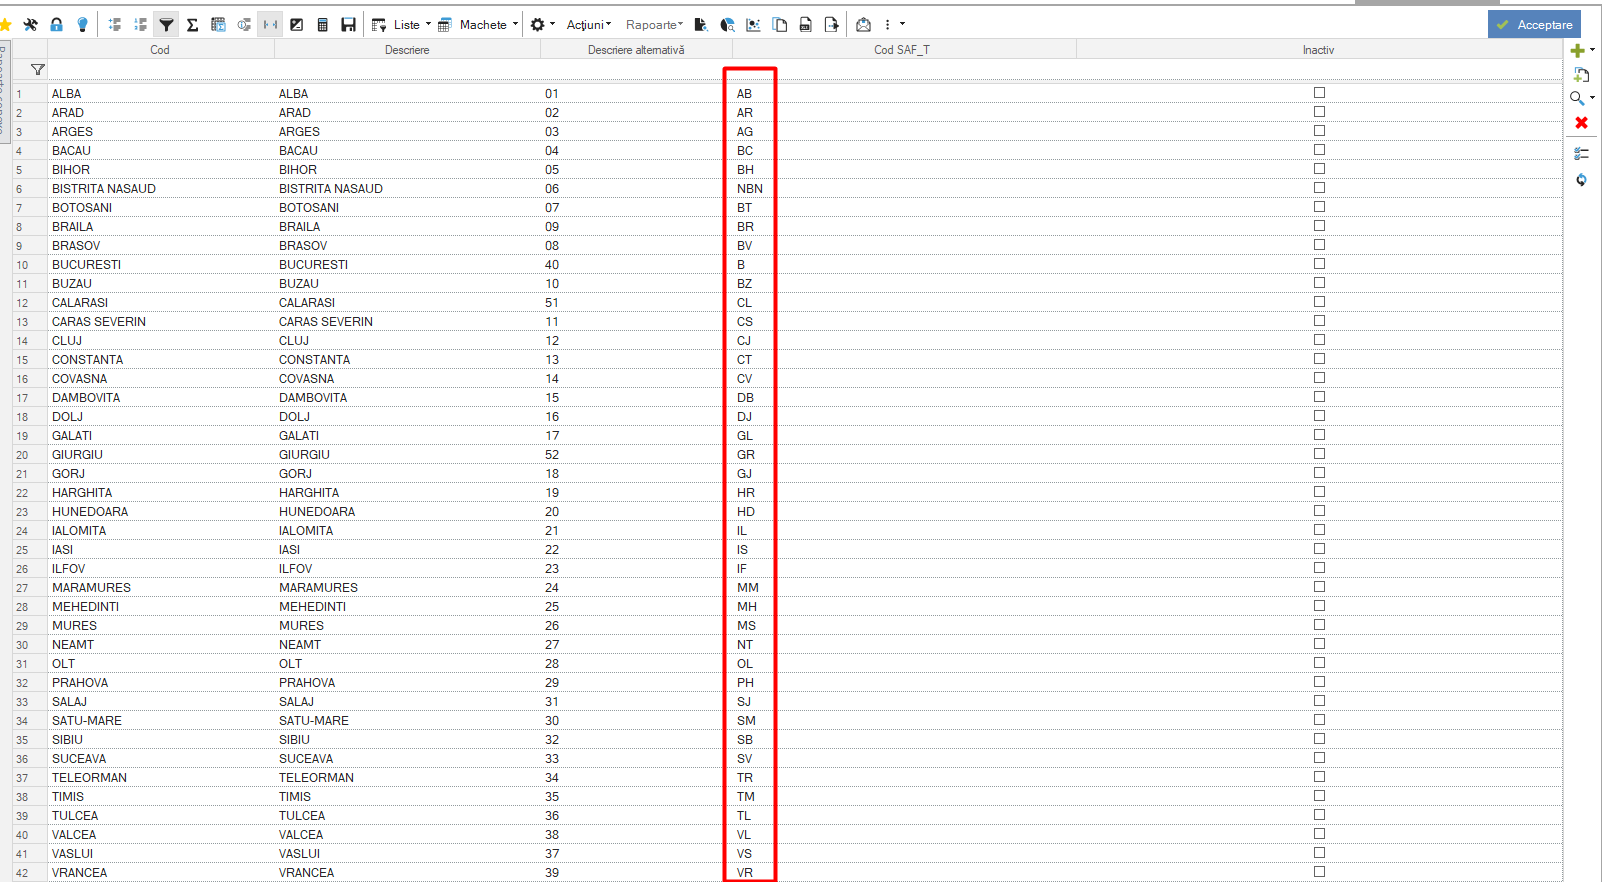
Another aspect to take into account in order to prepare the SAF-T declaration refers to the counties and the abbreviation column.
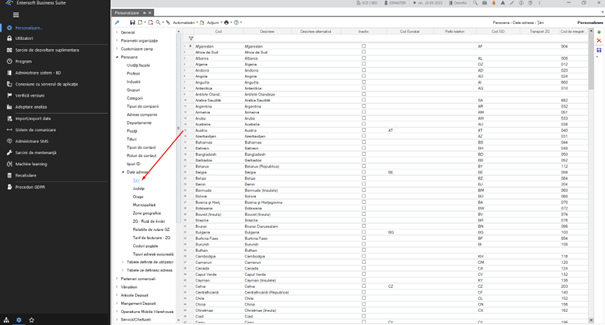
After parameterization, they will be found in: Tools and configuration > Personalization > Persons > Address data > Counties
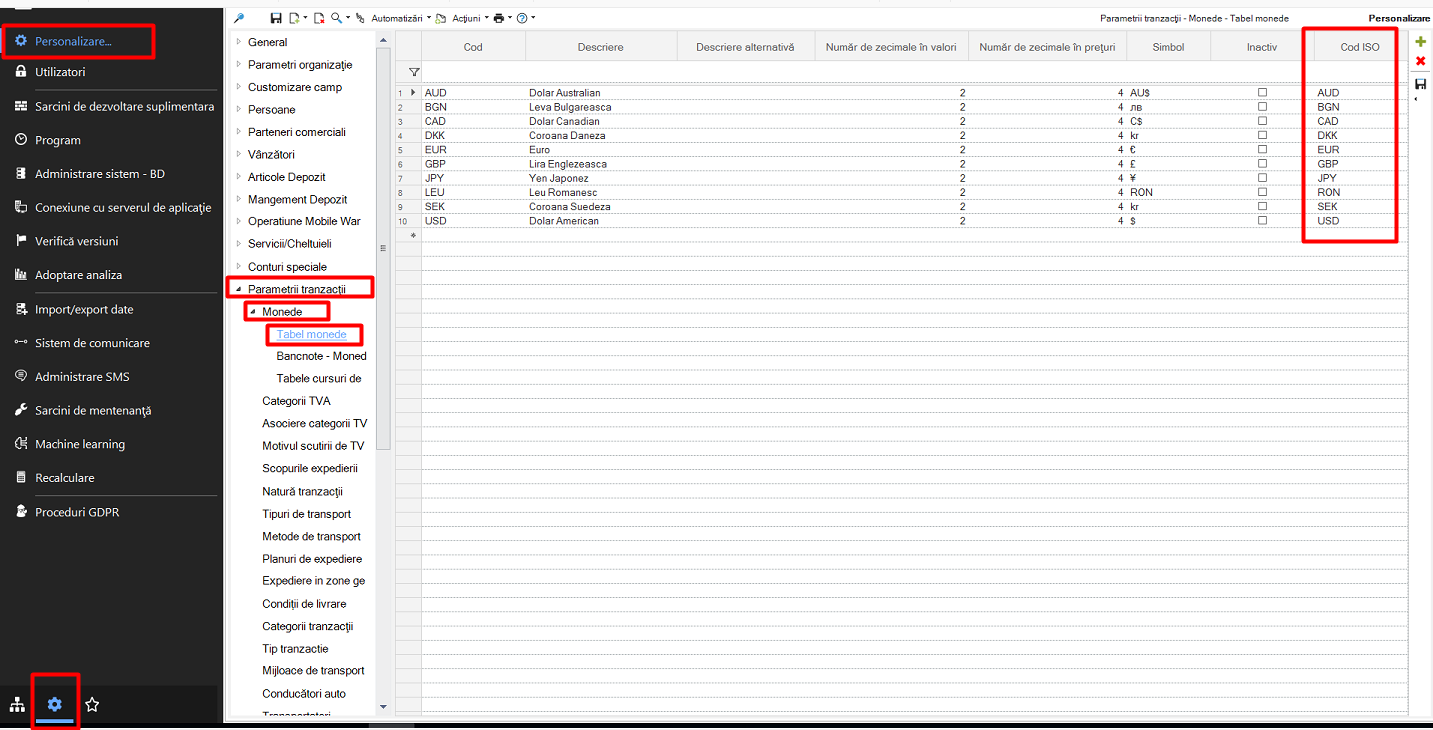
10. Currencies
Another aspect to mention is the use of currencies in company transactions.
It is very important to fill in the column “ISO code” with the corresponding code.
To verify, the information is found by following these steps:
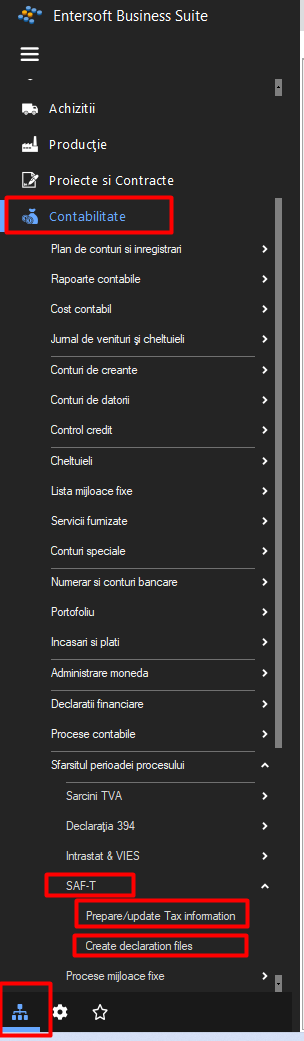
A first step in generating files for the SAF-T declaration is to prepare and update the tax codes, so it is necessary to access the following menu:
Accounting > End of period process > SAF-T > Prepare/Update Tax Code
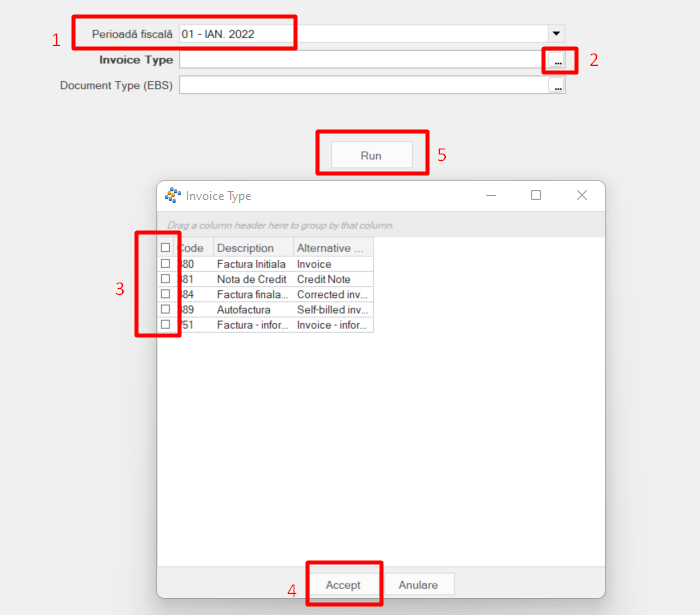
Choose the tax period for which you want to generate the declaration and follow the steps below:
11.2. Xml file generation
The generation of the XML file of the declaration is generated from the menu Accounting > End of process period > SAF-T > Create declaration files.
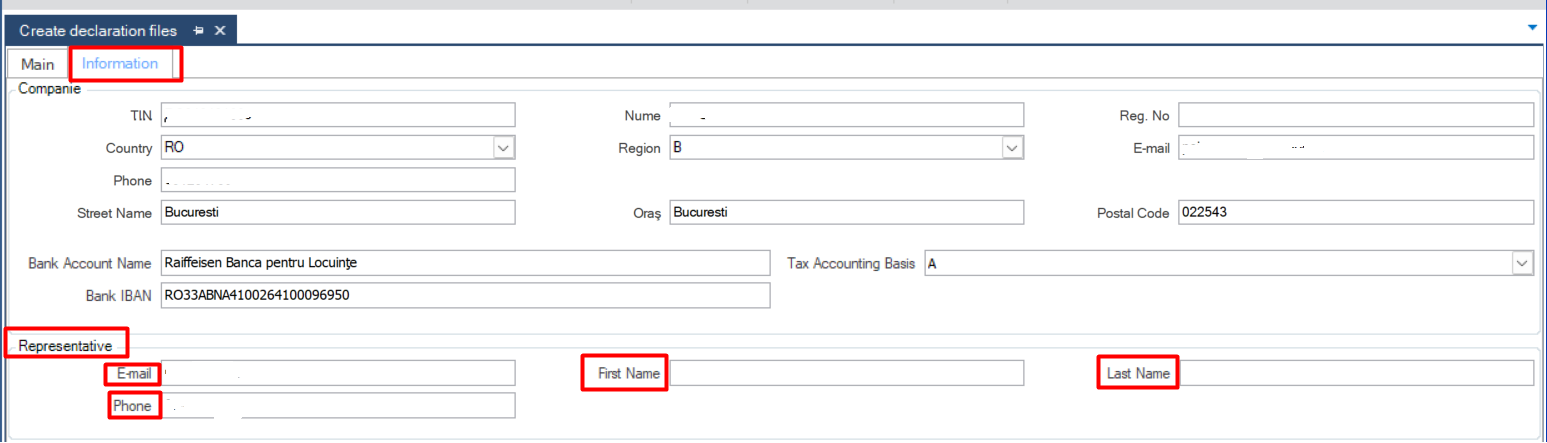
First of all, before running, you need to make sure that in the Information Tab the following fields are populated with the data of the person who is going to submit the declaration.
Otherwise, the system will warn you and an error will appear when generating the declaration.
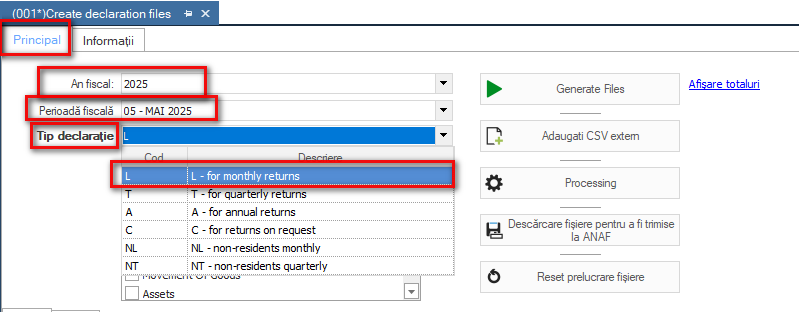
The declaration generation is performed from the Main Tab, for each month for which you wish to submit the declaration.
Choose the first unclosed tax year (even if the year for which the return is being filed is
different), return type L, tax period is the desired month for filing.
For the quarterly return the return type T will be chosen and the month will be the last month of
of the quarter for submission.
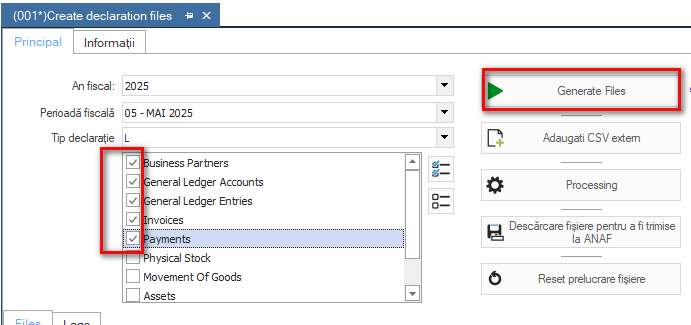
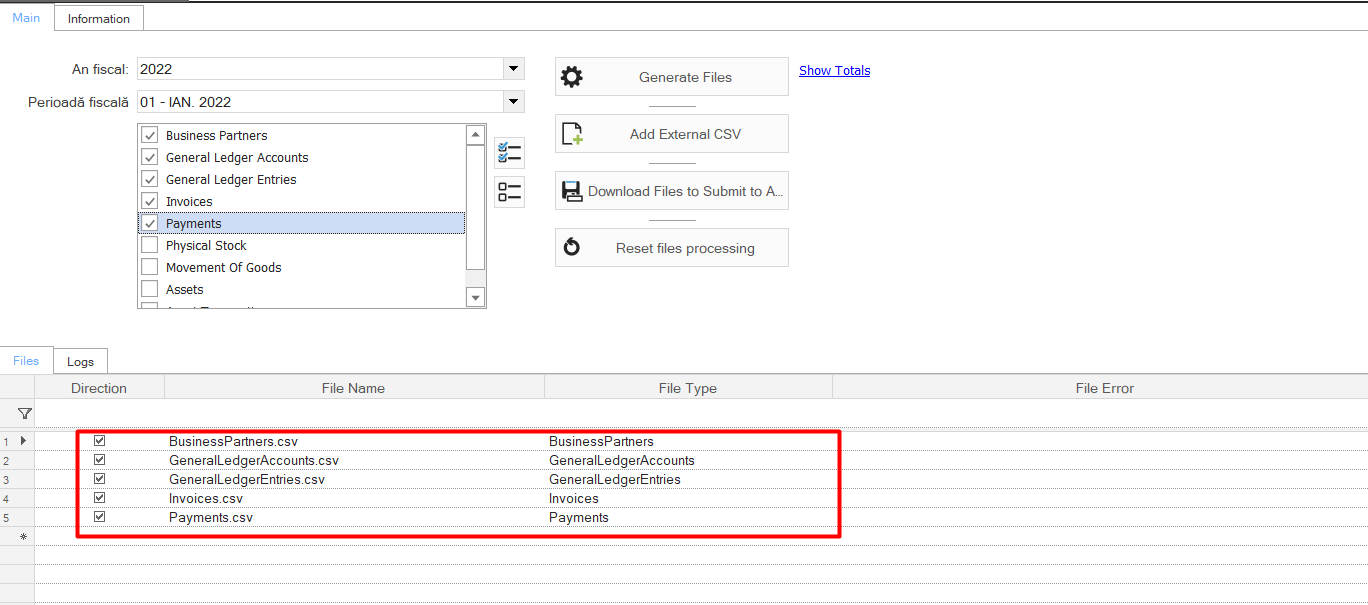
It is recommended to start generating the CSVs first for the General Ledger Accounts scroller, continuing with Business Partners, General Ledger Entries, Invoices and Payments. The other scrollers will be run and transmitted only on request.
In case you are trying to generate files, errors occur in a certain month that are resolved and you want to restart the process for the same month, it is recommended to access the “Reset file processing” button. It acts as a refresh and deletes the generated csv from the application folder.
If the declaration was processed successfully, the following CSVs will appear in the system:
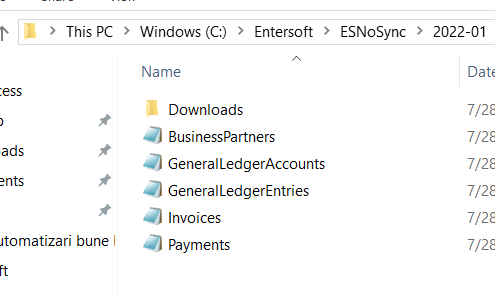
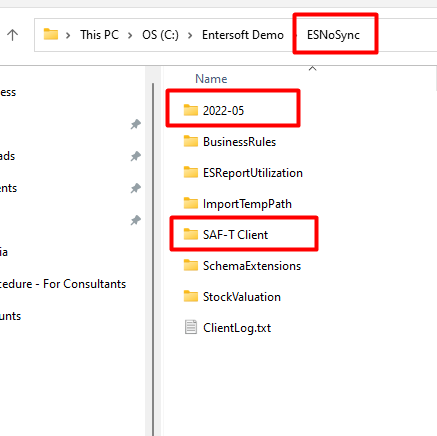
The CSVs will also be placed in the application folder > ESNoSync folder, where a folder with the year and month of the declaration is automatically created.
After generating the .csv files click the “Processing” button to generate the .xml files.
In the Downloads folder you will find the .xmls that need to be checked for errors in Duk Integrator and, if there are no errors, converted to PDF, signed and submitted.
This .xml is based on the information aggregated from the run CSVs.
12. Instructions, parameterization
Adding the elements corresponding to the SAF-T declaration in EBS, implies some actions detailed in the following.
A first step is to check the application version. The SAF-T declaration requires at least version 5.2.0.
Therefore, the application should contain the following information:
12.1. Enter API key
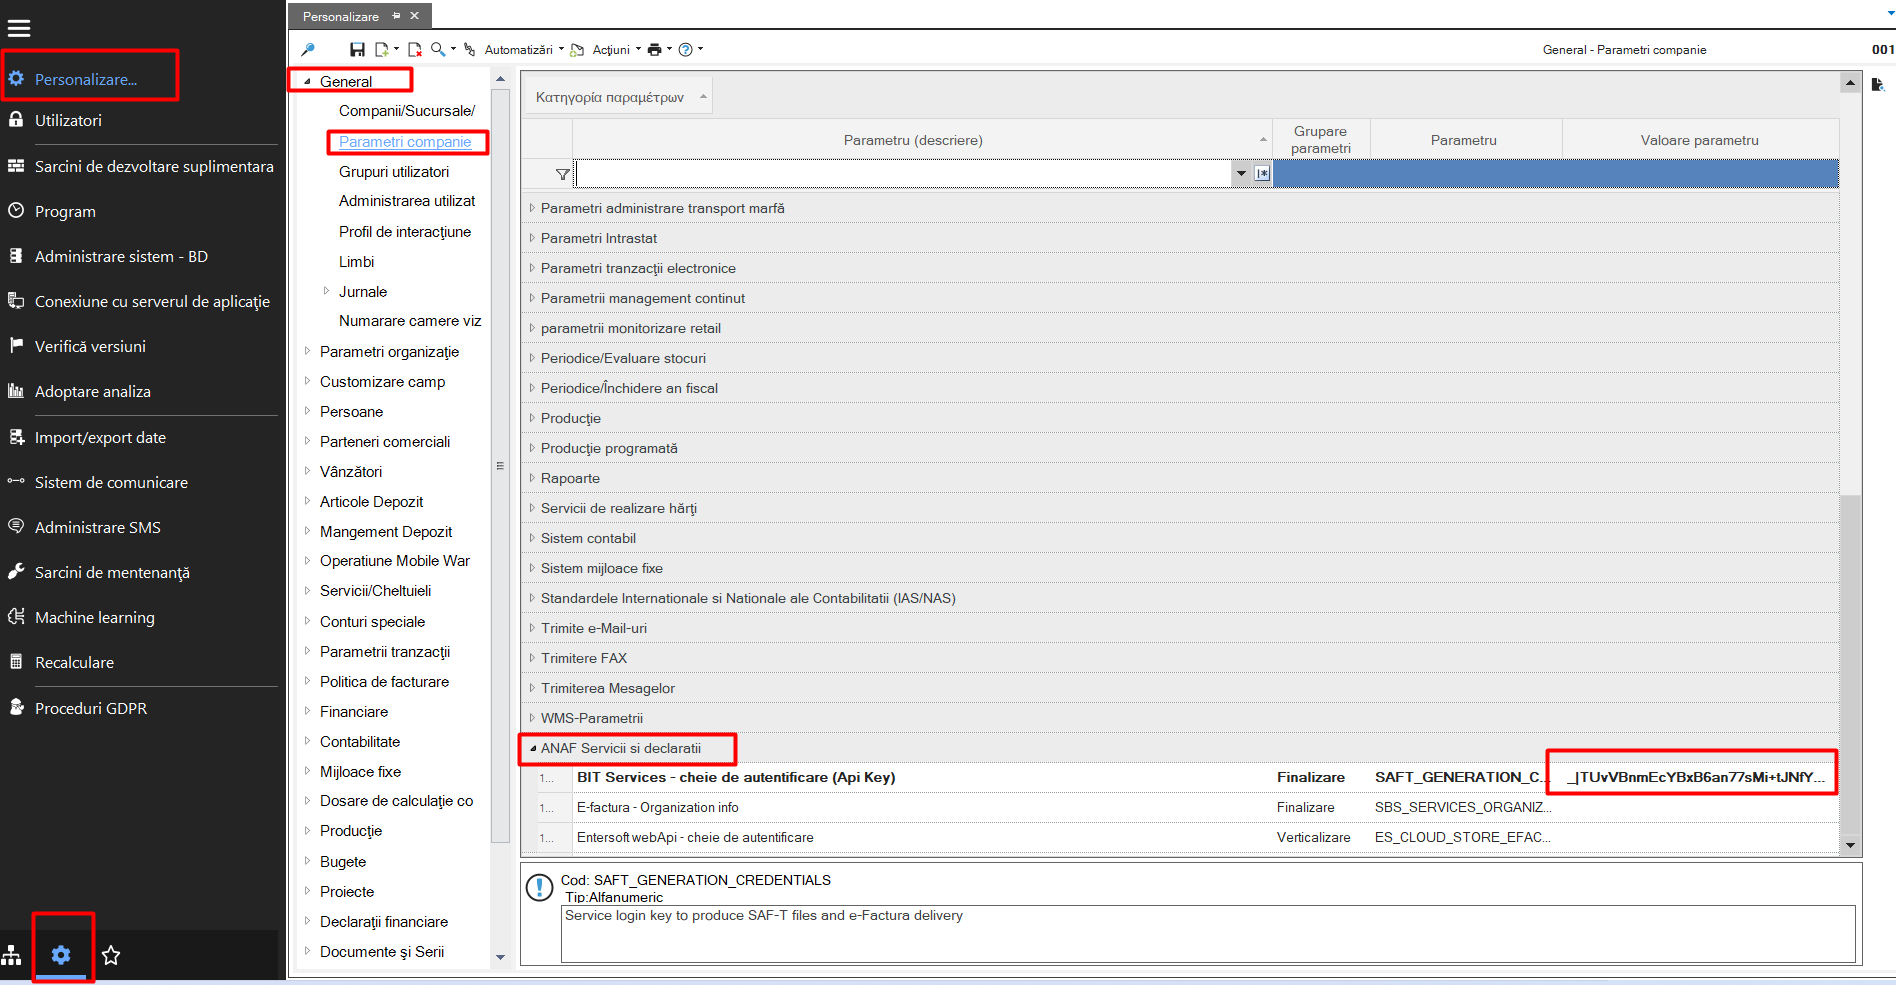
API Key, a verification key available separately for each client, This key will be introduced as follows: Customization > Company Settings > Anaf Services and Declarations > Bit Services
12.2. SAF-T Shortcuts
By adding this .json file:
12.3. SAF-T files
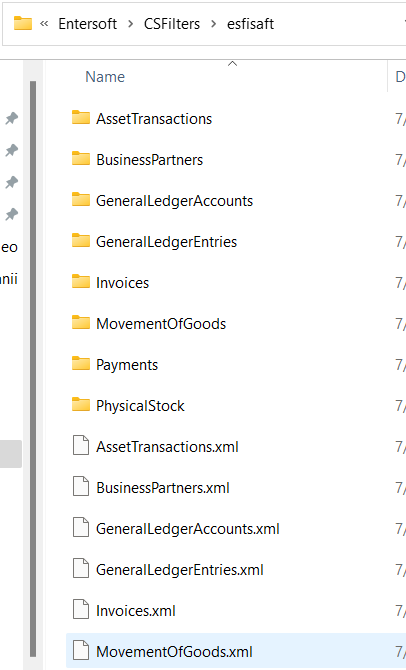
In the application folder CS Filters/ESFISAFT, you will find the following files, related to the scrollers whose information is the basis for the generation of the SAF-T declaration.
Business Partners
General Ledger Accounts
General Ledger Entries
Invoices
Payments
Movement of Goods
12.3. Files saved in the ESNoSync folder
The ESNoSync application folder will contain:
SAF-T Client: where CSV validation errors will be saved
One folder for each month where the created CSV files will be stored. They are created when running the statement.
12.4. Import county codes
Adding the following files helps to map the county codes according to the requirements provided in the preparation of the SAF-T declaration.
To bring the field exemplified below, the following steps are required:
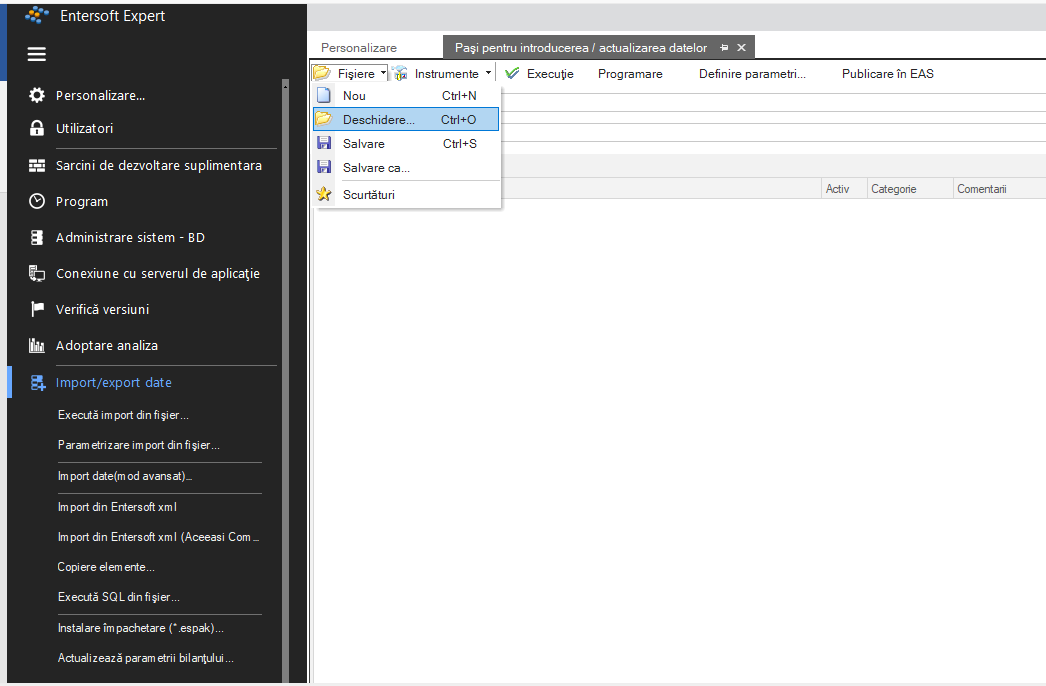
In the menu Tools and Configuration > Import/Export Data > Import Data (advanced mode) attach the .xml file:
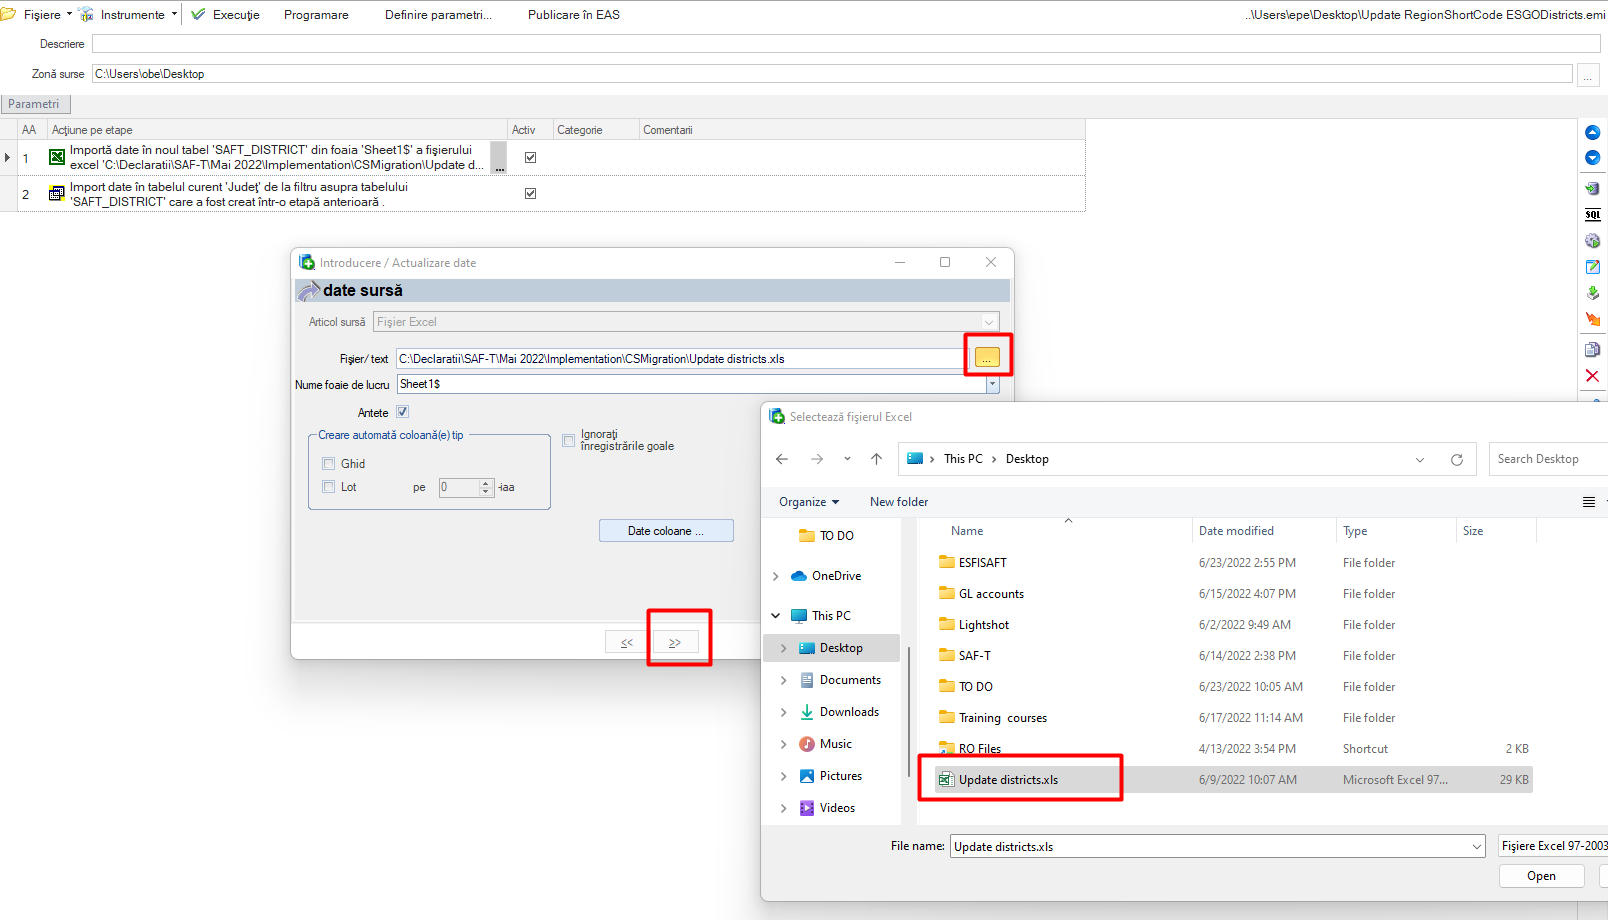
Urmatorul dupa fisier .xml este fisierul de tip excel:
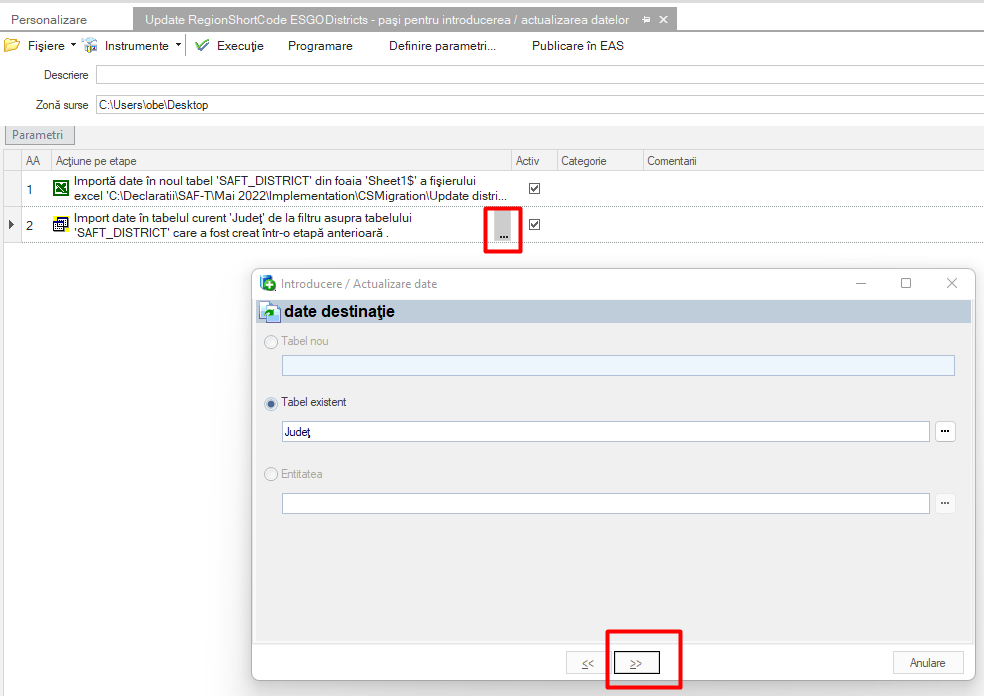
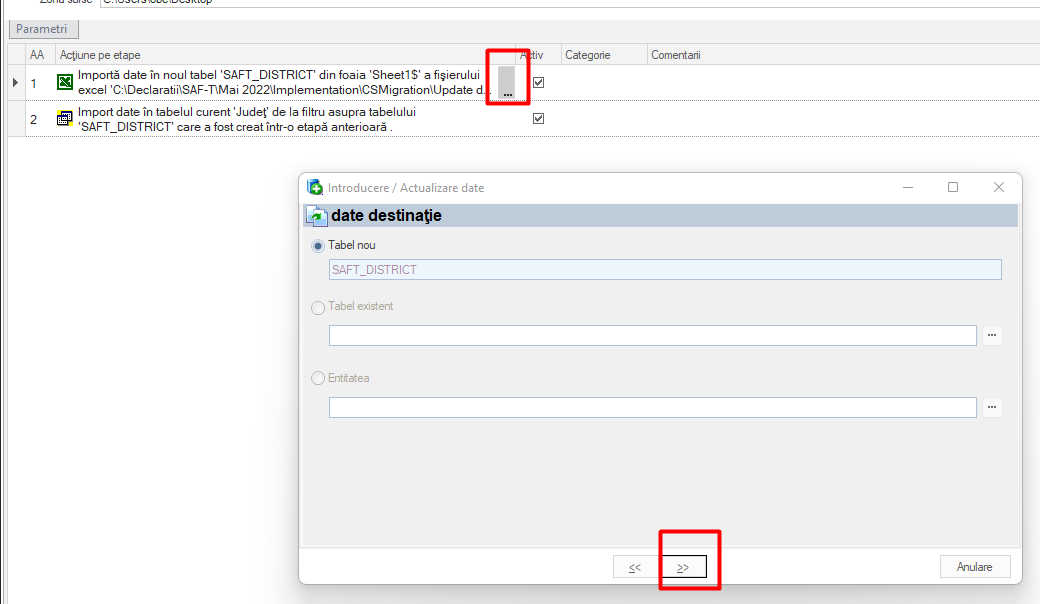
The path mentioned below is updated, when the excel file is added, followed by pressing the “>>” button:
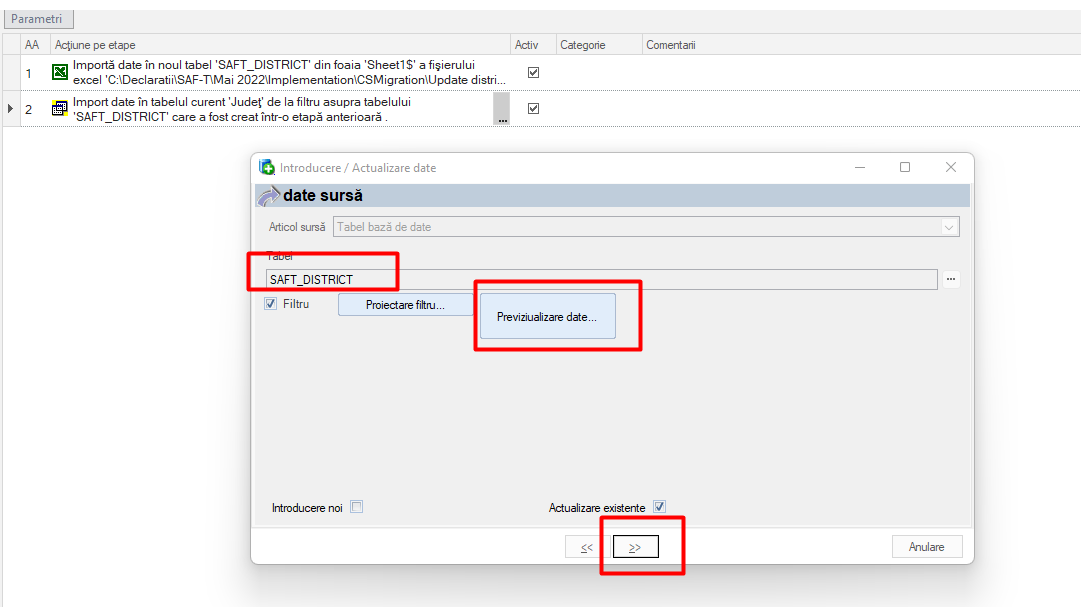
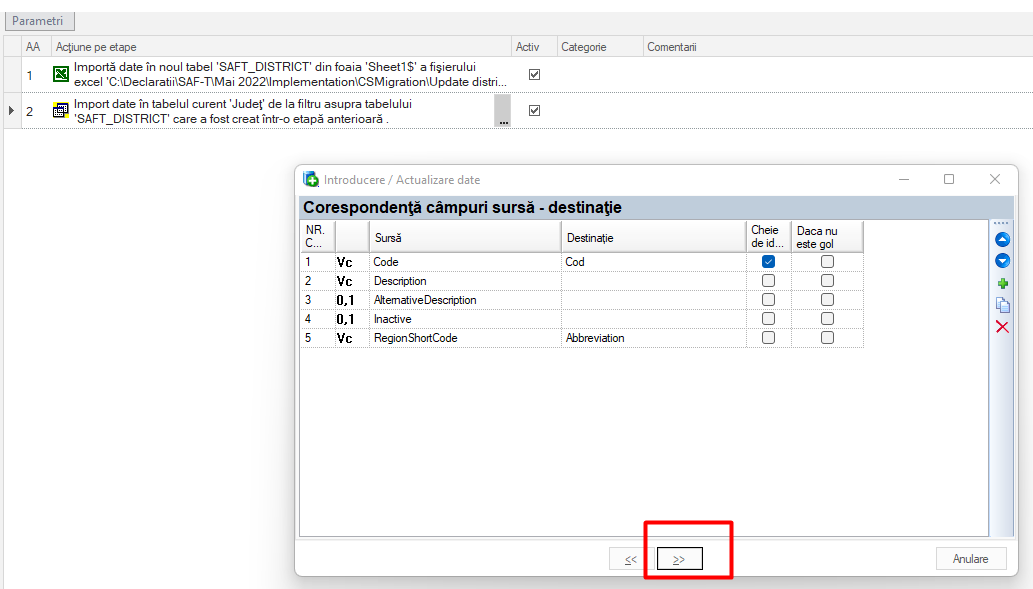
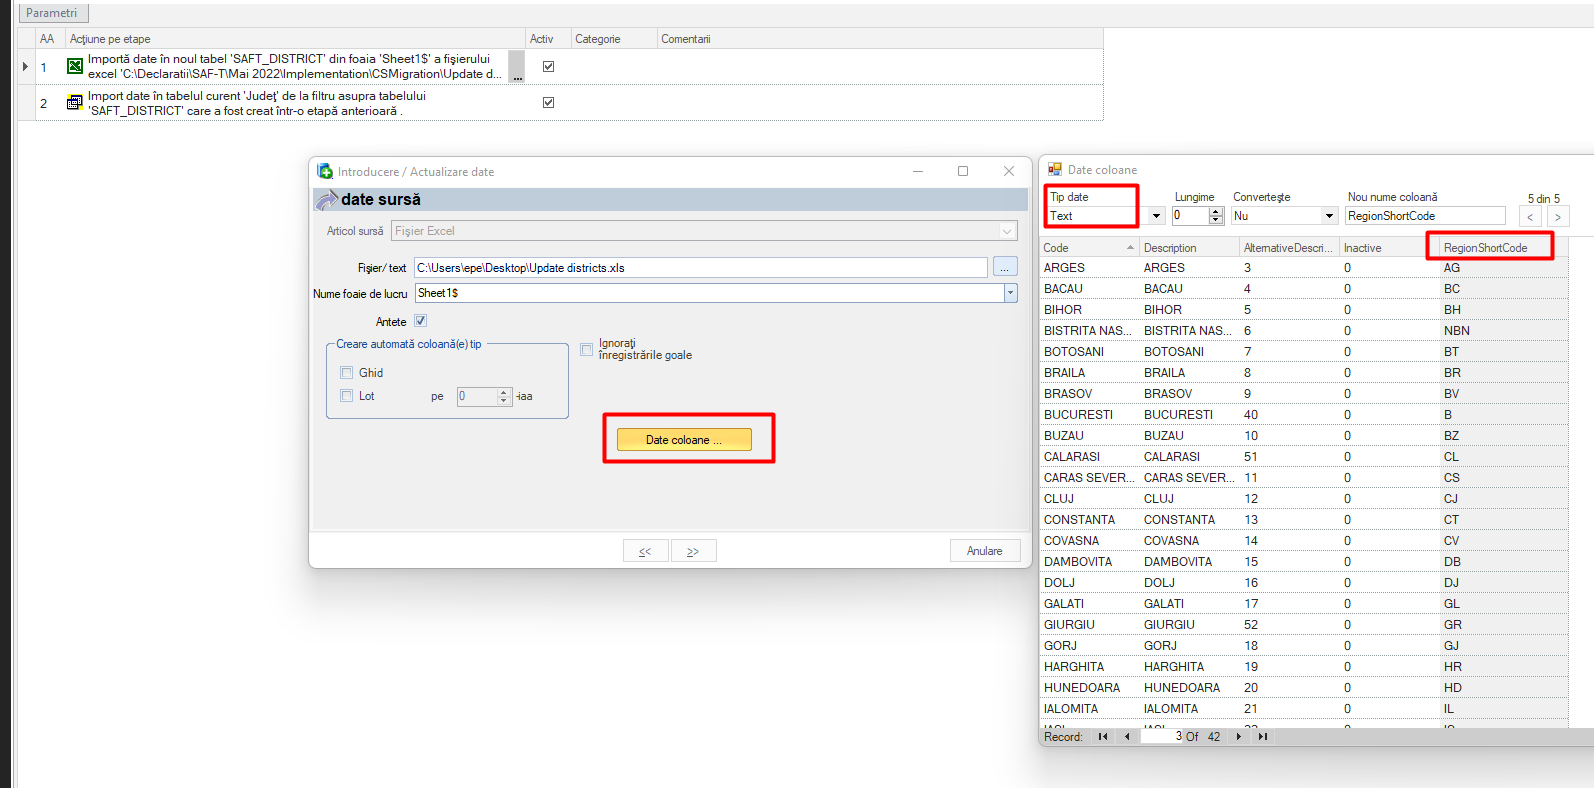
We can preview the format of the columns that will appear in the scroller like this:
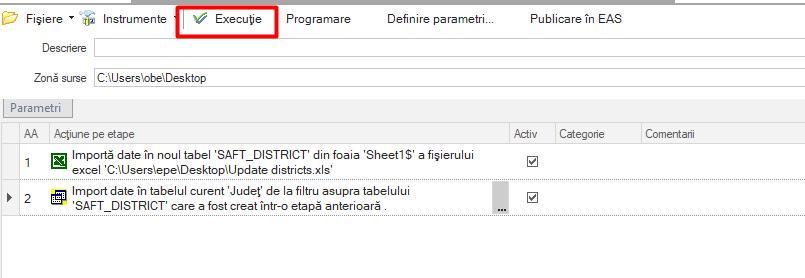
Very important, after adding these files, in order to save the changes made, it is necessary to press the “Execute” button.
After completing the process, following the path below, the scroller should look like this:
Tools and Configuration > Personalization > Personalization > People > Address Data > Counties
12.5. Import GL accounts
Import SAFT GL Accounts, following the same steps for import as in point 4 above.
This import updates the BOM in the path below.
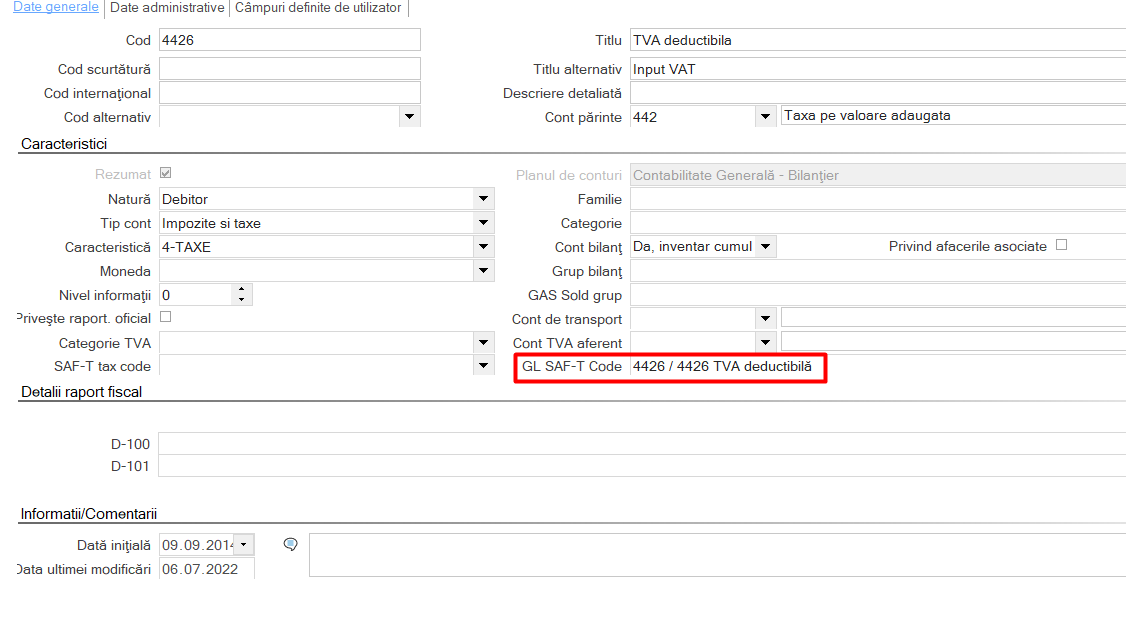
Thus, on the card of an accounting account in the chart of accounts, you can select the corresponding account in the “GL SAF-T Code” field. For the mass update of this field, there is this migration scenario that updates the chart of accounts for the most part.
12.6. Document types and transaction category
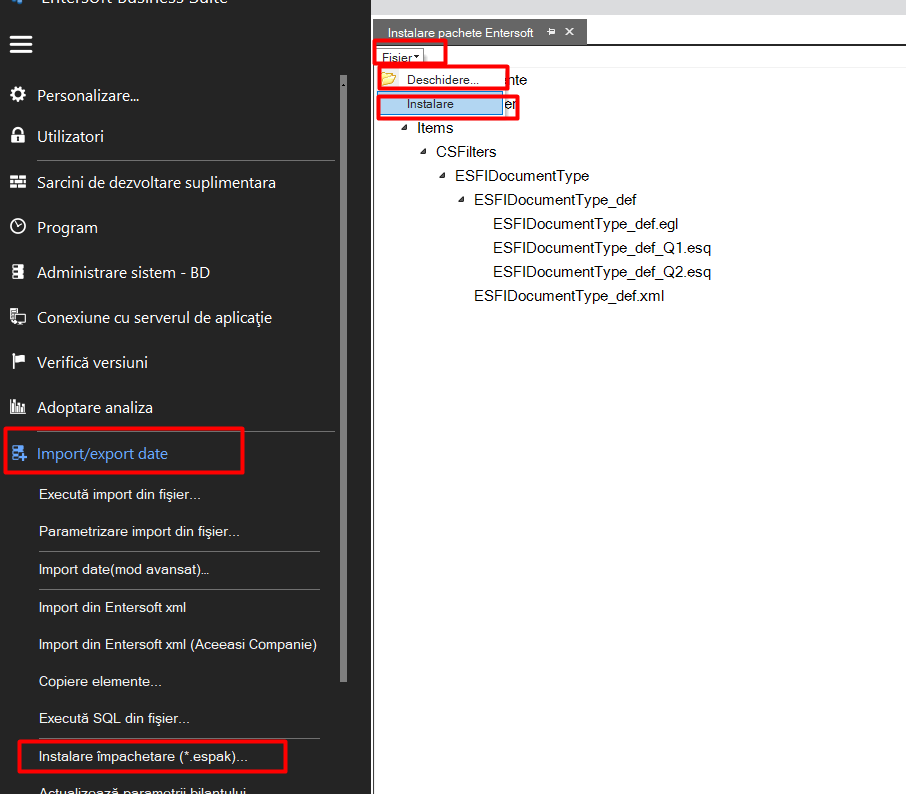
To make it easier to map the document types according to the transaction category, this .espak file was used, following the following procedure:
Intrastat
1. Settings
1.1. Company settings
In order to run the Intrastat declaration several fields need to be filled in the company parameters:
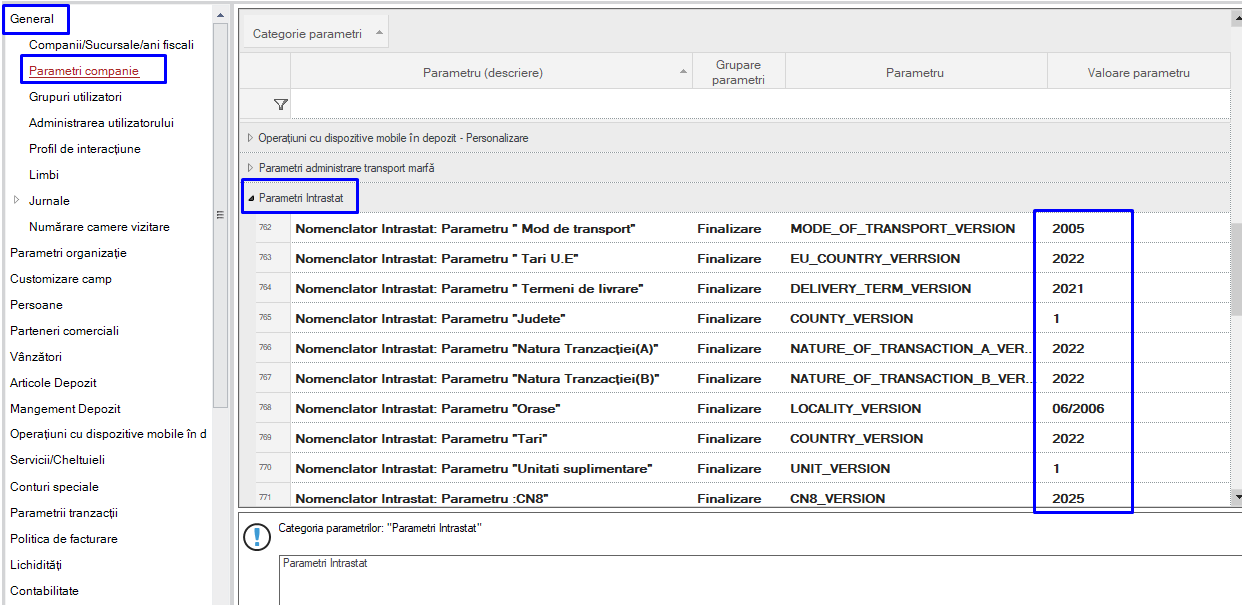
Go to menu (Configuration and tools) > Customization… in General > Company parameters Category: Intrastat parameters
In the parameter field CN8 fills in the year in which the declaration is made (2022, 2023, etc.)
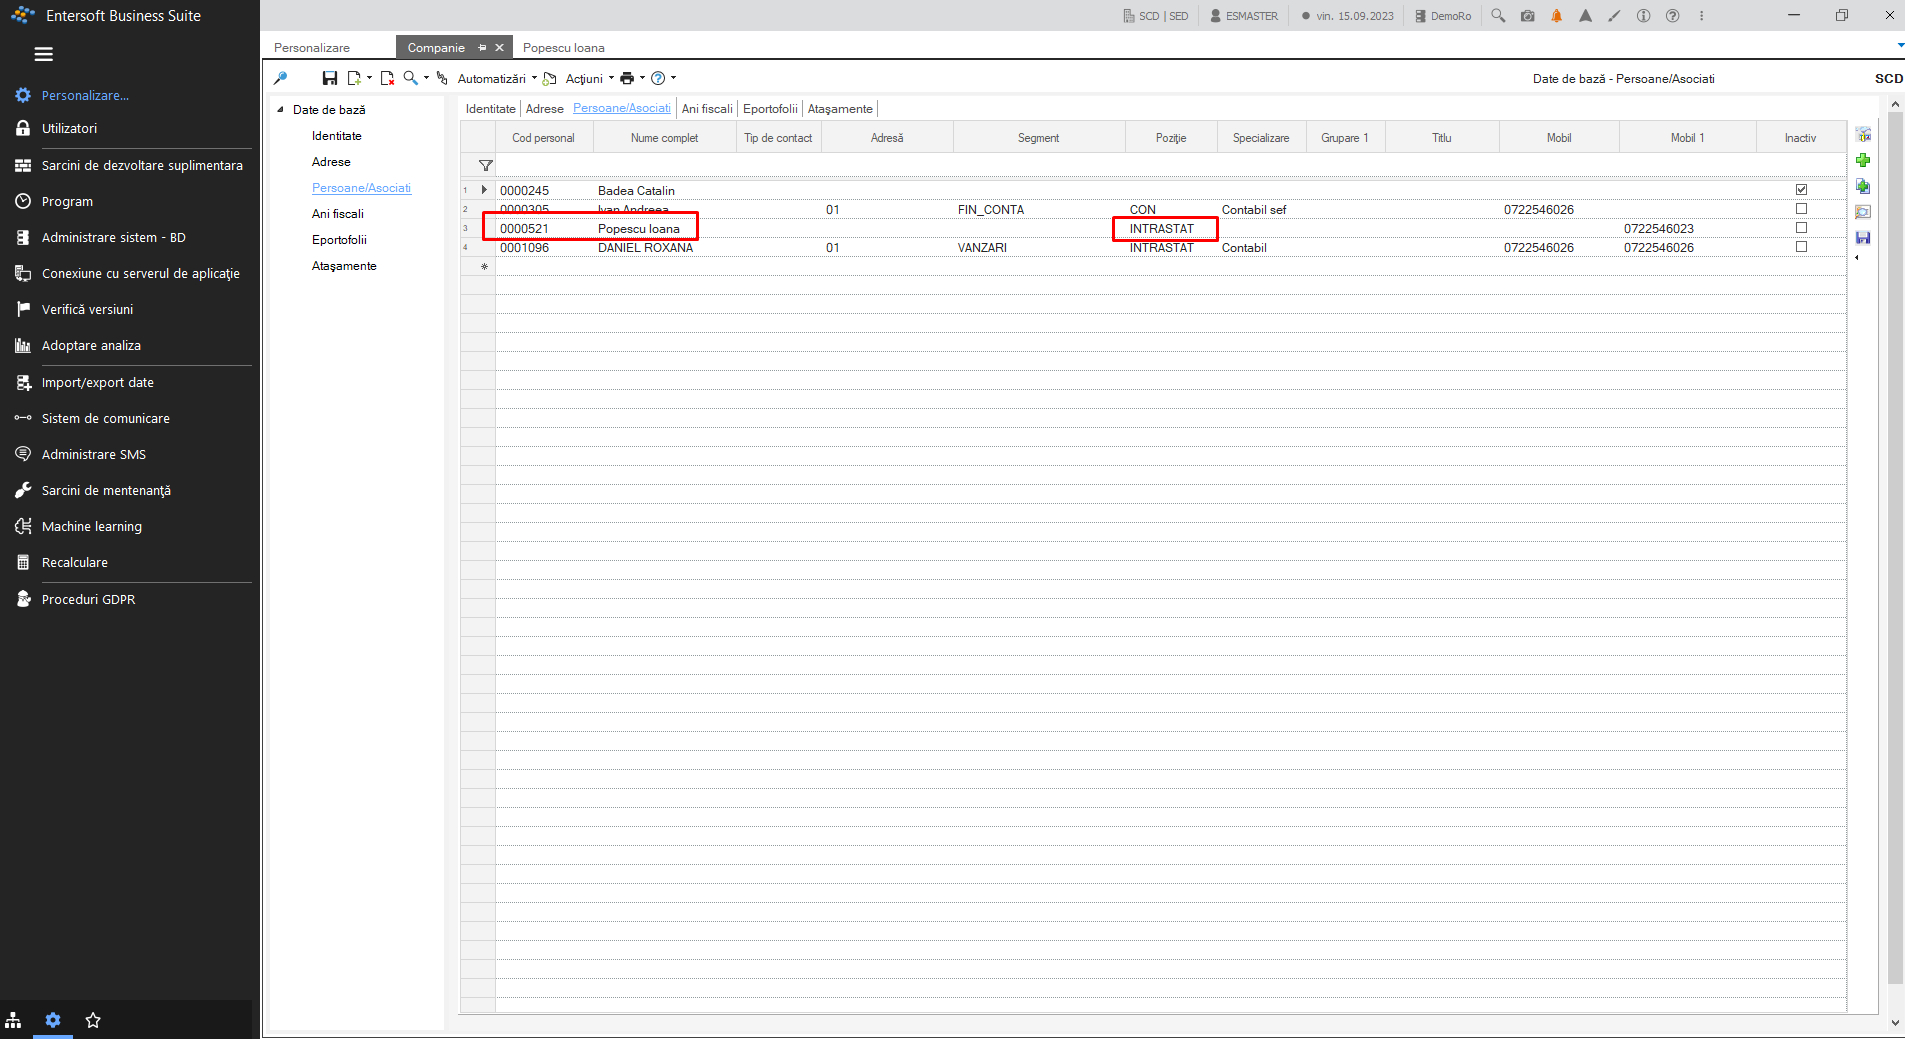
In the field Contact person fill in the code of the person signing the Intrastat declaration.
This person must be set on the company card in persons/associates.
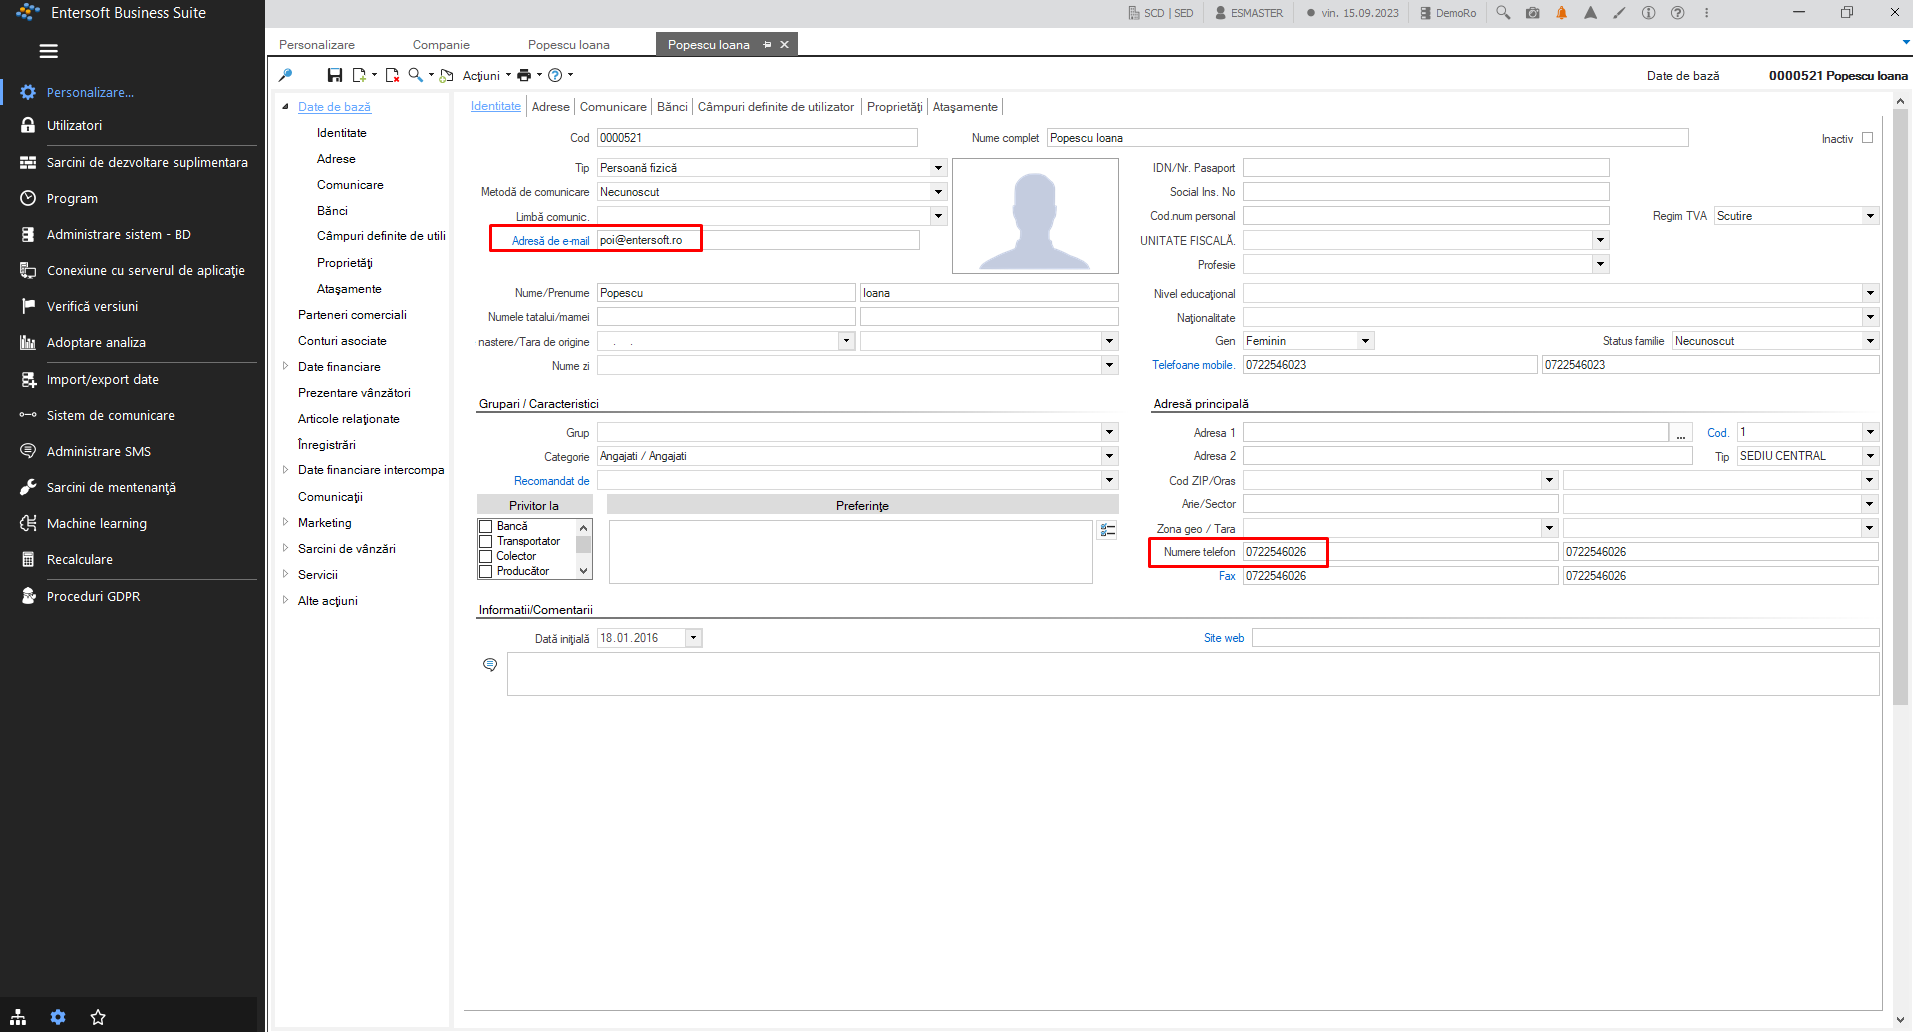
The person must have completed the Intrastat position, telephone number and email address. The following fields must be completed on the person’s card:
If these fields are not completed, the declaration is not visible.
In the field UDF document line to define the country of origin of the item choose Comment 1, 2, 3, 4 or 5 from the document line, if nothing is filled in the declaration, the country of origin of the product bought/sold will be the one on the item card.
1.2. Document settings
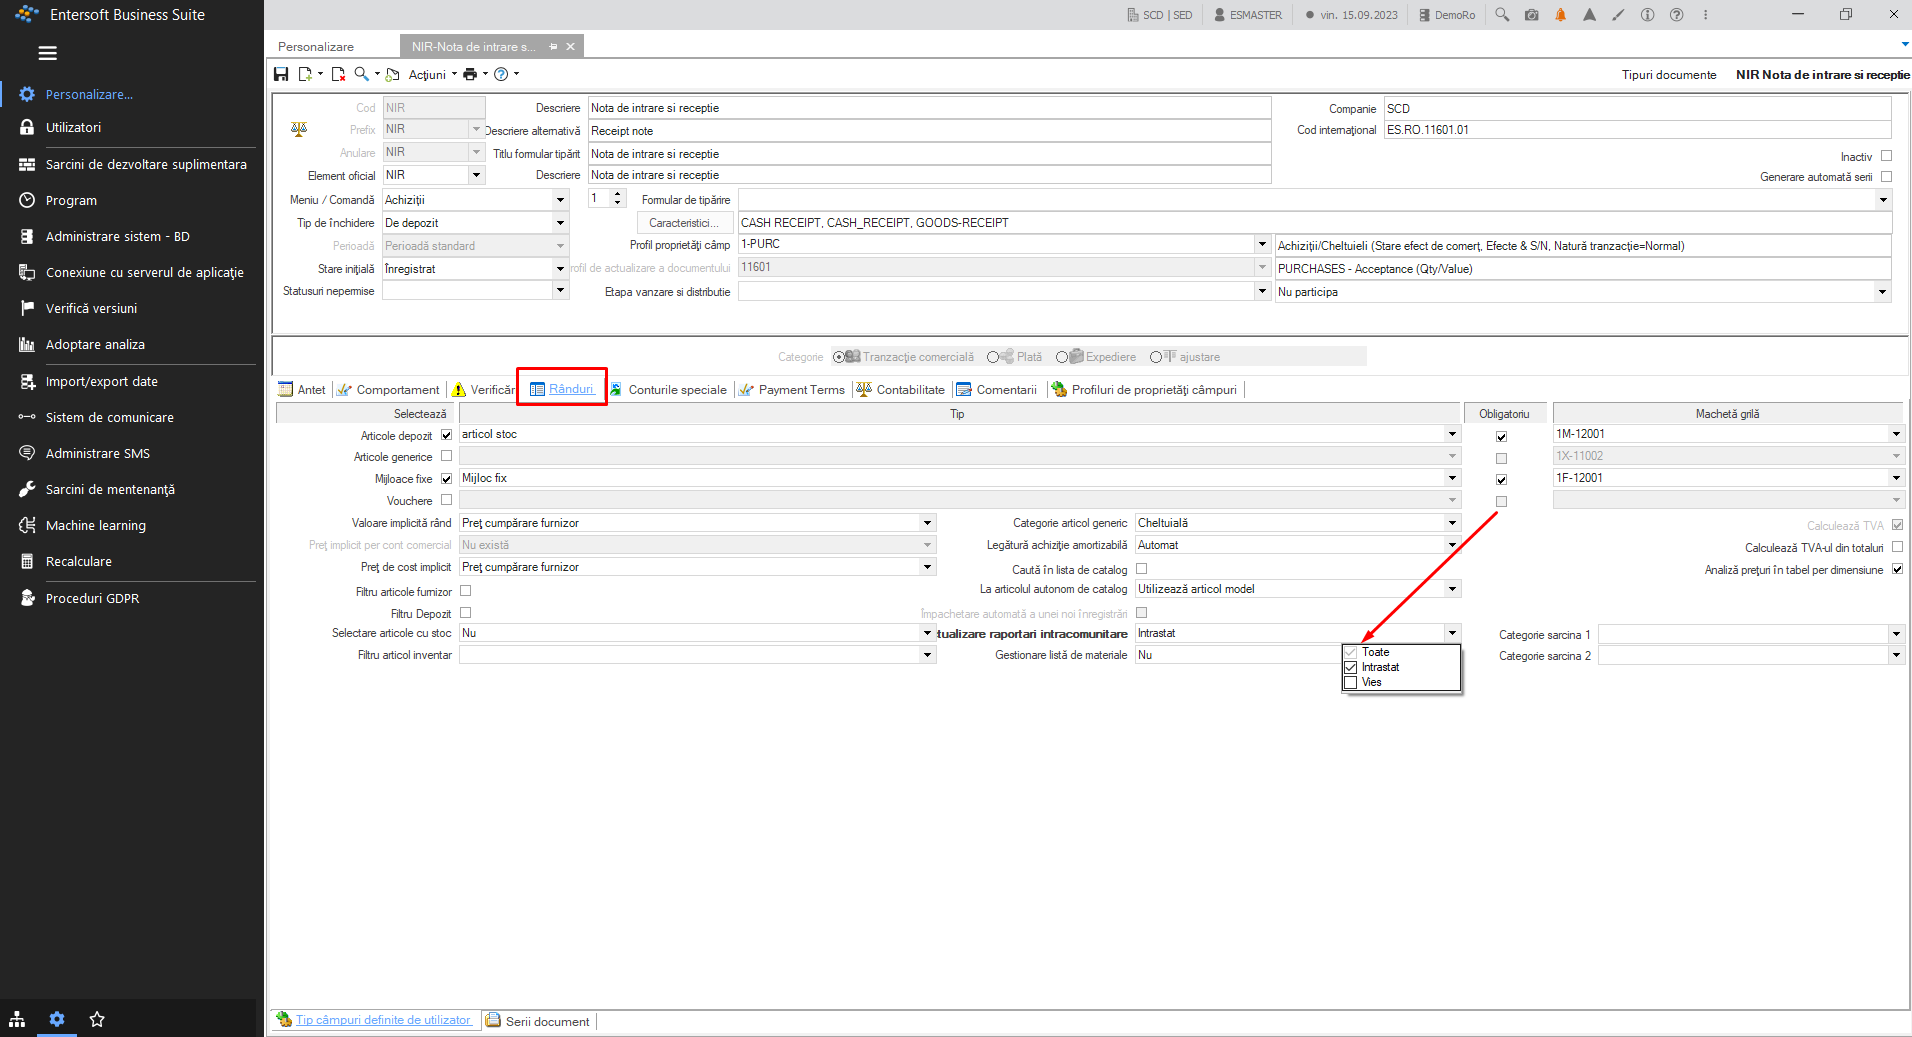
It is necessary to set the purchasing documents specifically for the type of declaration.
This setting is done on the document card and is accessed via:
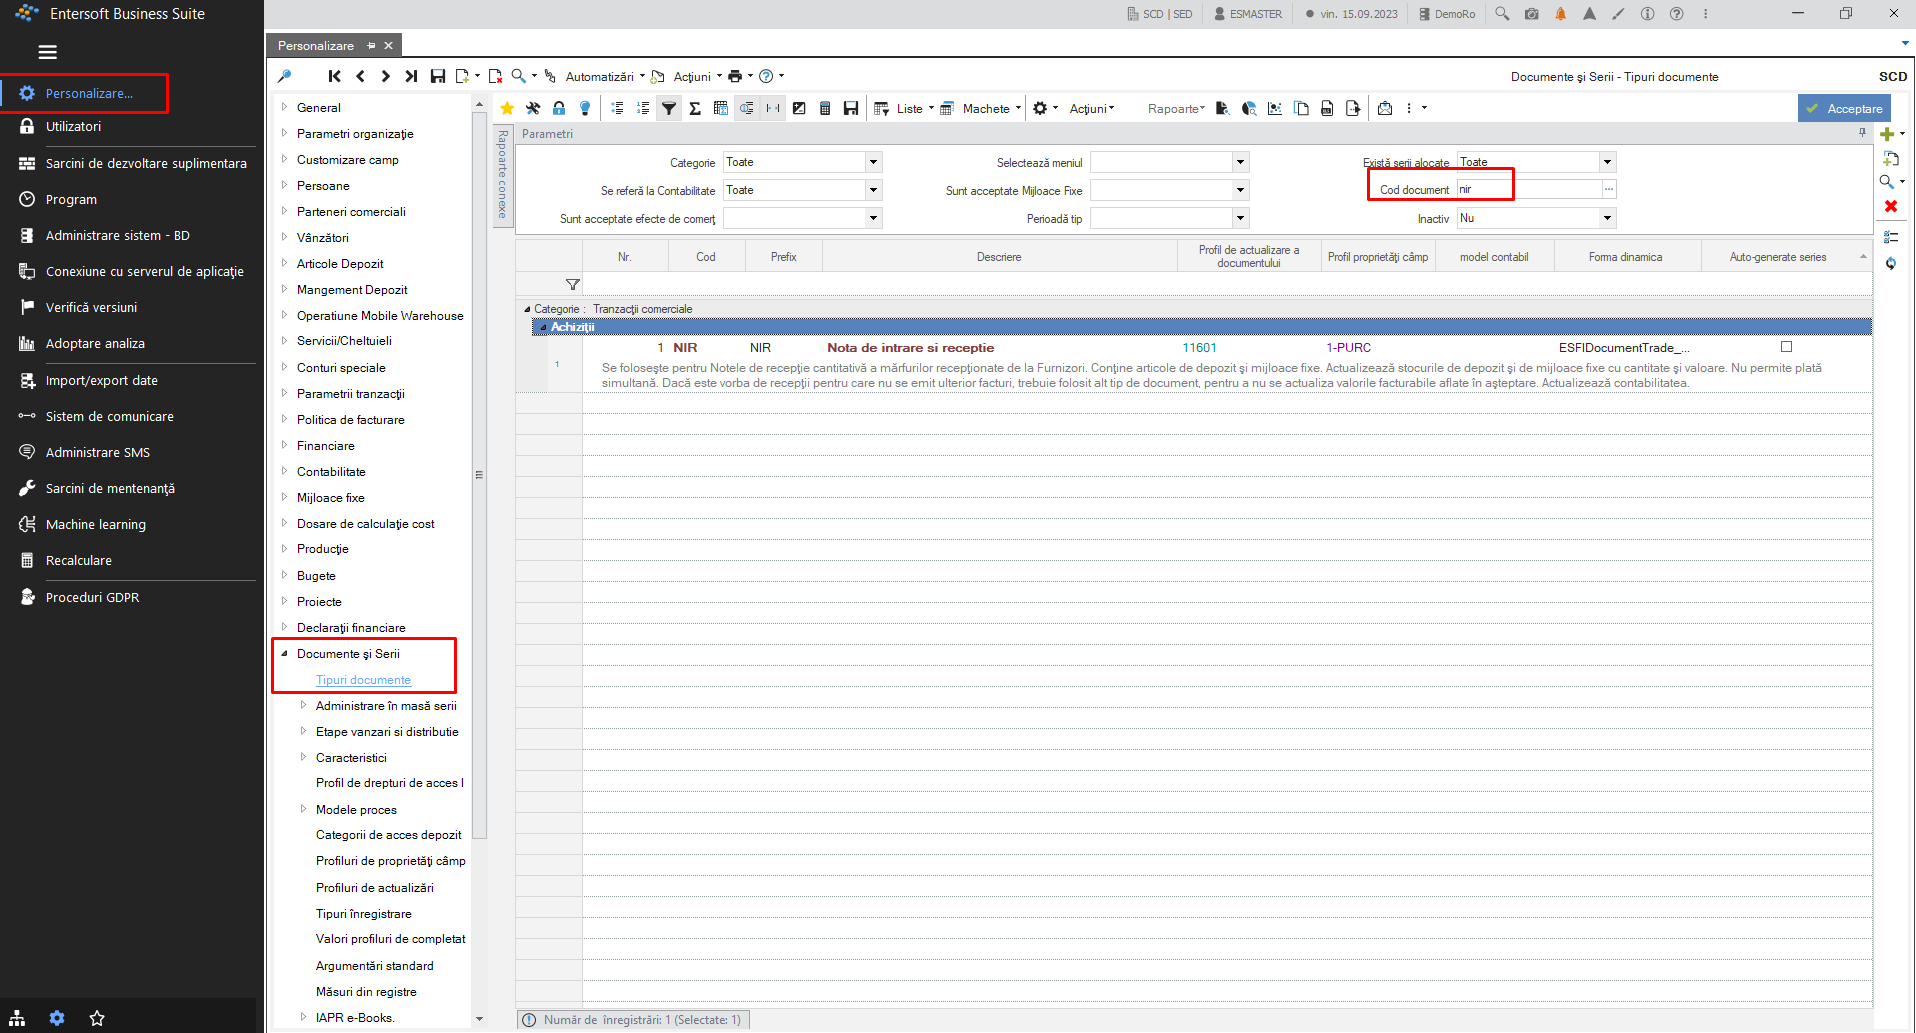
(Configuration and tools) > Customize…> General / Documents & Series - document type - document search.
1.3. Partner settings
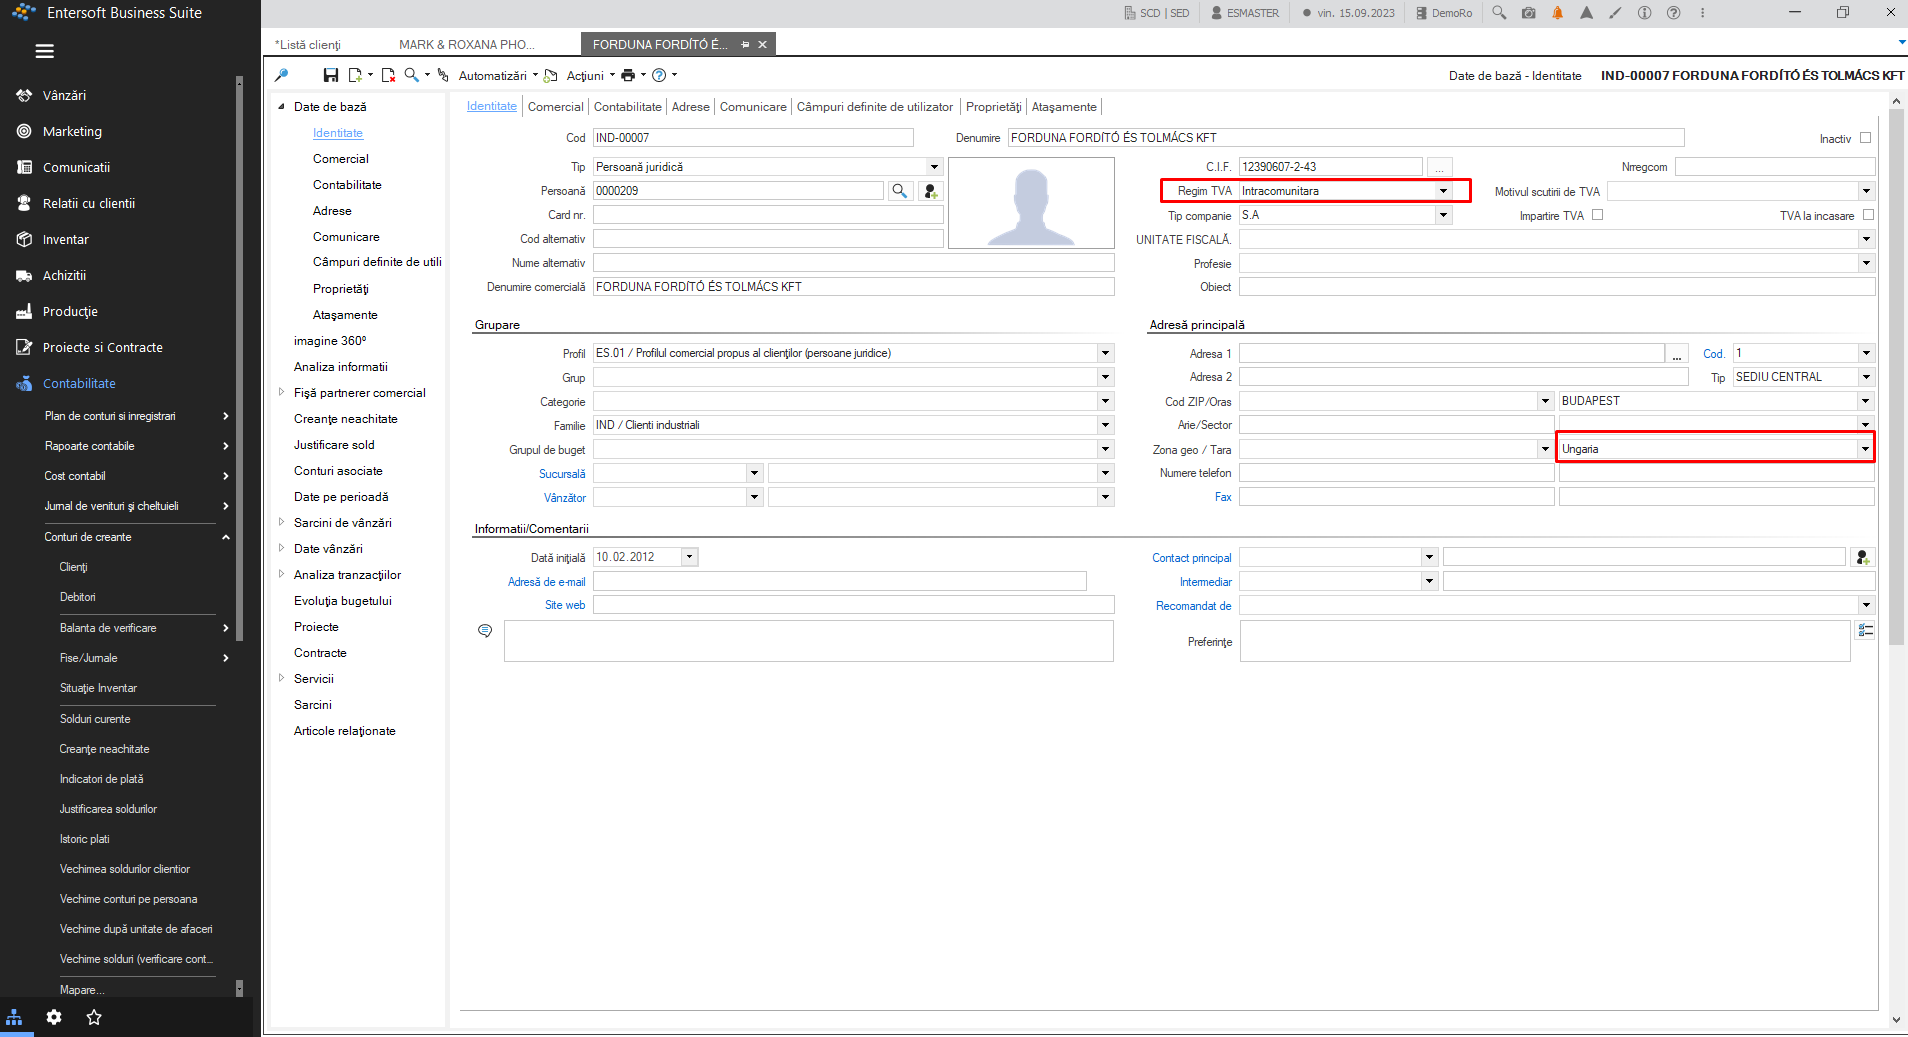
The following fields must be completed on the trading partner card:
VAT - Intra-community;
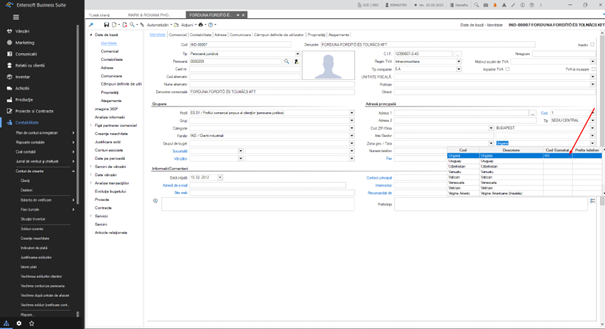
The country set on the commercial account card must have the Eurostat code filled in;
If the partner has more than one delivery address, check that the delivery address is set to the country.
The partner’s tax code must be completed.
If changes need to be made to the country table, it can be set using the path below:
If new lines are to be inserted, click on the green plus sign on the right side of the report and fill in the report line.
1.4. Stock item settings
A stock item must have the following set
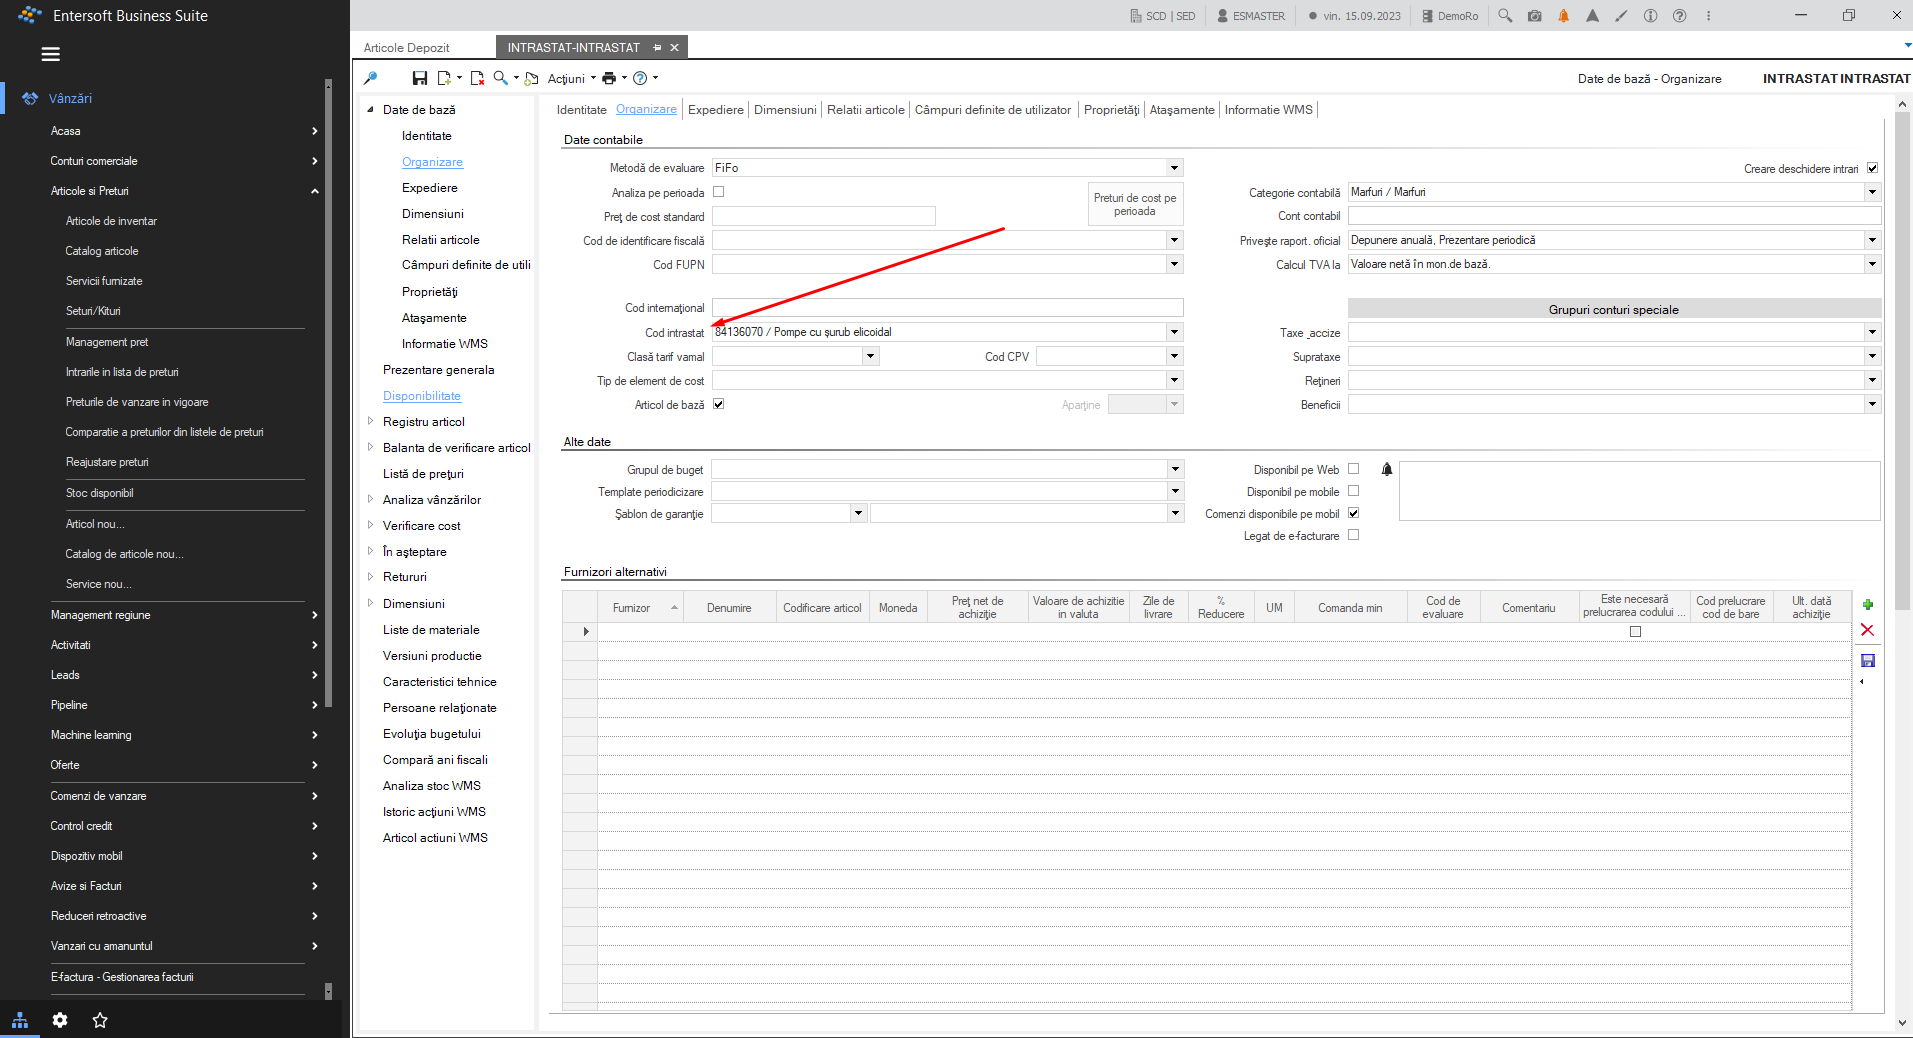
Intrastat code (can be found on the item card in the Organisation area)
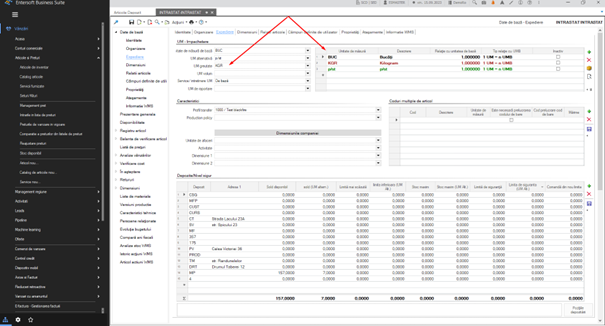
Unit of measurement for weight, which must be related to the base unit of measurement.
Alternative unit of measurement (for Intrastat codes requiring such a setting). This unit of measurement must be set in relation to the base unit of measurement.
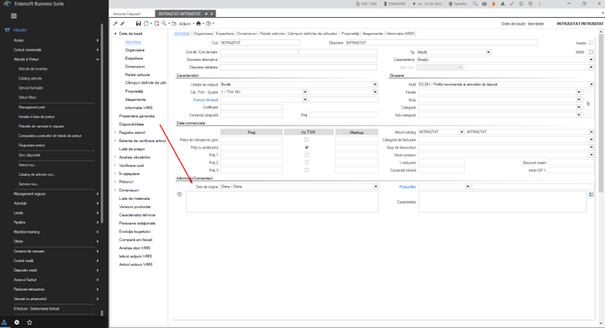
Country of origin
1.5. Generic item settings
Generic articles are of two types:
services;
expenses.
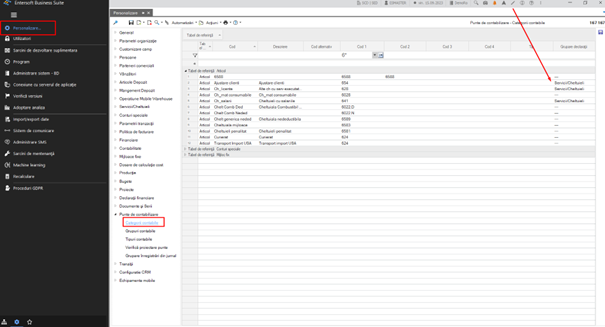
They must be set with the accounting category on their card and this must be set as such in order to be highlighted on statements:
1.6. Intrastat codes
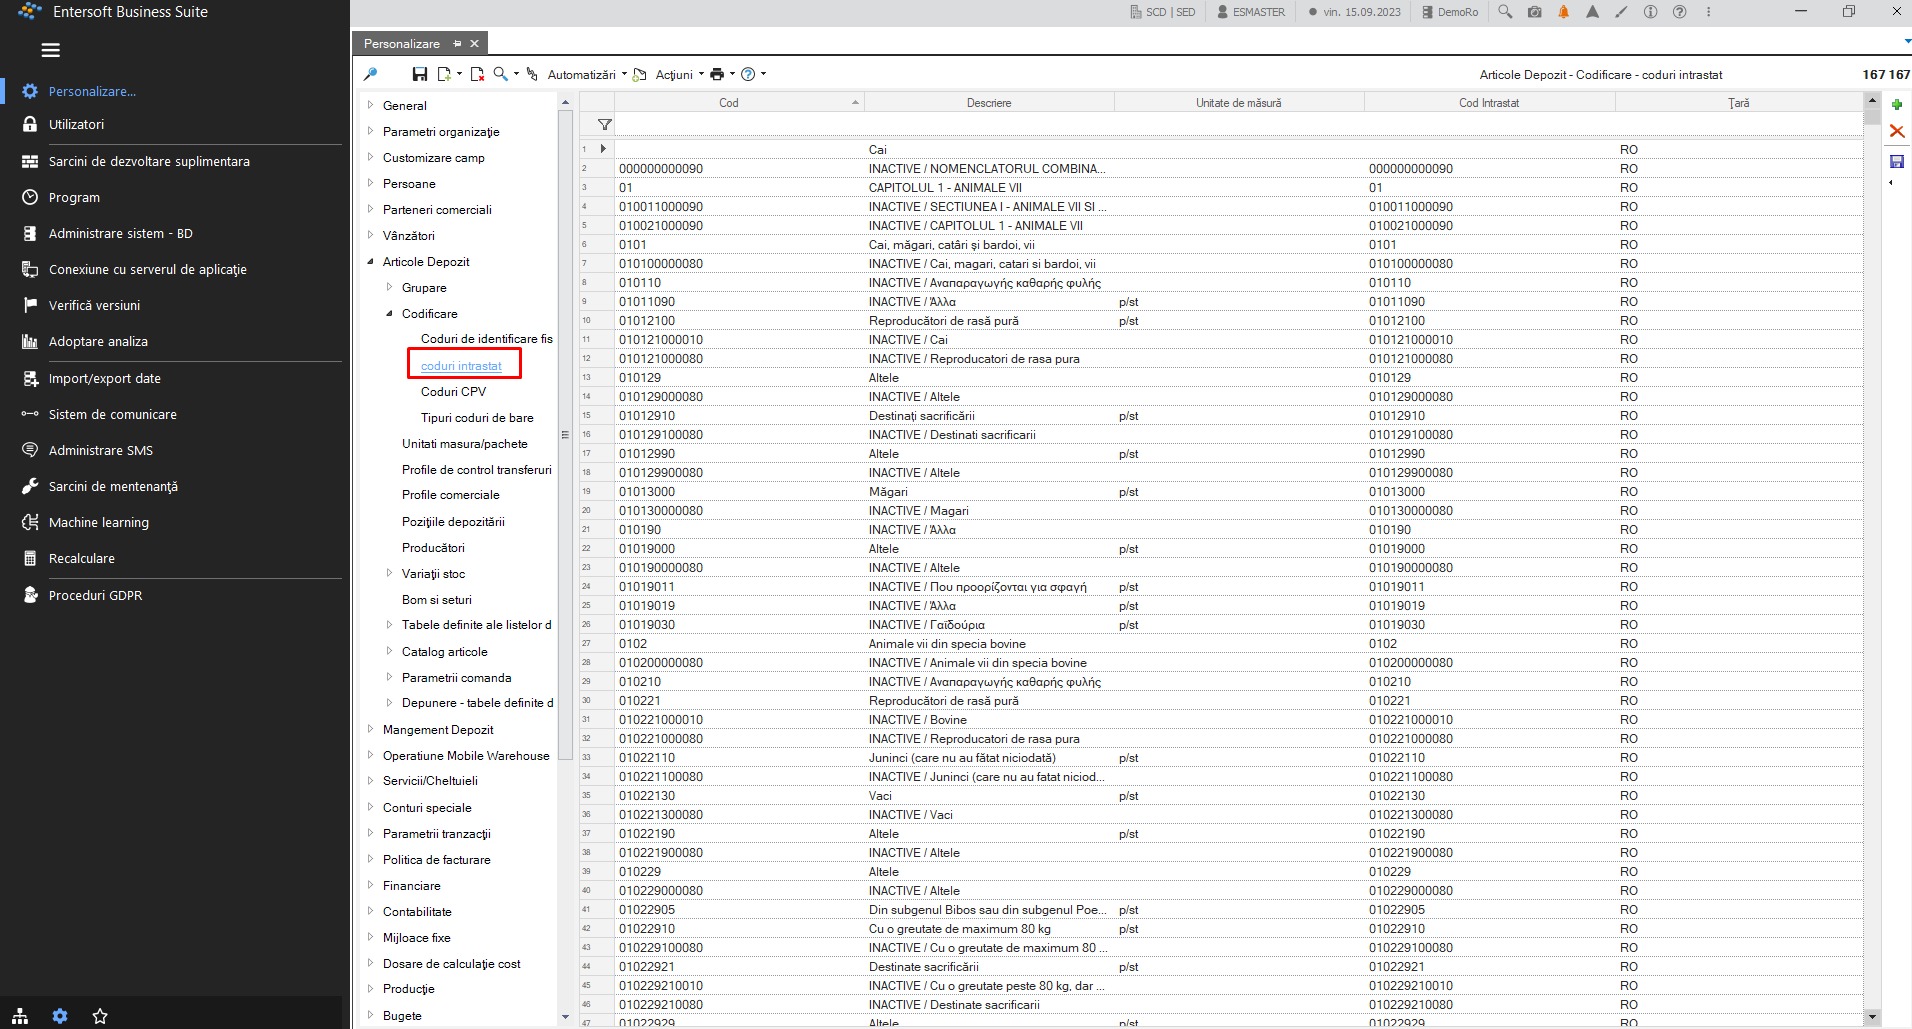
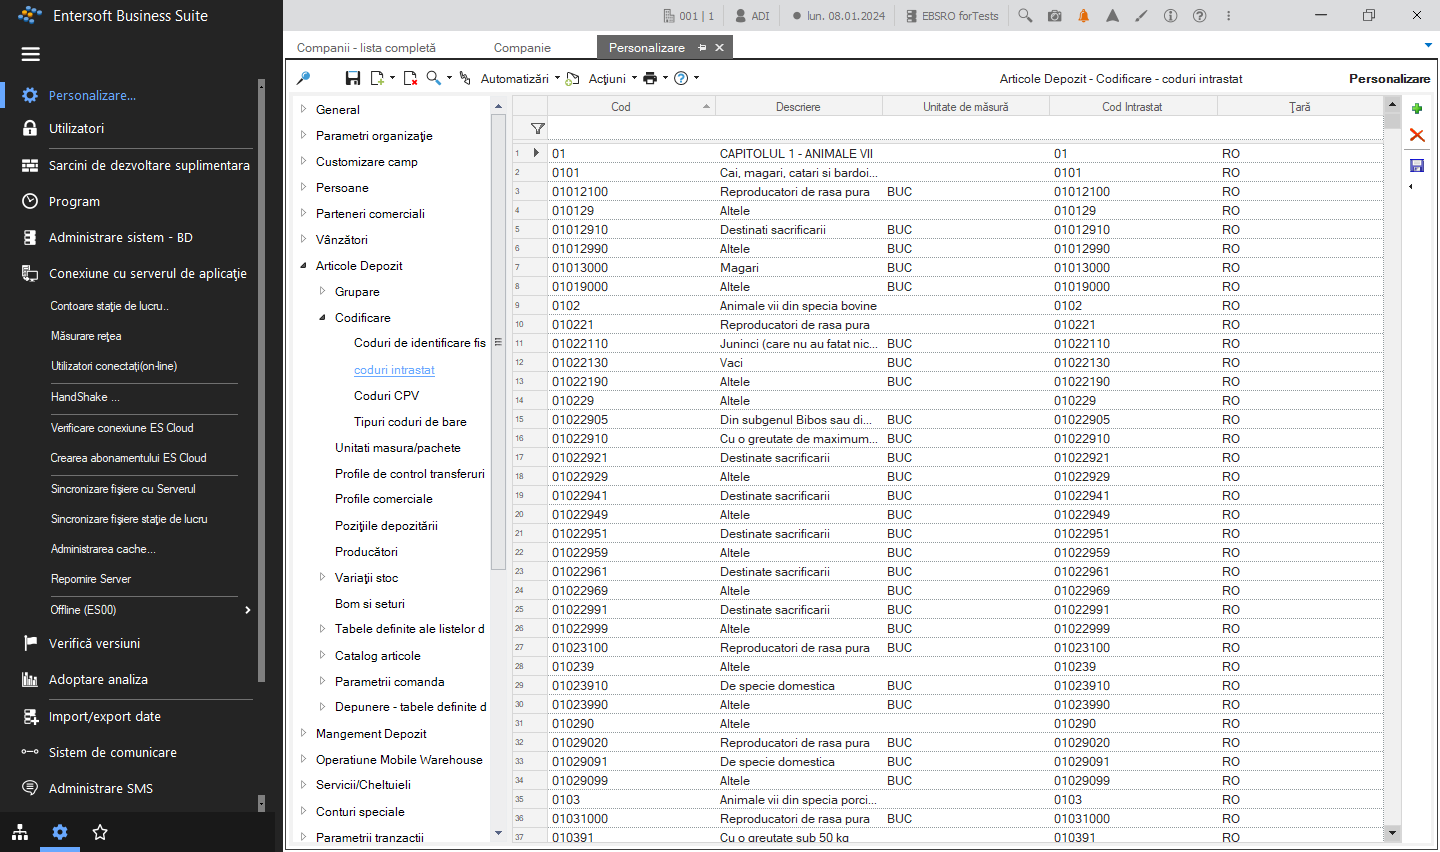
Intrastat codes can be found in the menu (Configuration and tools) > Customisation > Warehouse items > Coding > Intrastat codes.
1.7. Importing new nomenclatures with Intrastat codes
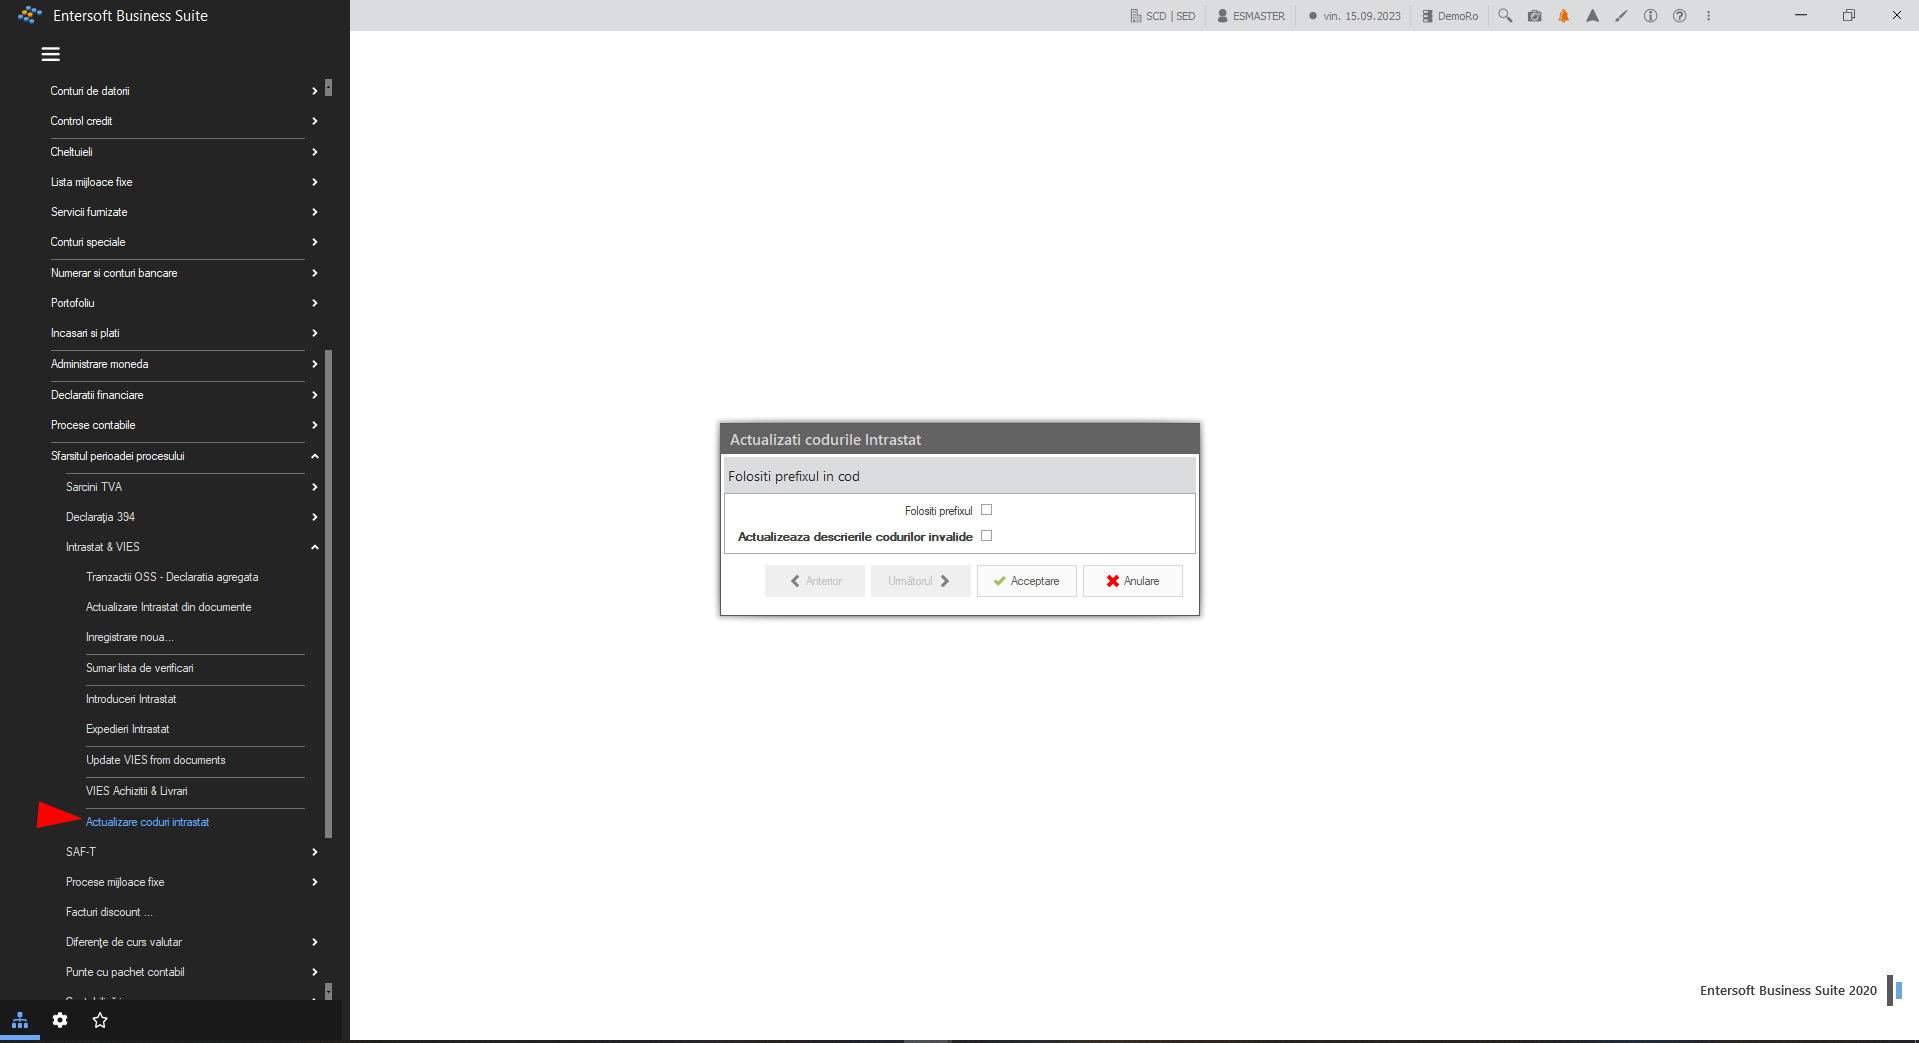
To update Intrastat codes, perform the Update Intrastat codes operation found in the menu:
Accounting > End of process period > Intrastat and Vies > Update Intrastat codes
File type IntrastatCodes.xlsx should be saved to the application folder following the path:
After saving the file, run the Intrastat Codes Update process:
In the open window we make the following selections as appropriate:
Check the box Use prefix ONLY if the company HAS shared database with other countries; Warning! If you use a common database in more than one country, in the next screen use the SAME prefix for Romania as already used so far, so that mapping [Prefix]+[IntrastatCode] does an update not an insert into the database**.** If you have not checked the use of the prefix, or if in the next window you do not enter the prefix, the update in the DB will be done in the default country for which the application works.
Check the box Update descriptions of invalid codes to “inactivate” the old codes. Inactivation of codes is achieved by changing the item name (e.g. INACTIVE / Weighing less than 50 kg); Attention! The Intrastat code update process will not delete codes that are no longer valid but will add the word INACTIVE to their description.
Important! The update process will update not only the Intrastat codes but also the units of measurement so it is recommended to check the units of measurement after running this process.
After “Accept” the process of updating Intrastat codes will start.
In the case of bases with more than one country, when running the update of the nomenclature the system will send a warning that there are Intrastat codes for other countries, the warning can be ignored if the prefix is ticked.
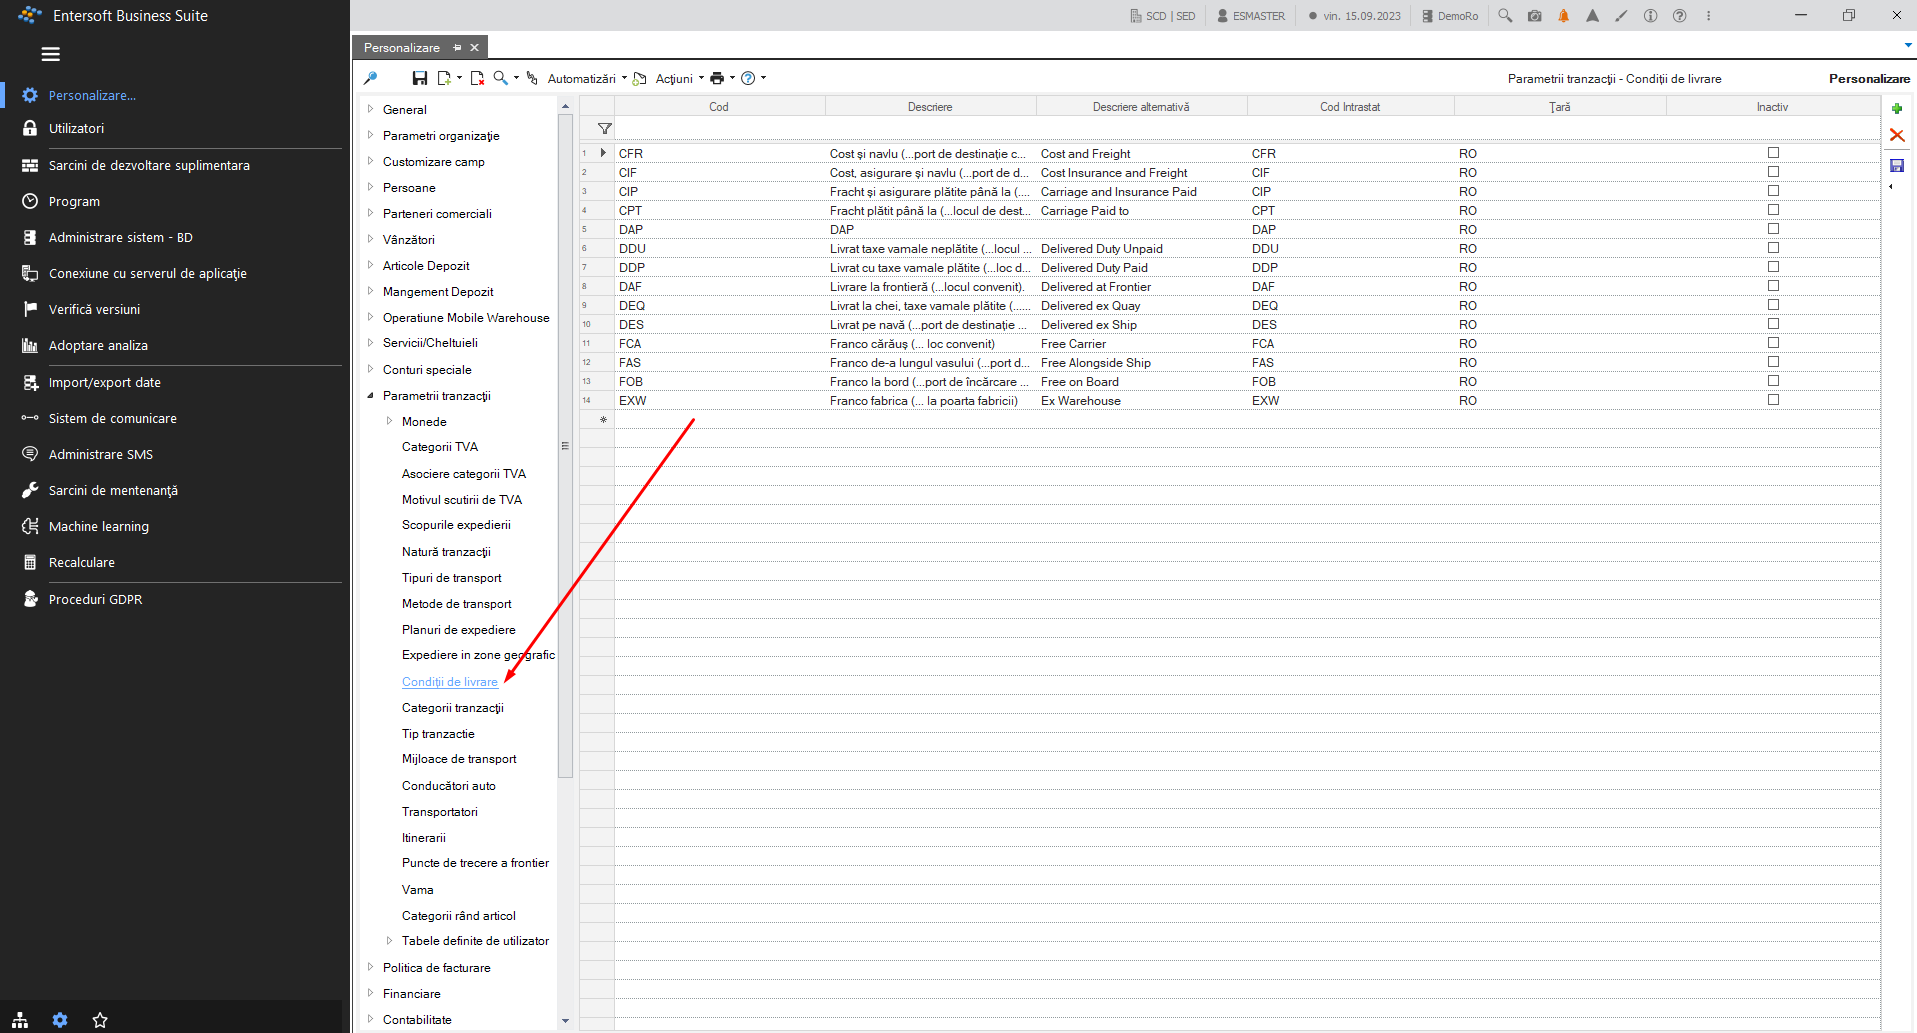
1.8. Delivery conditions
Delivery conditions are set in the menu:
(Configuration and tools) > Customize…> General > Transaction parameters > Delivery conditions
With the green plus on the right, new delivery conditions are added.
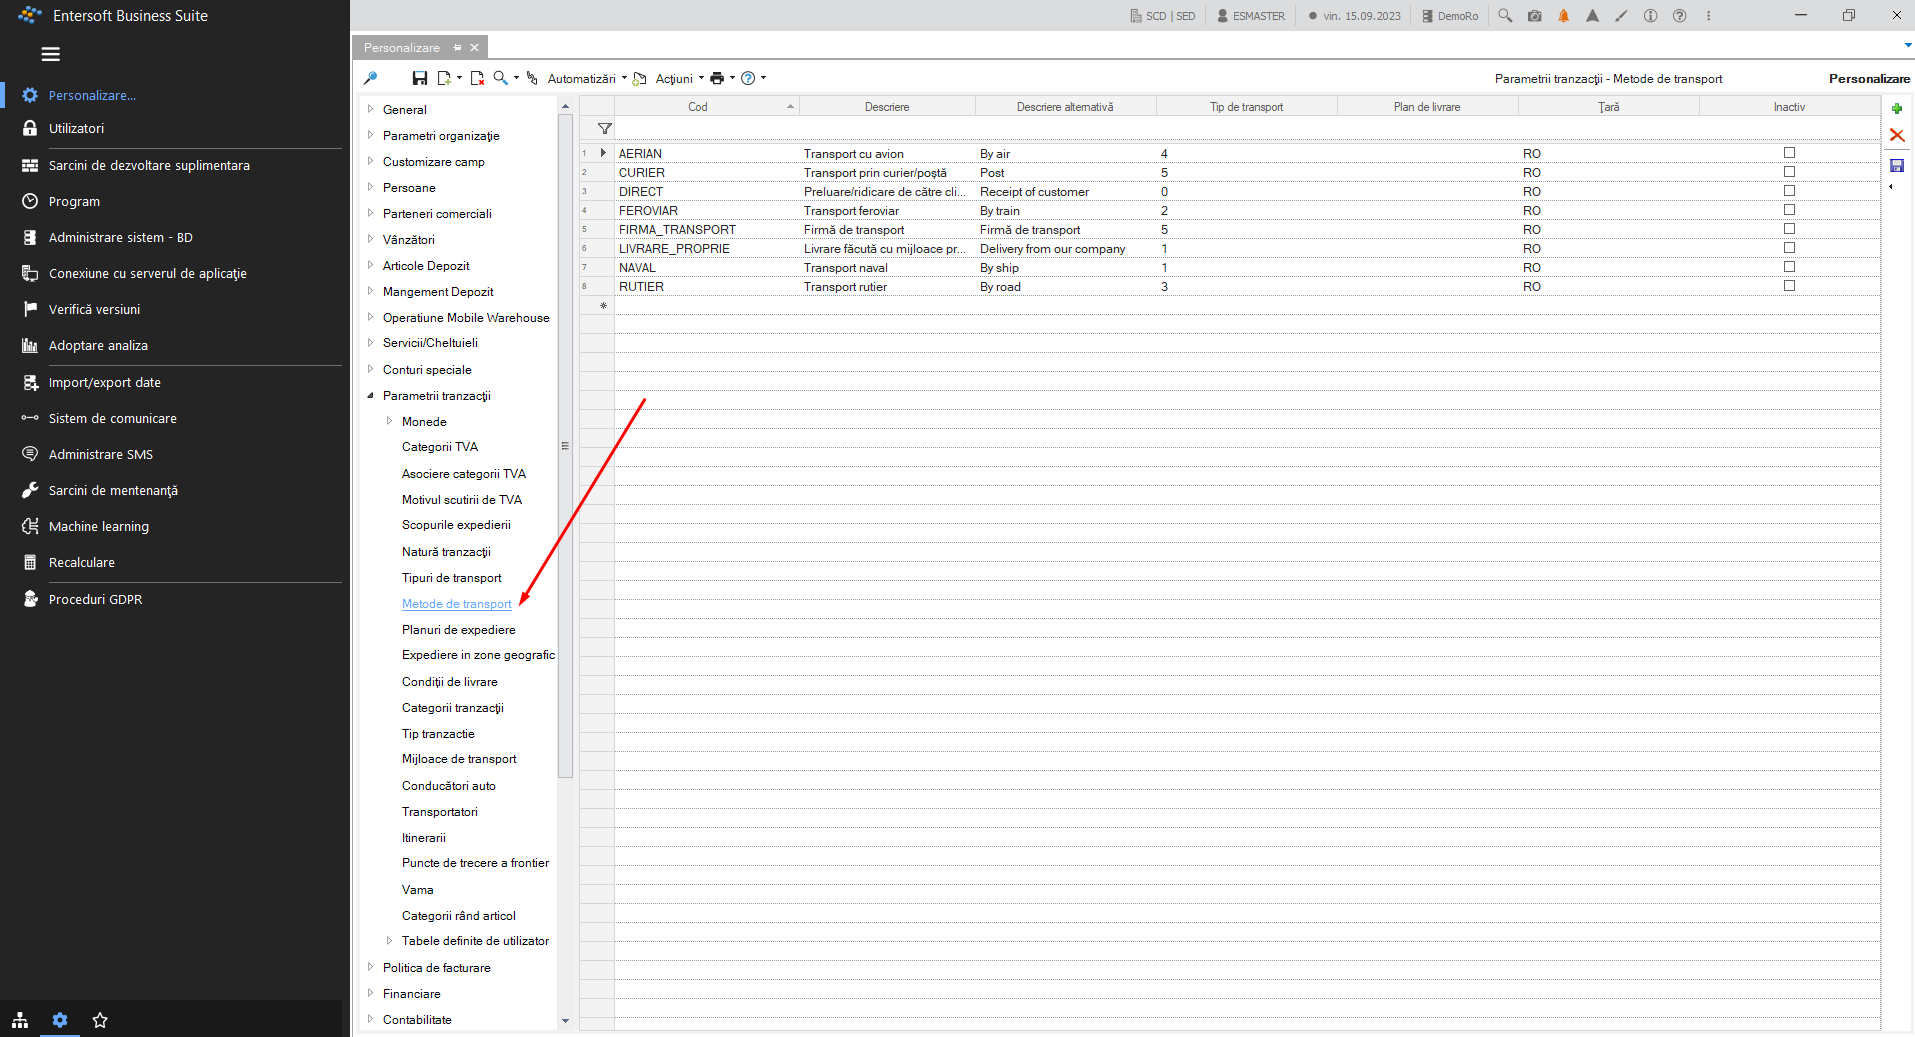
1.9. Shipping method
Shipping methods are set in the menu:
(Configuration and tools) > Customize…> General > Transaction parameters > Shipping methods
With the green plus on the right, new transport methods are added.
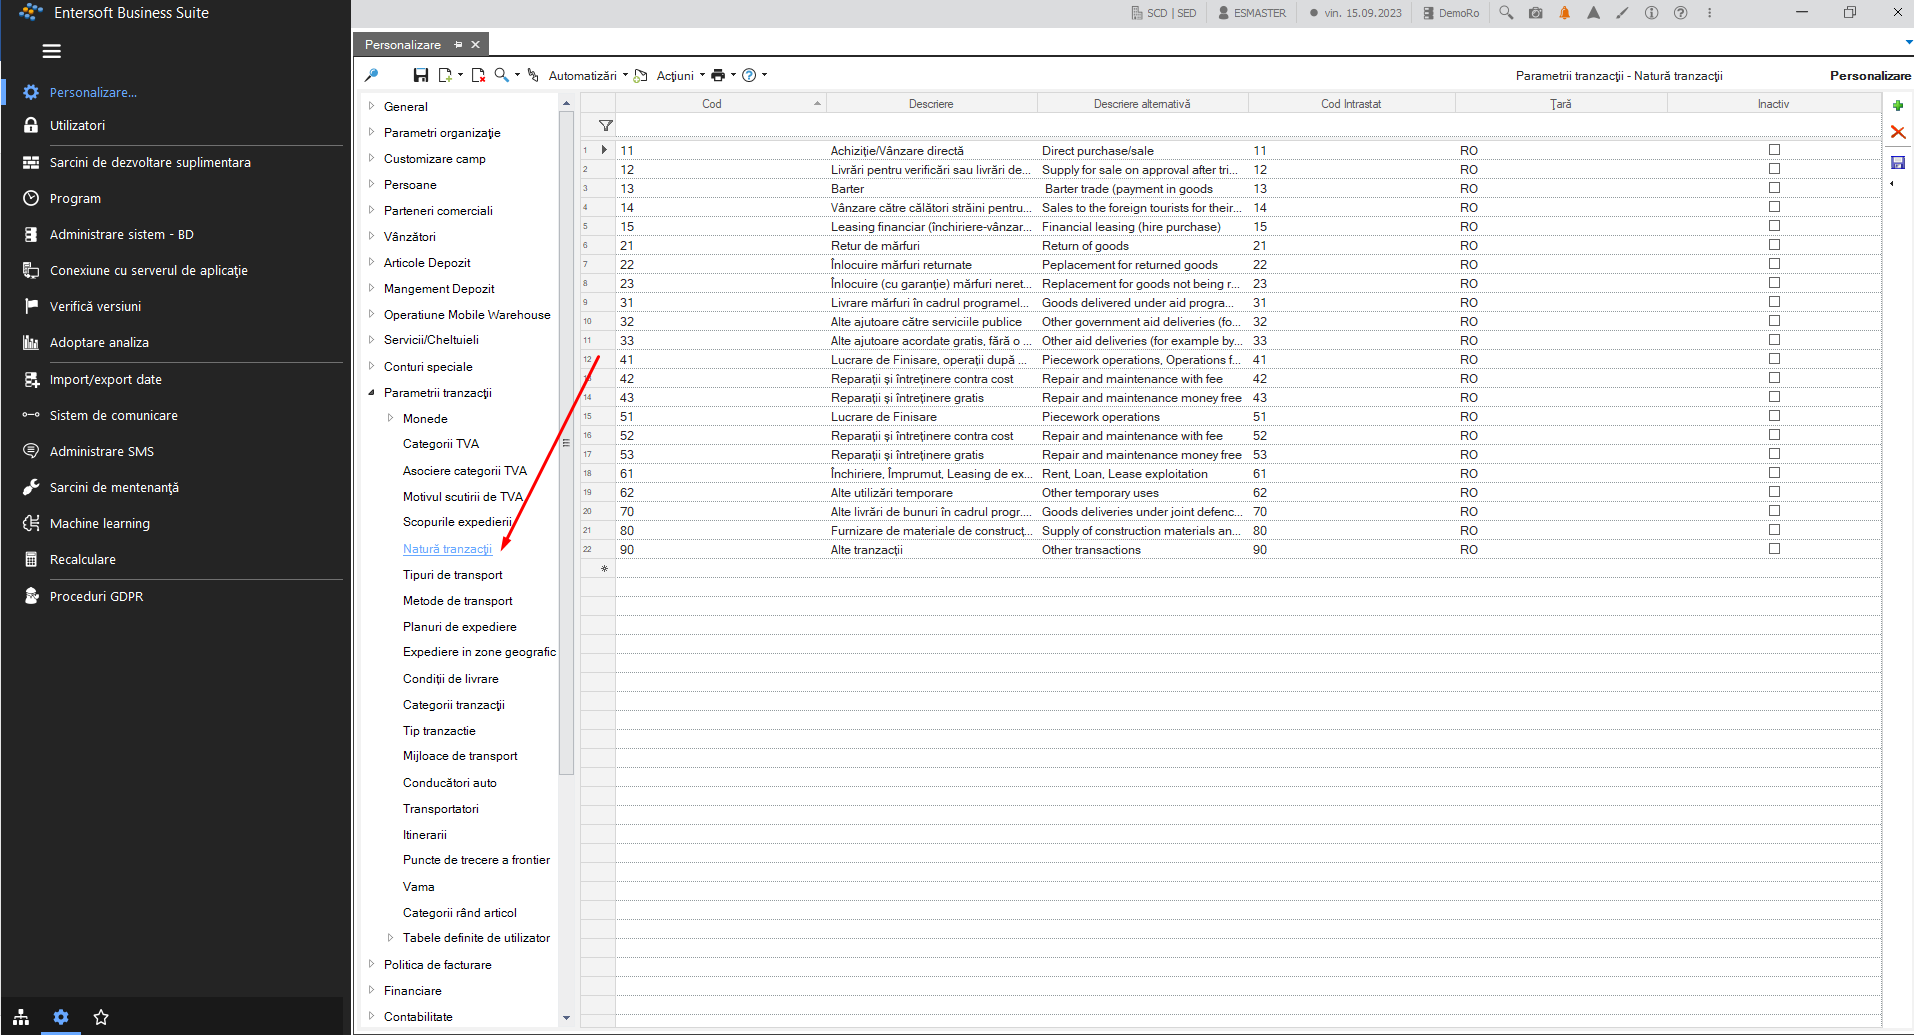
1.10. Nature of the transaction
The nature of the transaction is set in the menu:
(Configuration and tools) > Customize…> General > Transaction Parameters > Transaction Nature
With the green plus on the right, new transaction types are added.
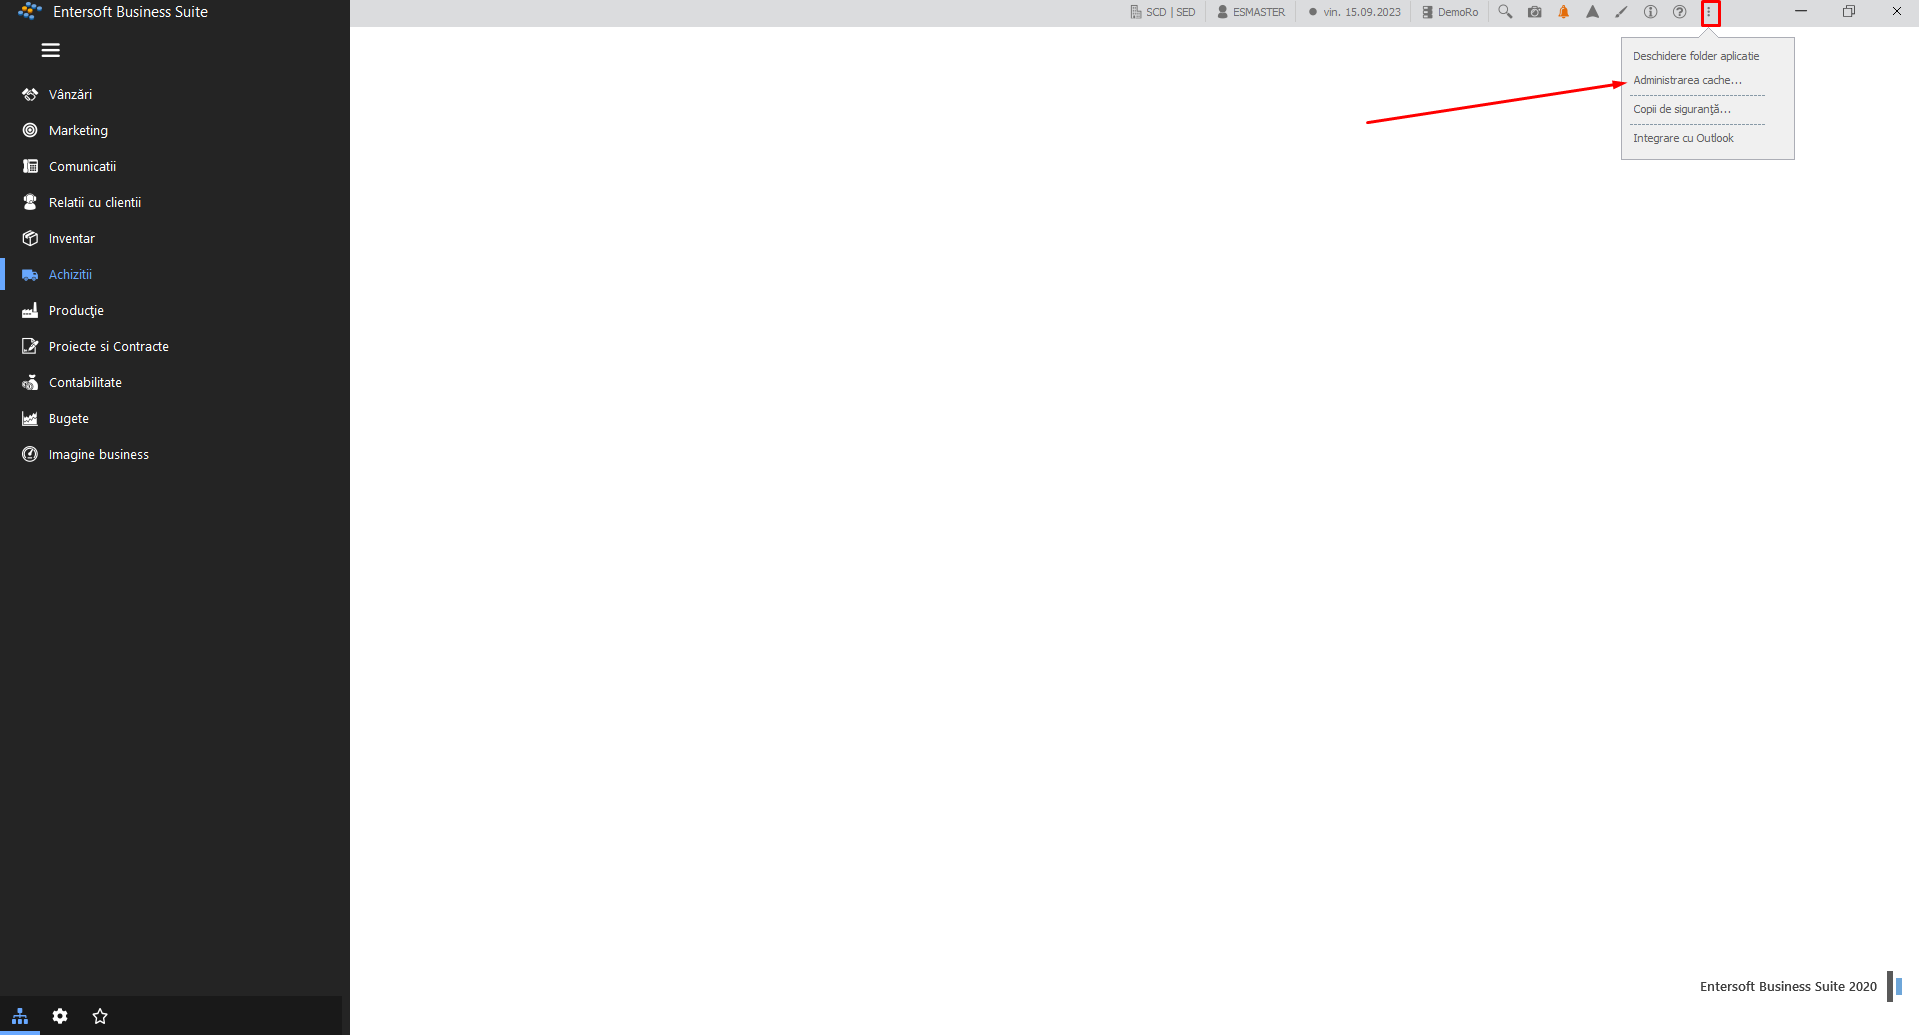
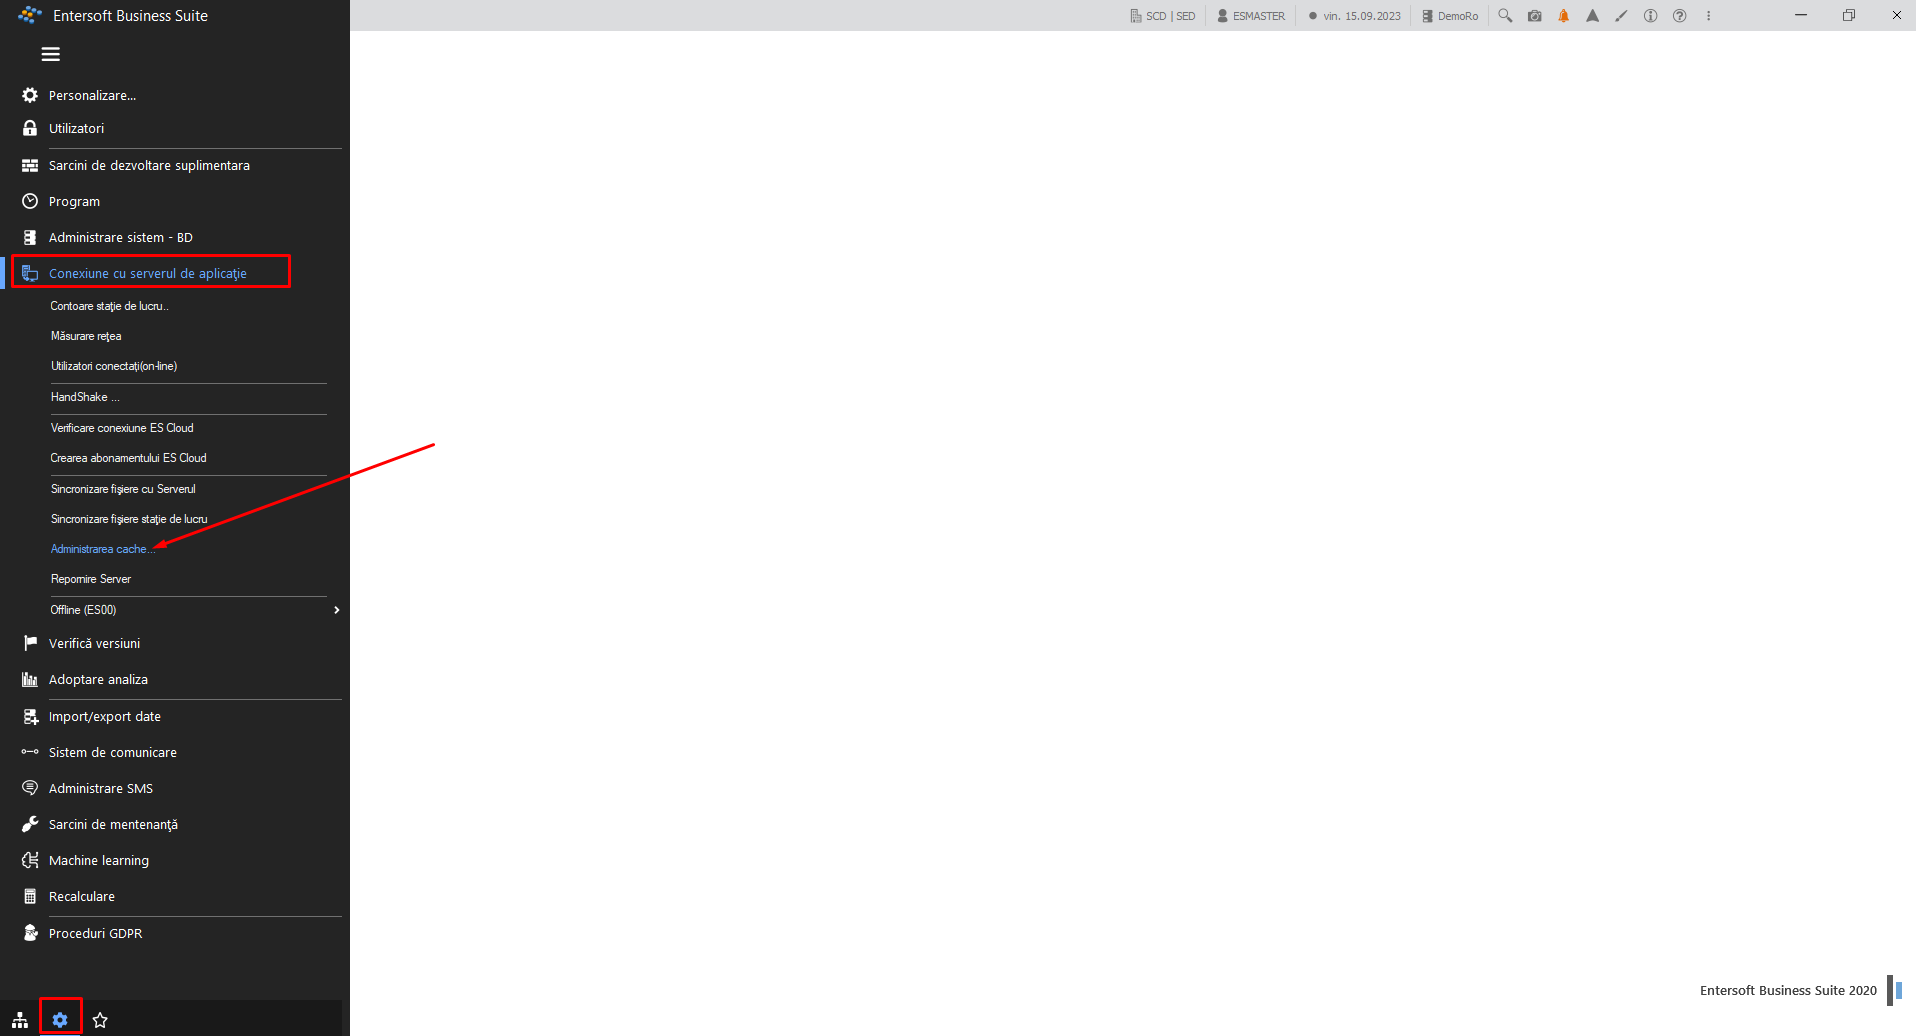
Attention! After any changes are made, the information needs to be saved and the Cache Administration run.
sau
2. Document registration
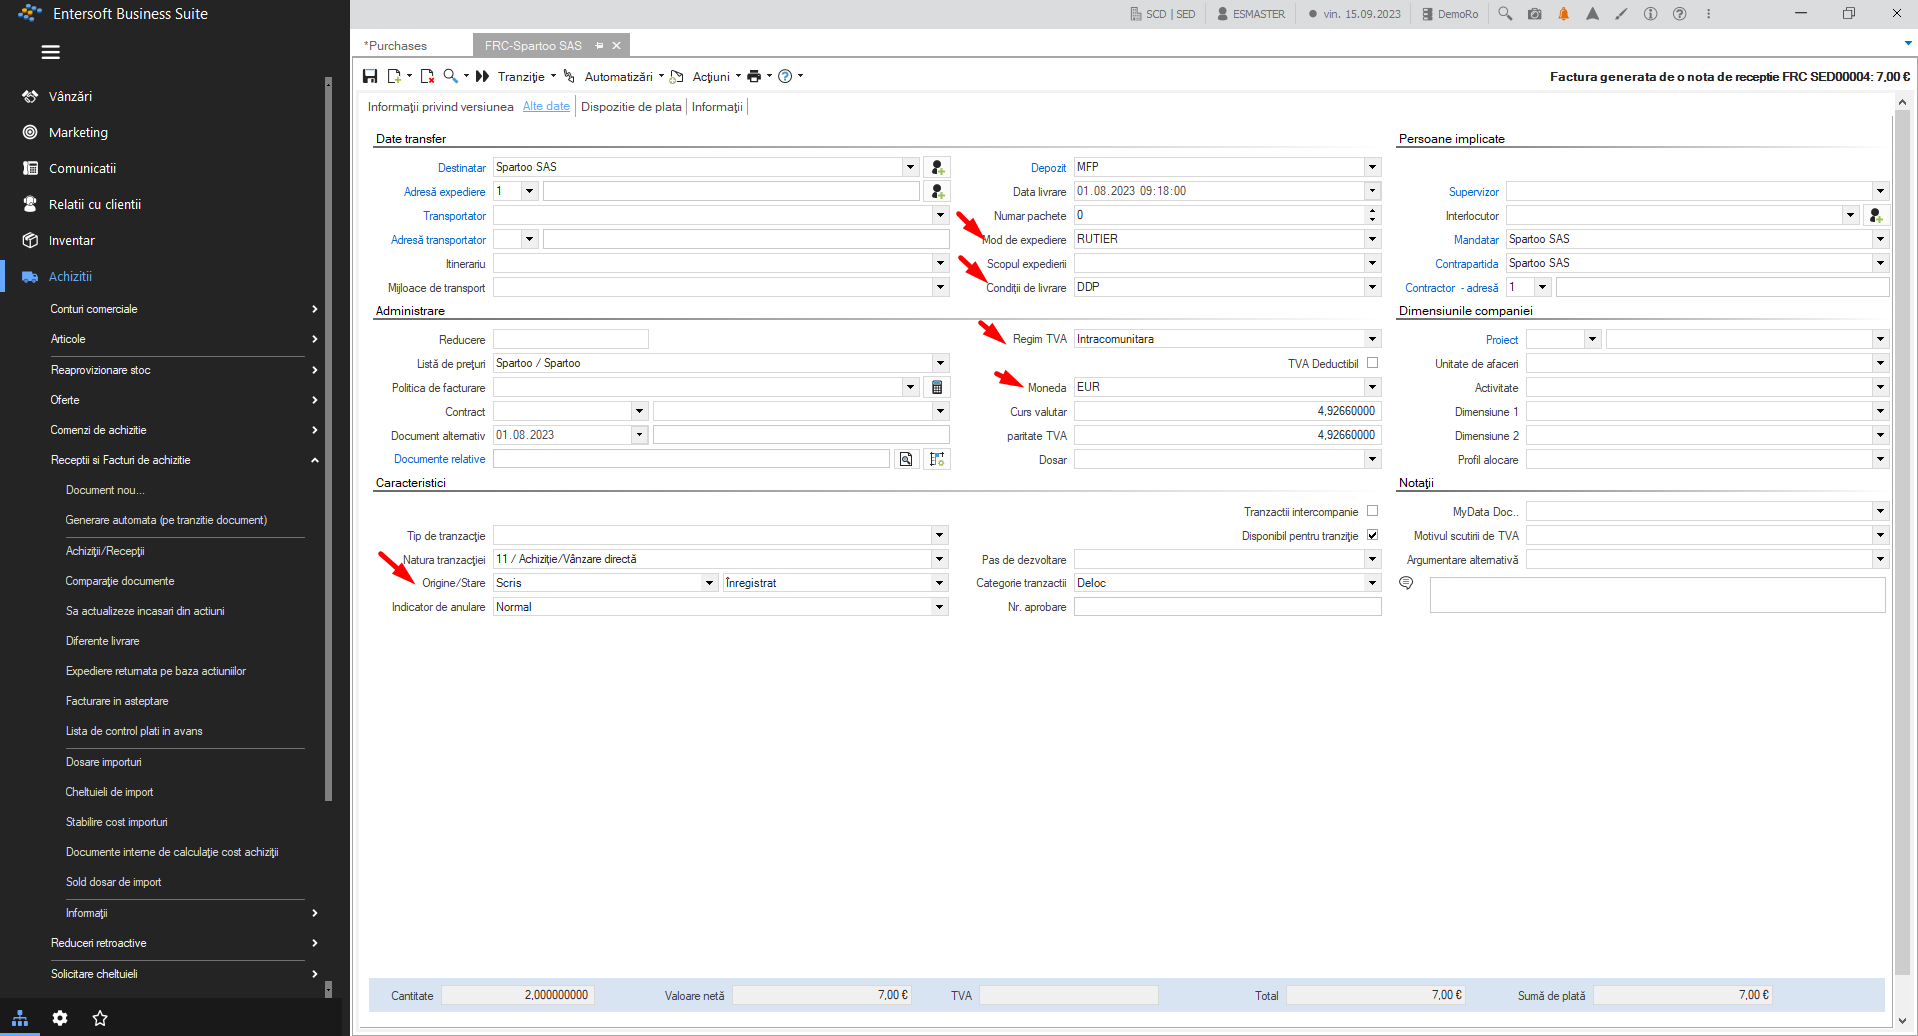
The following fields must be completed on the documents
Intra-Community VAT system
Currency - Euro
Delivery conditions
Shipping Method
Nature of the transaction, and the nature of the transaction must be among those accepted by Intrastat.
3. Intrastat manual records
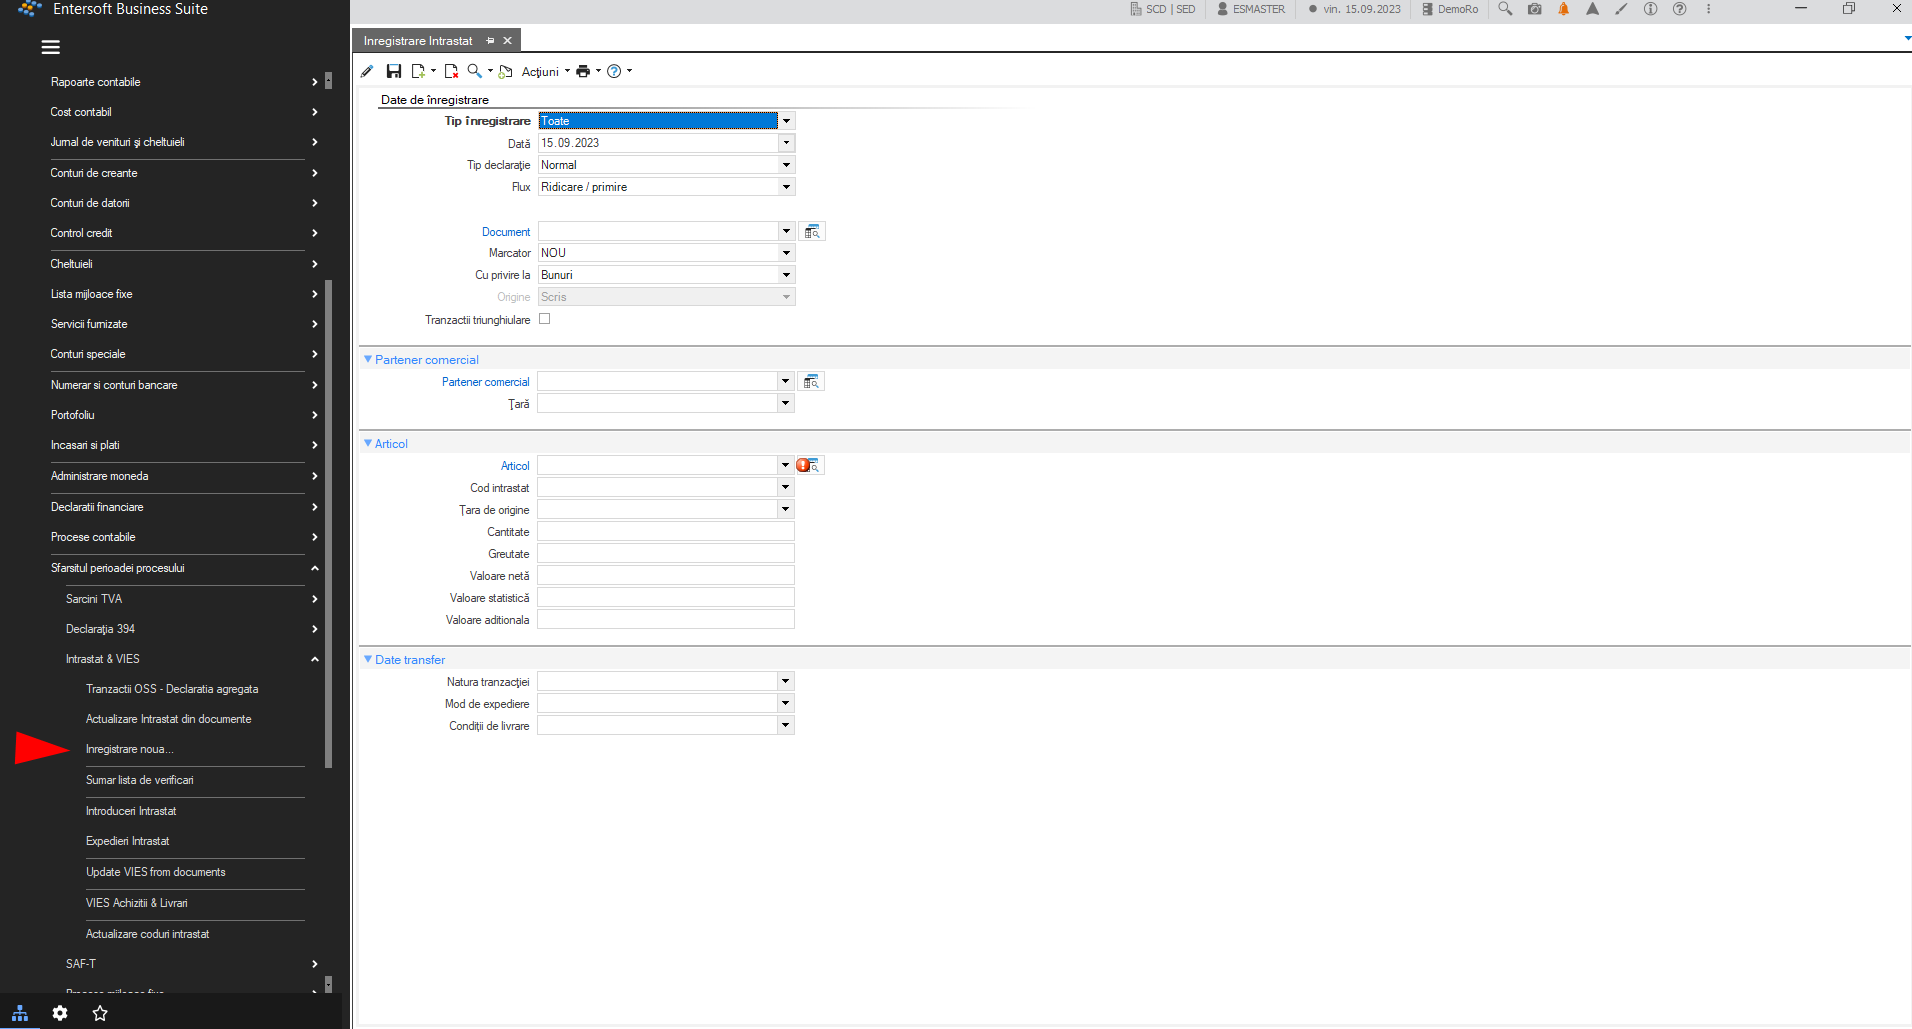
In order to manually enter an Intrastat record the following steps must be taken:
Accounting > End of process period :> Intrastat and Vies > New record.
4. Intrastat declaration
Intrastat records can be
Sale/Purchase Documents;
Documents entered manually by the user.
5. Generate declaration
Pași pentru generarea declarației sunt:
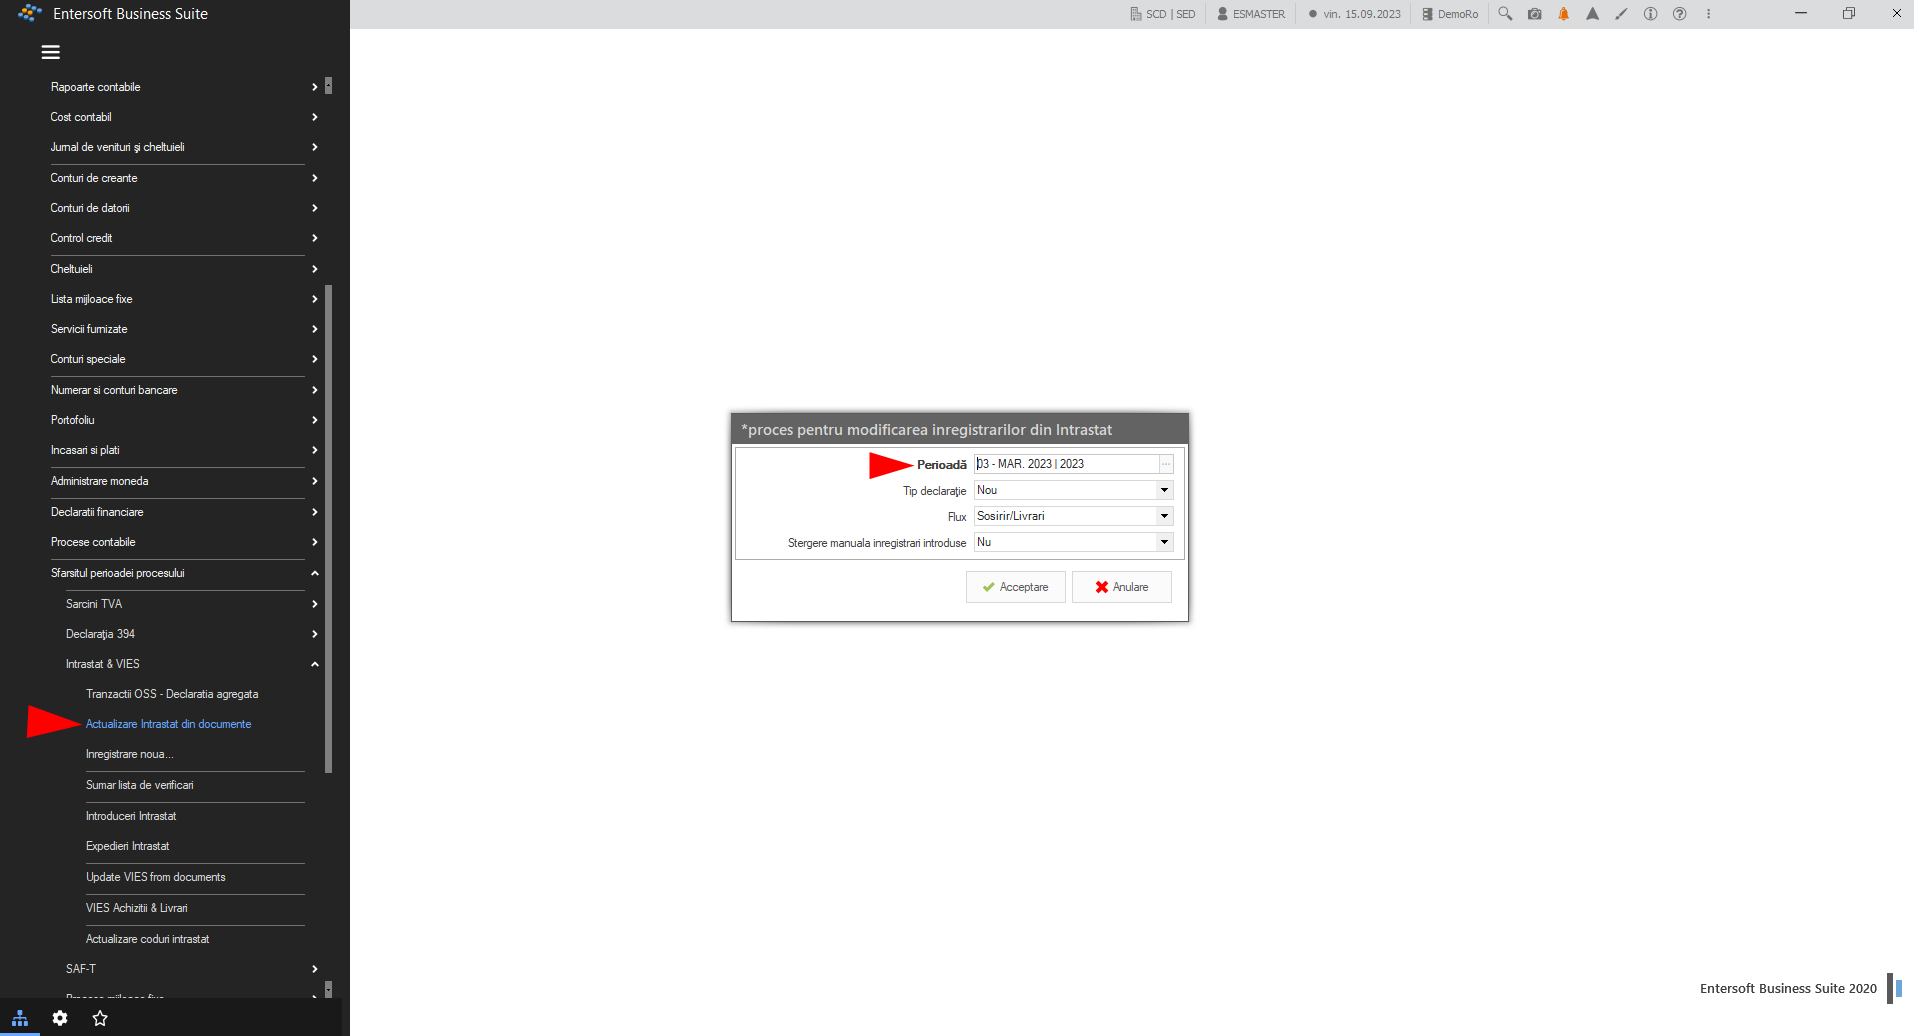
Call Intrastat update from documents Accounting > End of process period > Intrastat and Vies > Intrastat update from documents
Select the period in which you want to update.
The type of declaration can be:
New - records will be created for all documents in the selected tax period;
Review - the process will delete records from the original return and create new records;
Review without deletion - the process will create new records, old records will remain untouched as historical data.
6. Check declaration data
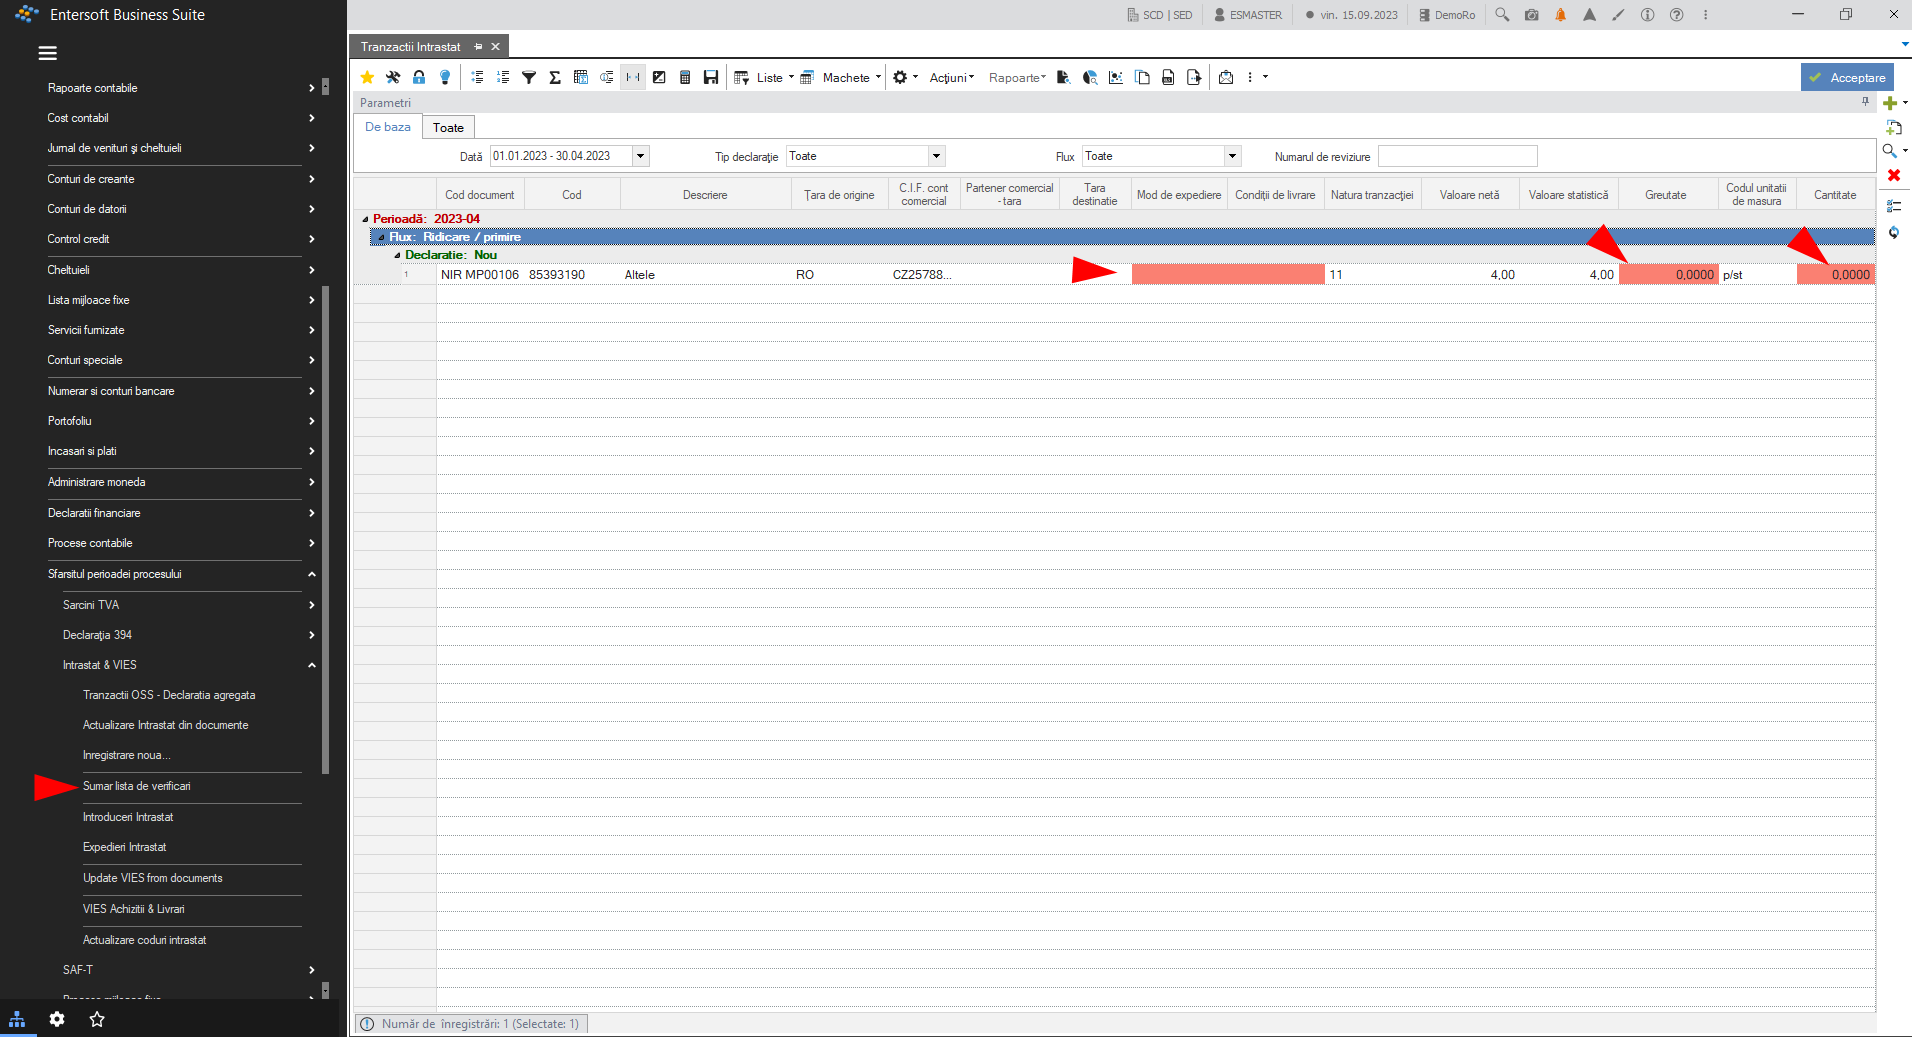
In the menu: Accounting > End of process period > Intrastat and Vies > Checklist summary you can see if the records in the declaration have incomplete data.
In this window, fields that are not completed will be marked in red.
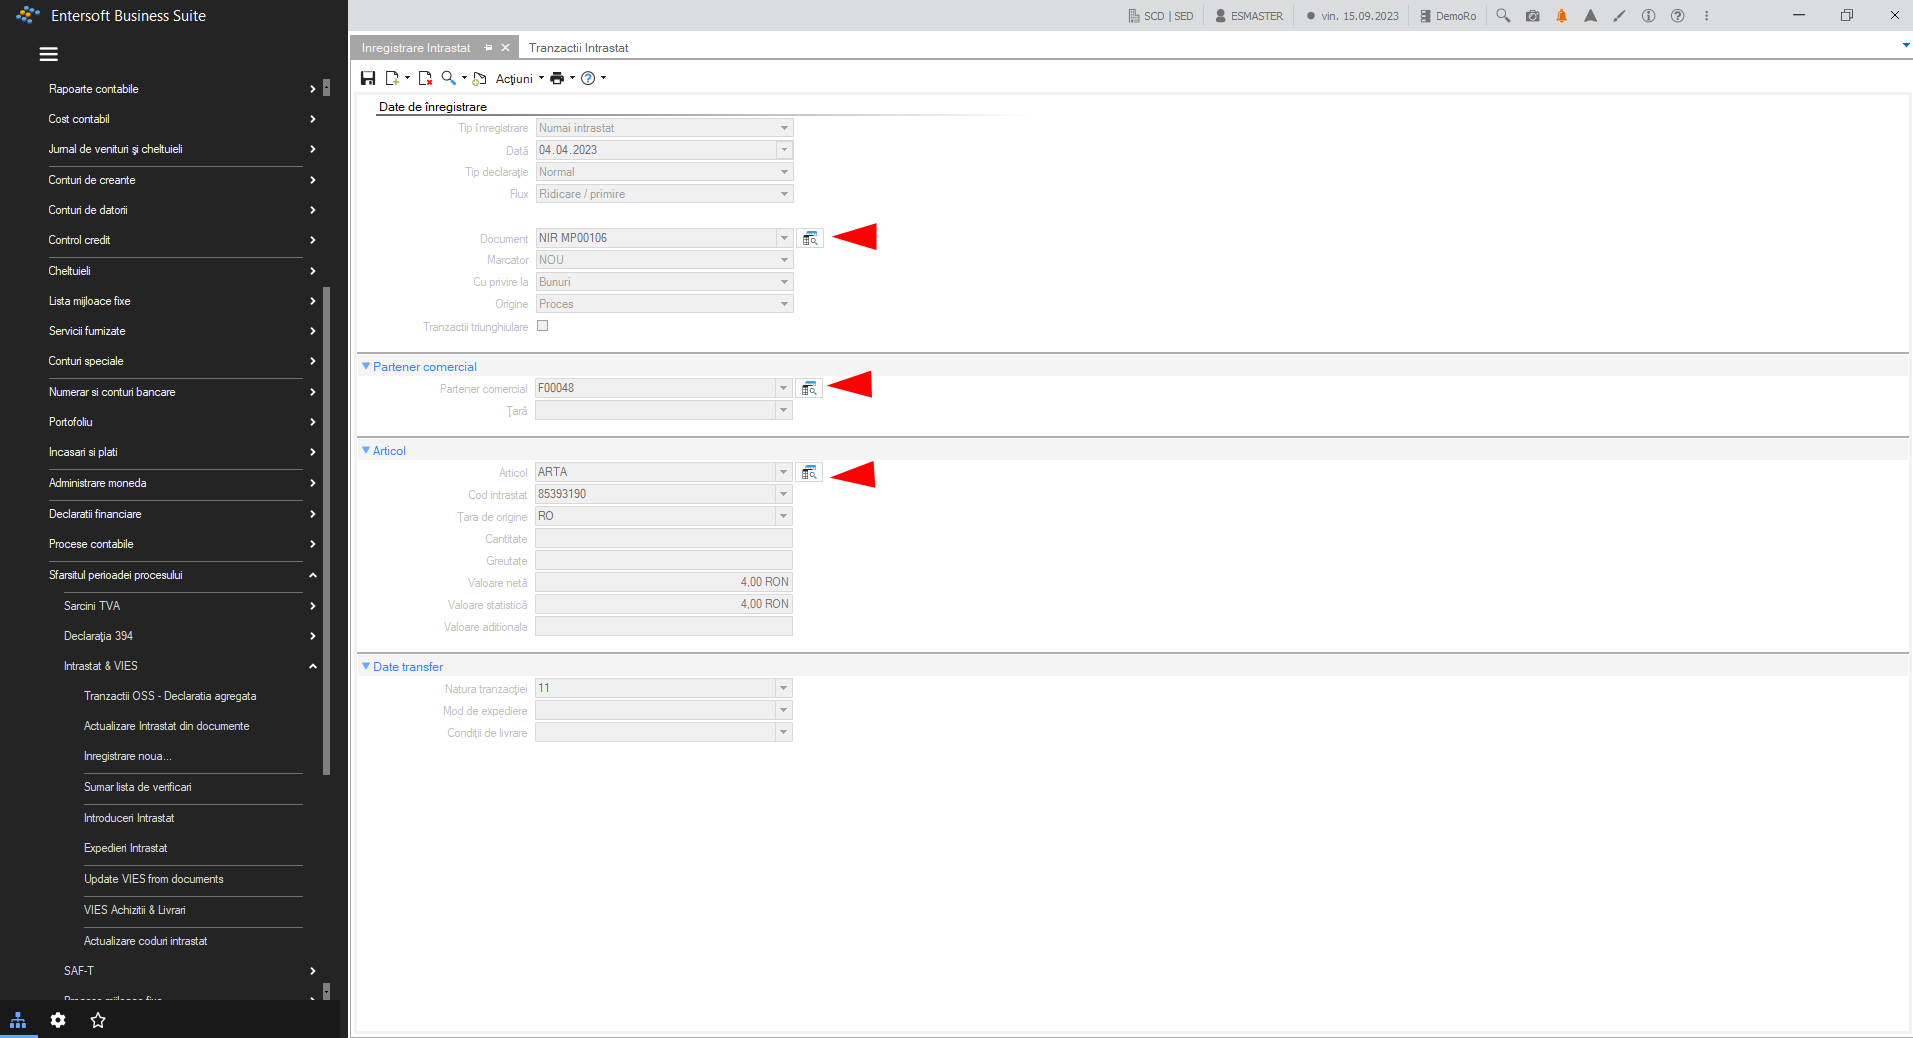
By double-clicking on one of the records, a window will appear in which we can access the document where the fields are missing and correct them.
By pressing the button to the right of each field type you can access the area of the document/item where the records are located in order to fill in the missing information.
Attention! Changes will be visible after the Intrastat Update operation in the documents.
7. View Intrastat results and file generation
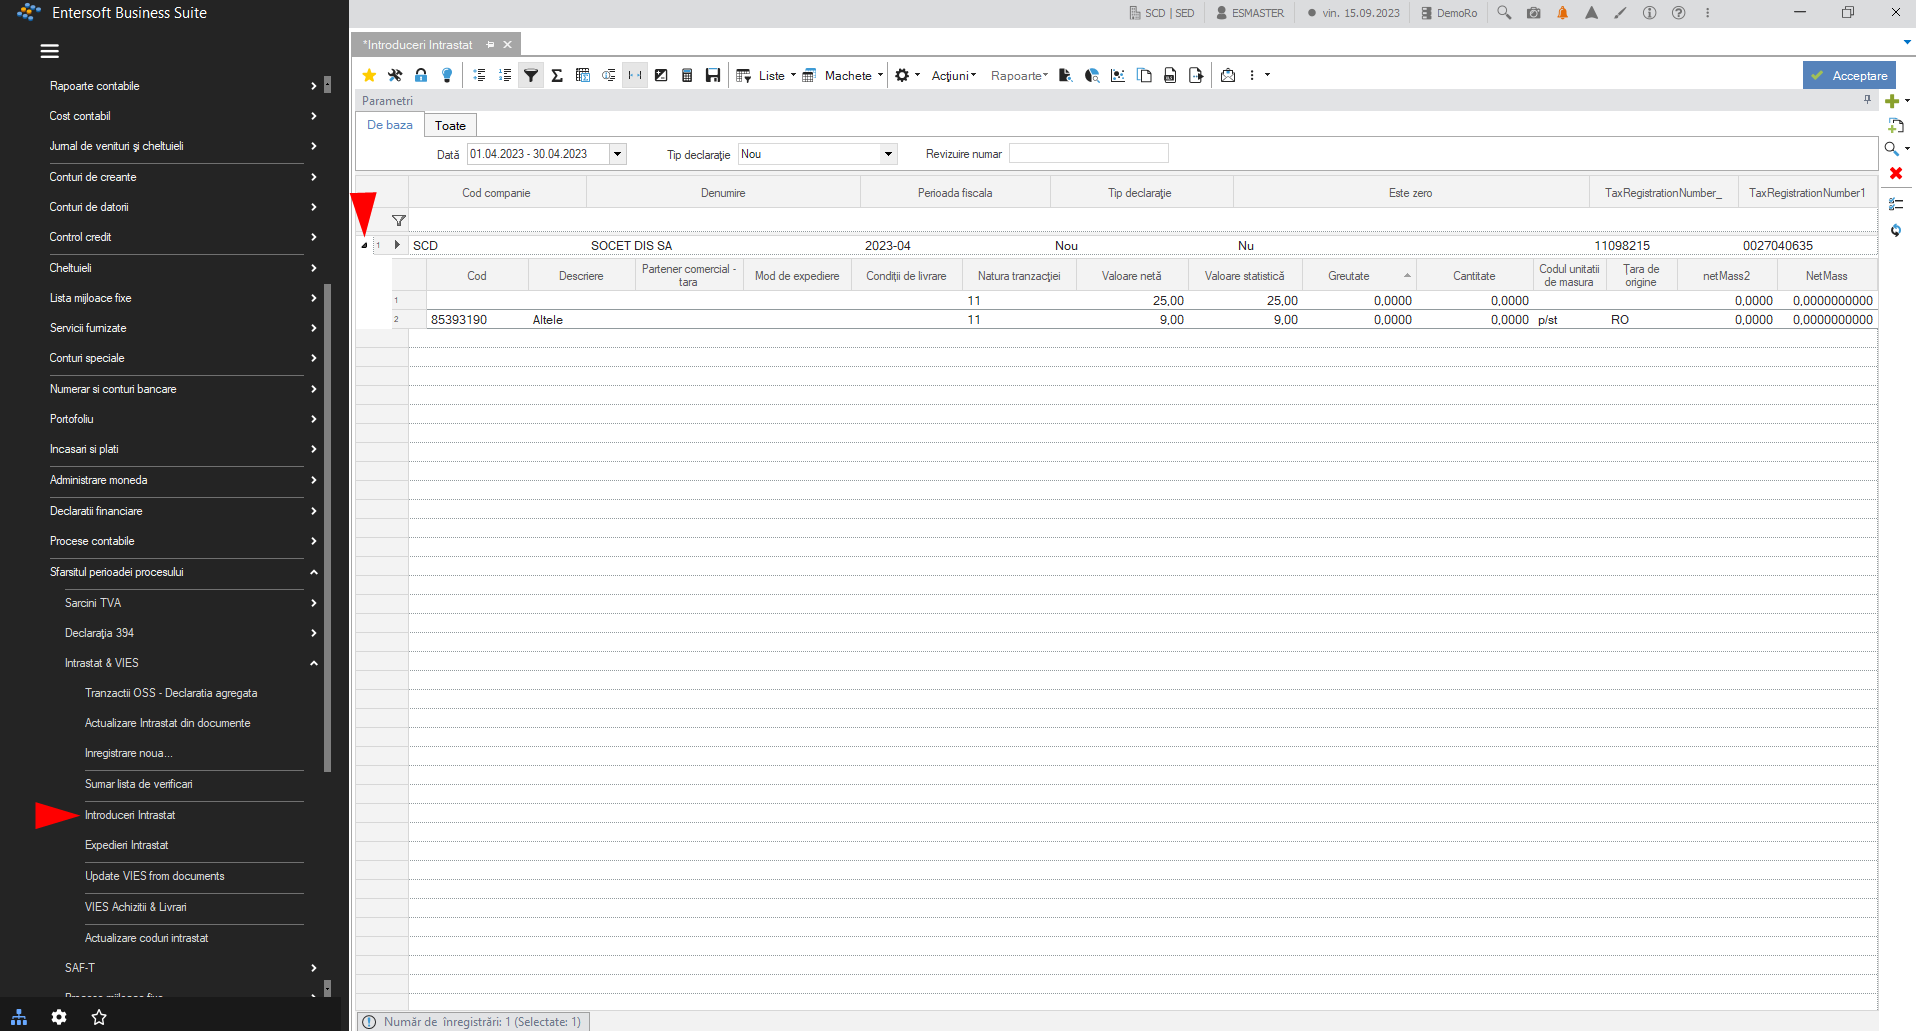
To view and generate the Intrastat purchases file, go to: Accounting > End of process period > Intrastat and Vies > Intrastat entries.
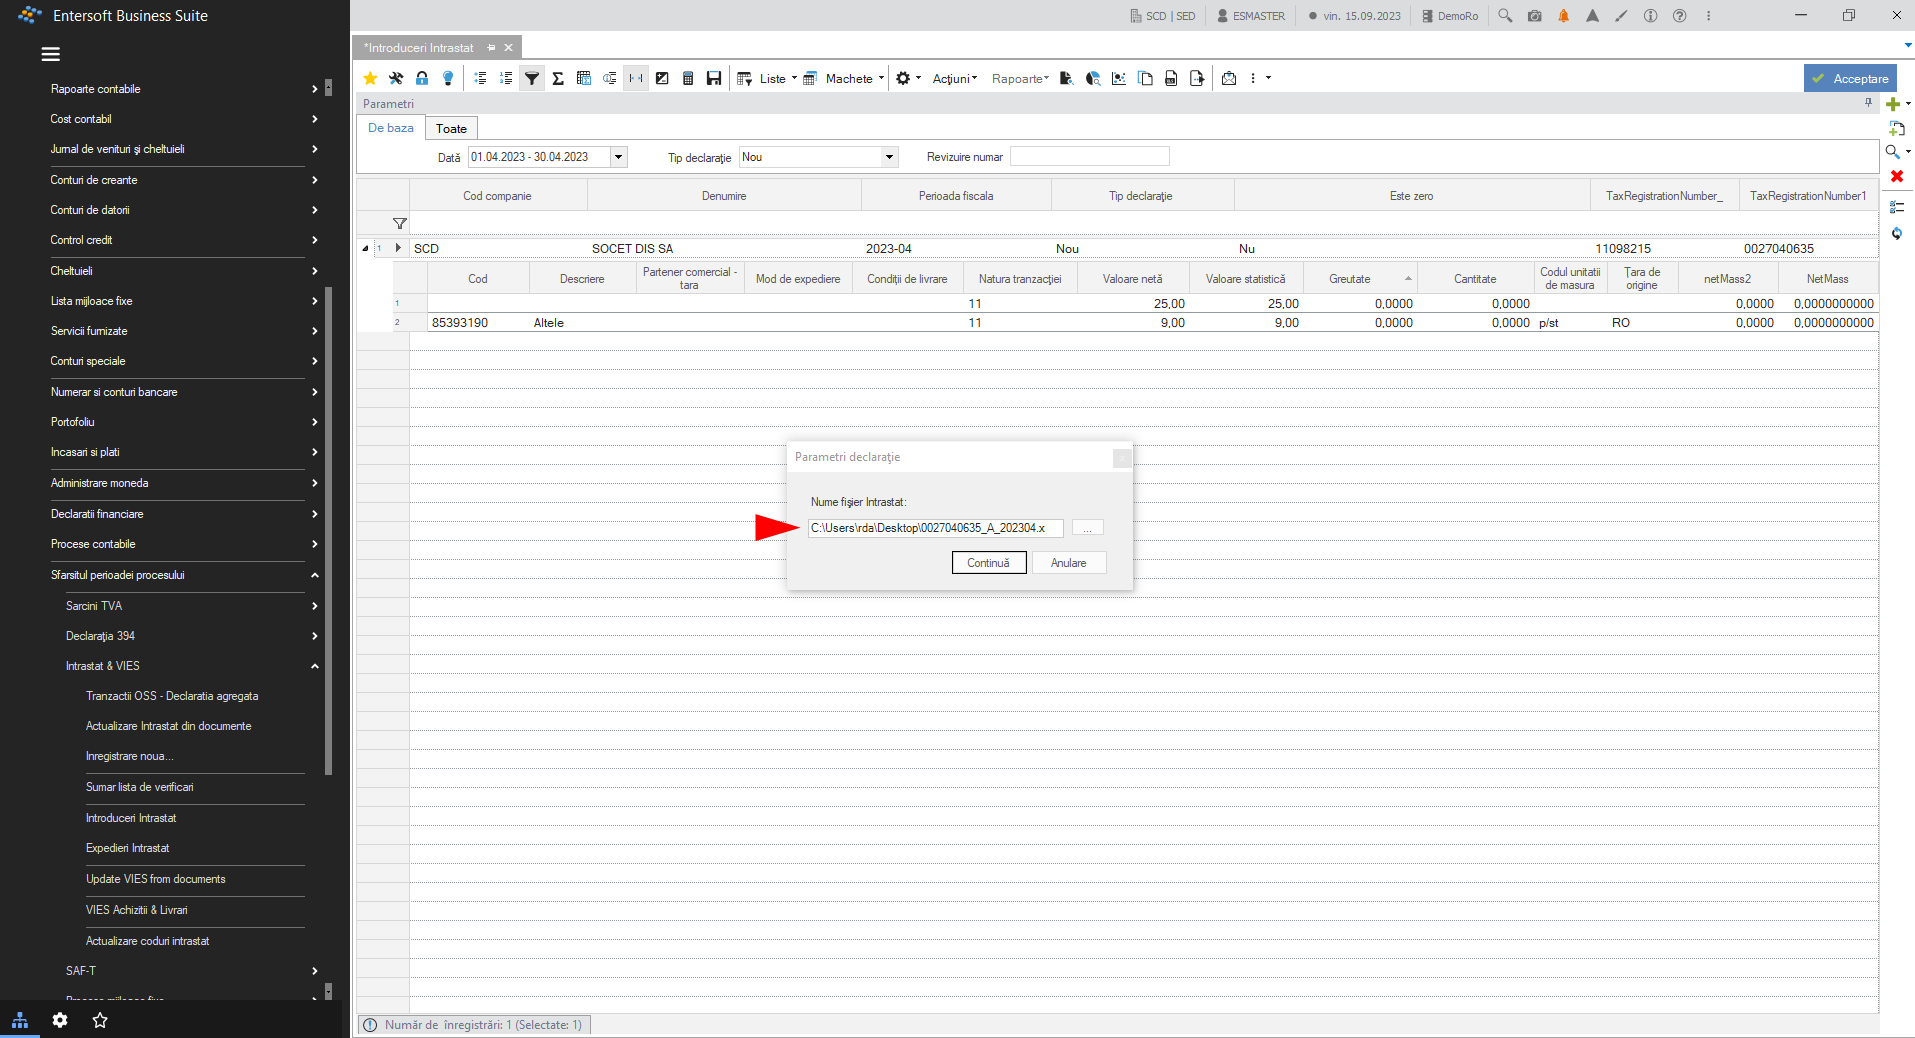
Intrastat entries will appear in the Intrastat entries scroller:
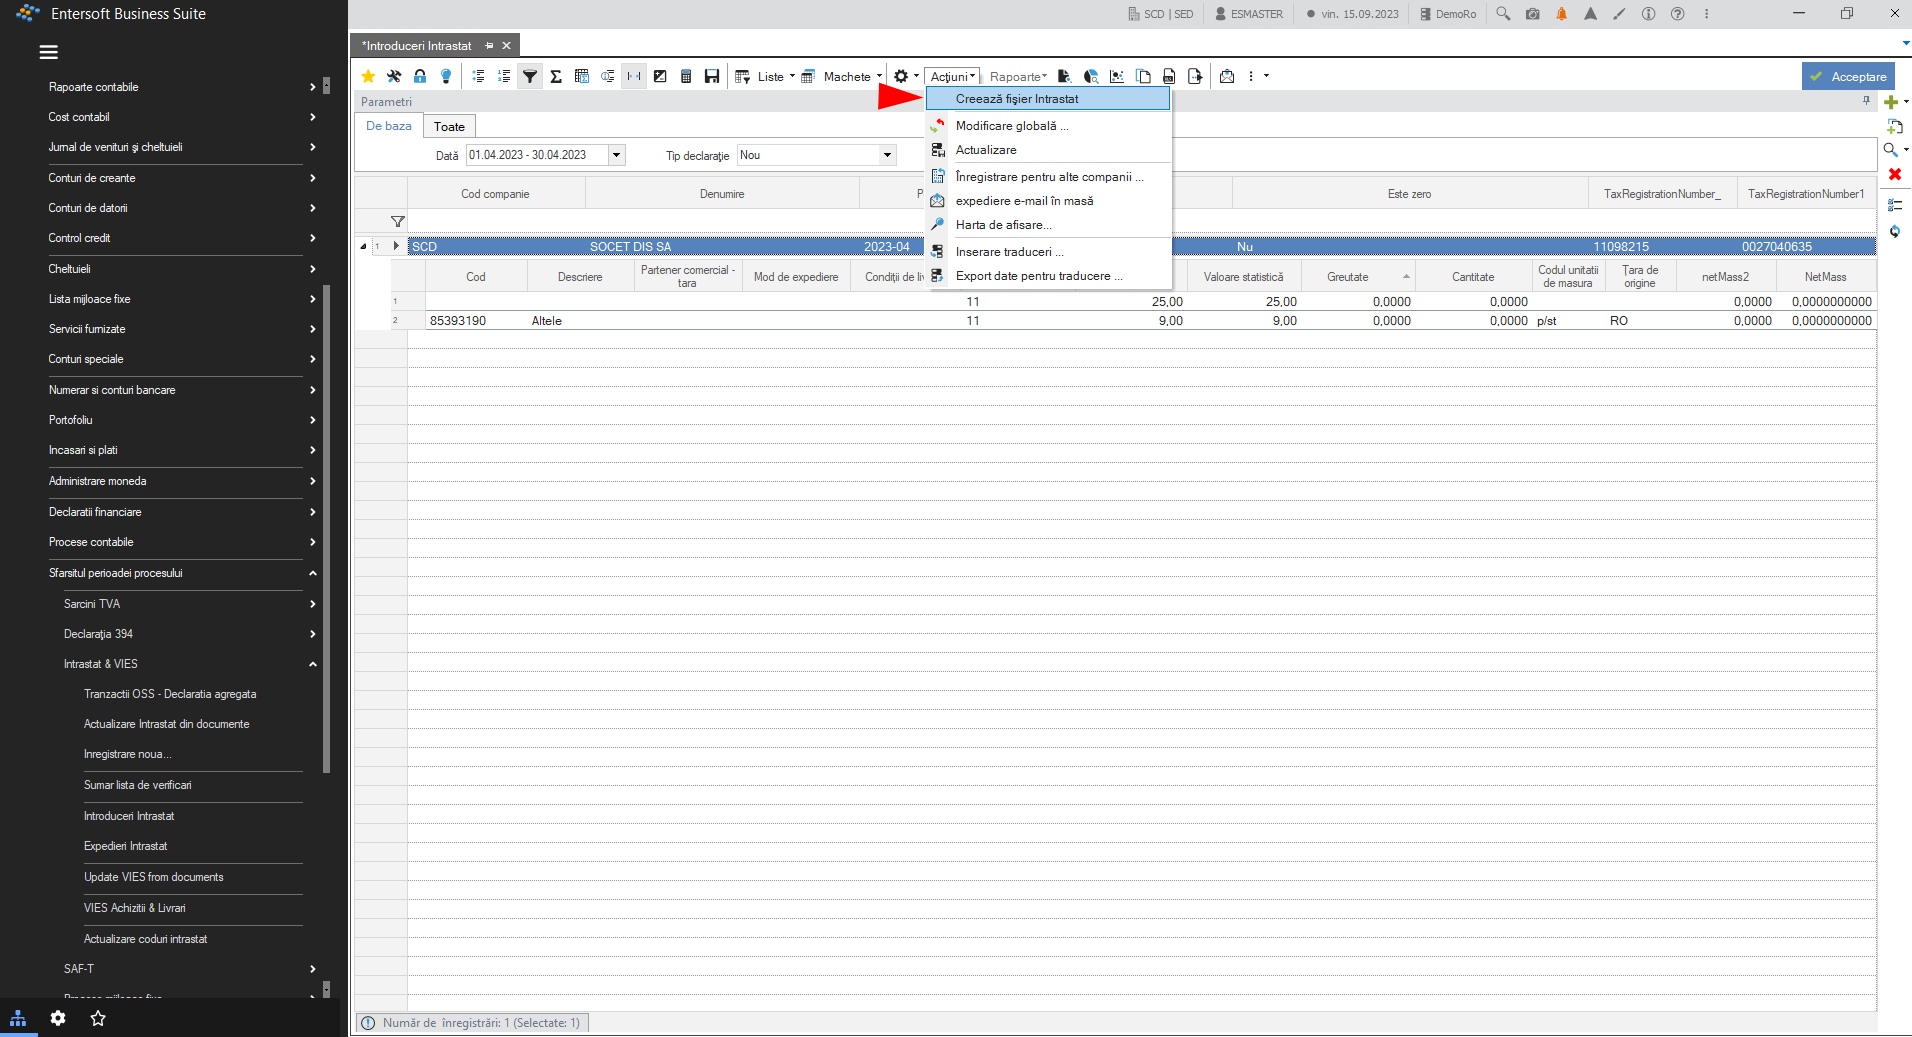
To view and generate the Intrastat Entries file call ActionsCreate Intrastat file.
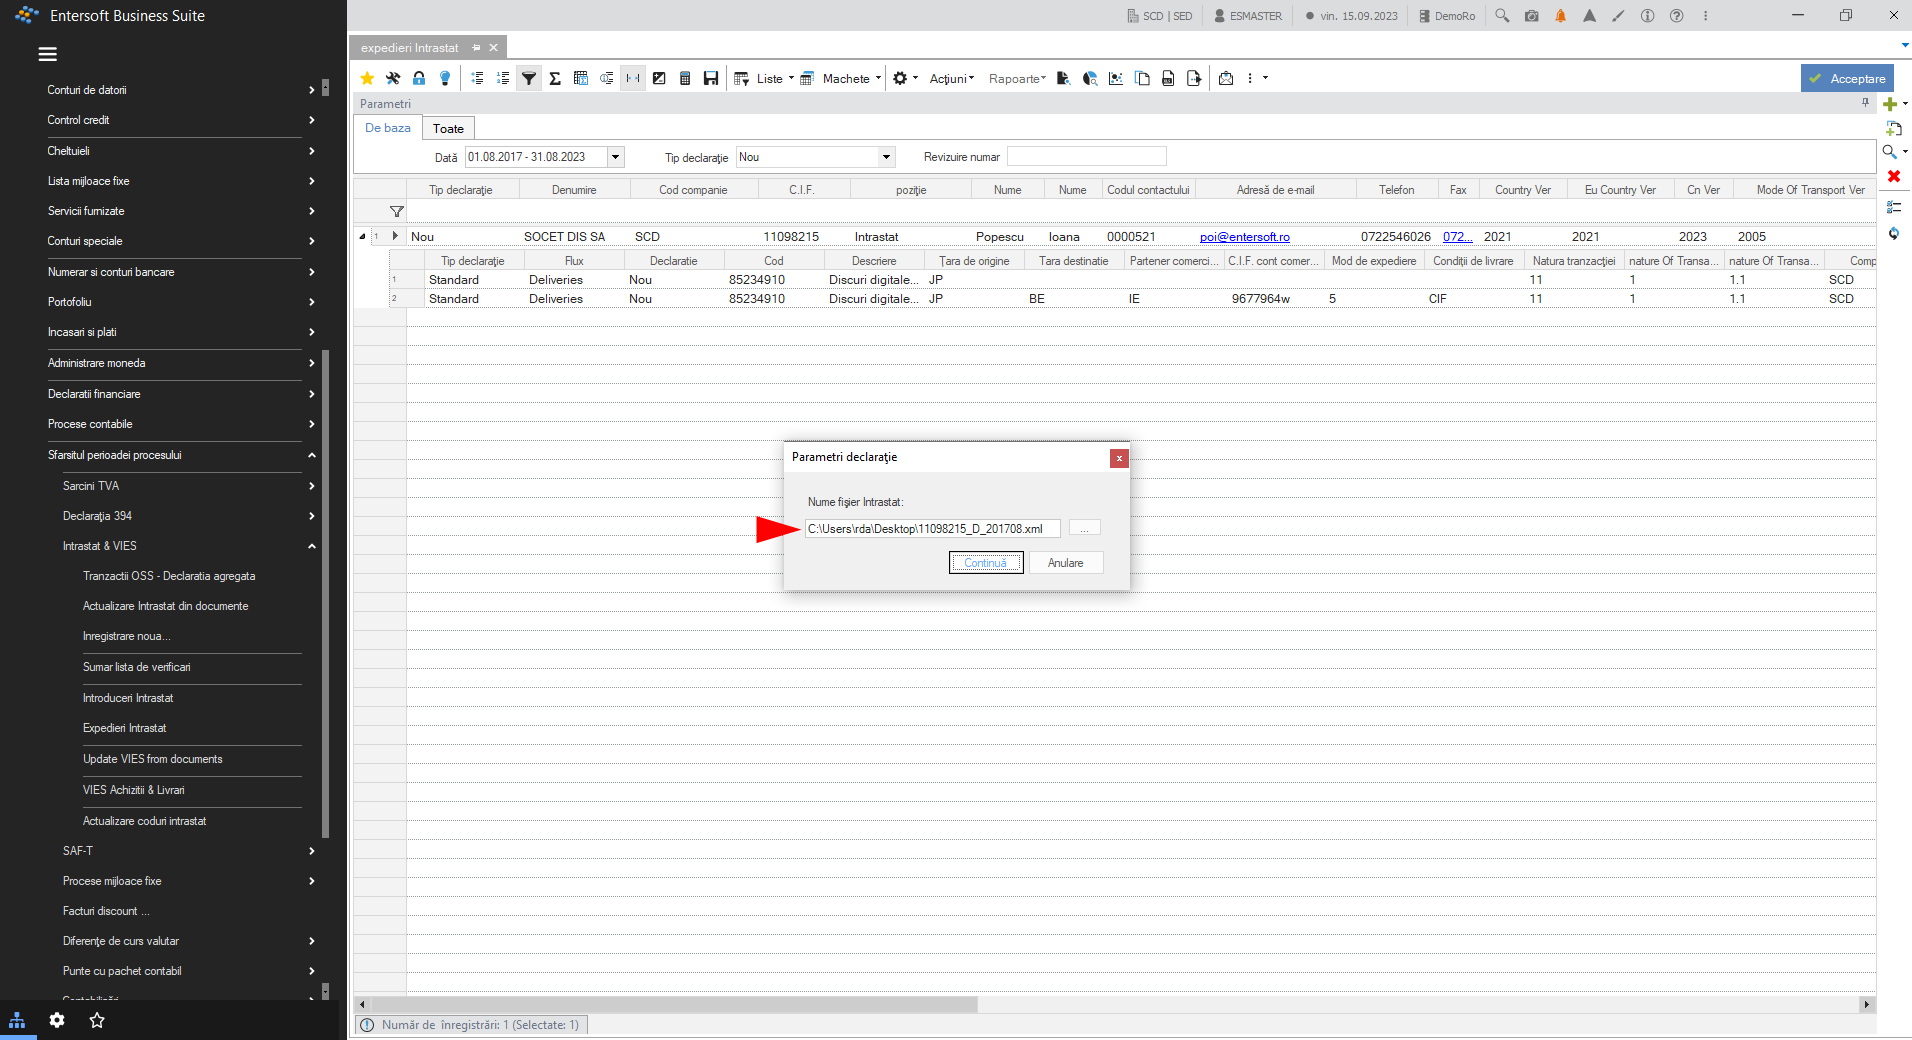
This will generate the Intrastat .xml file in the path set in the declaration parameters:
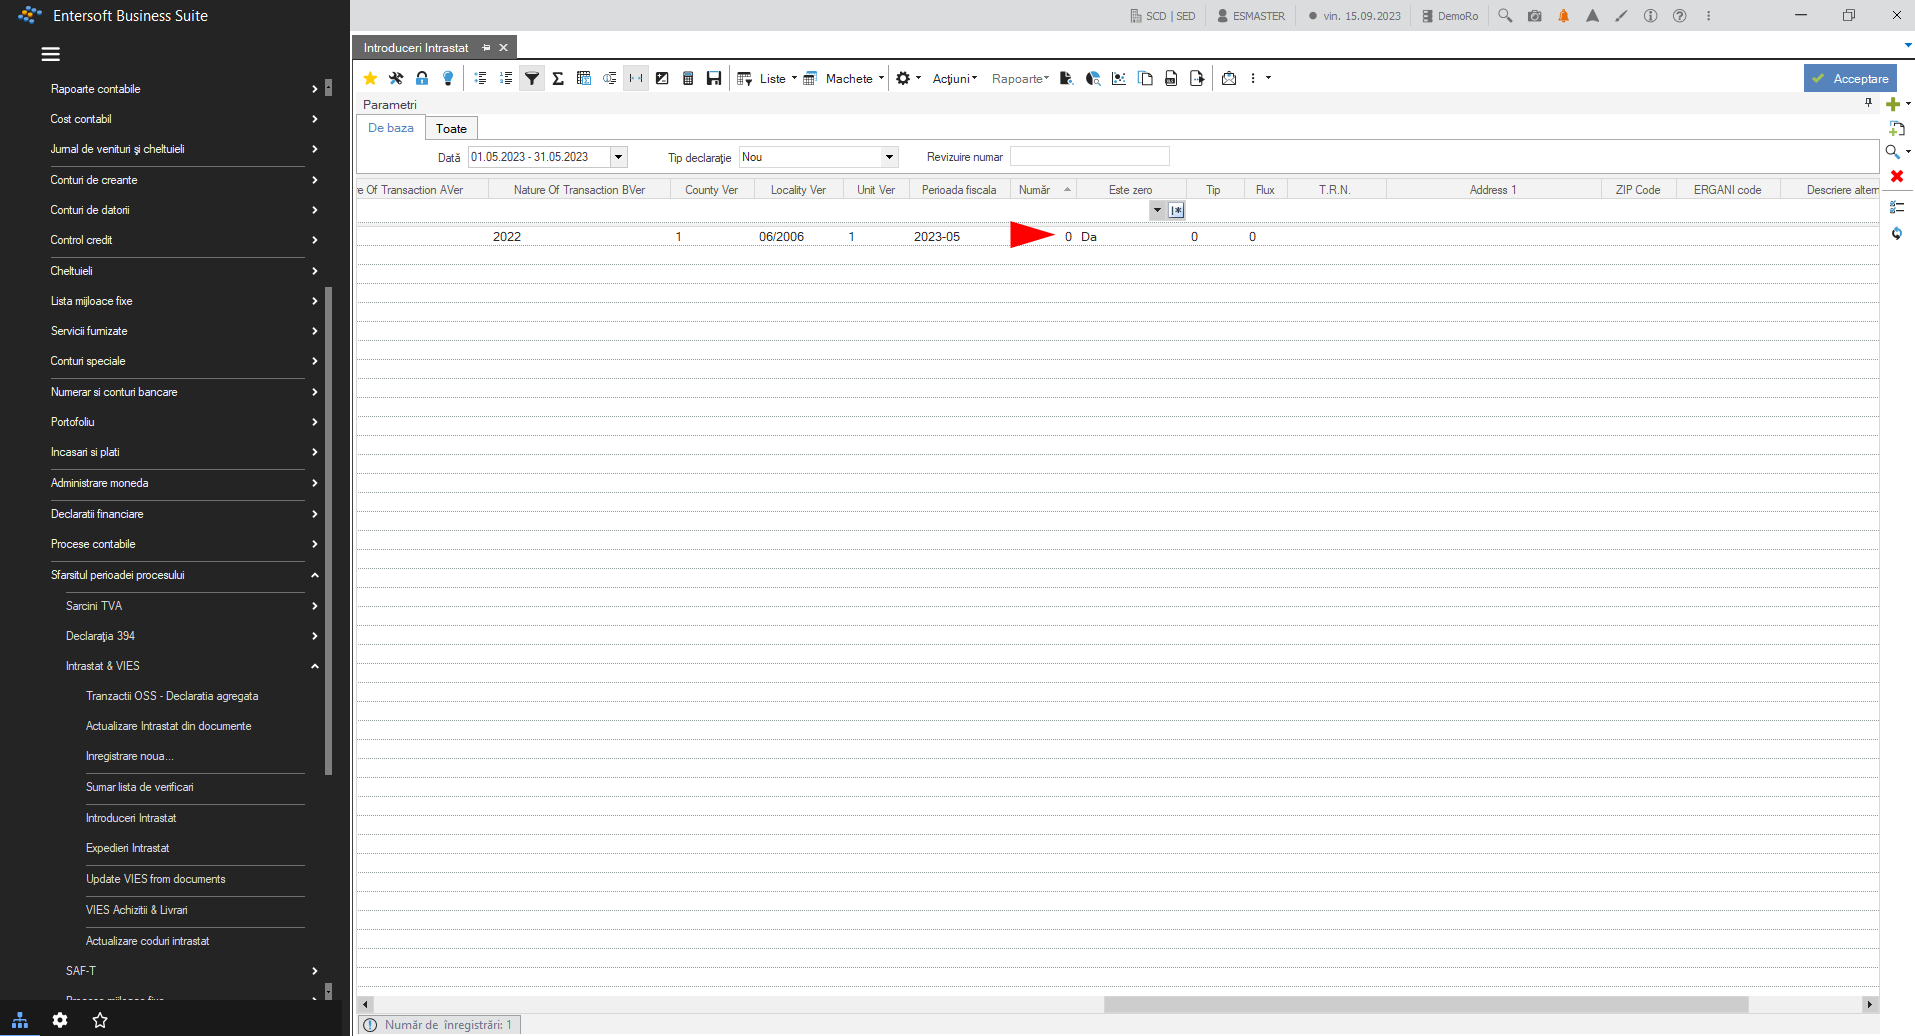
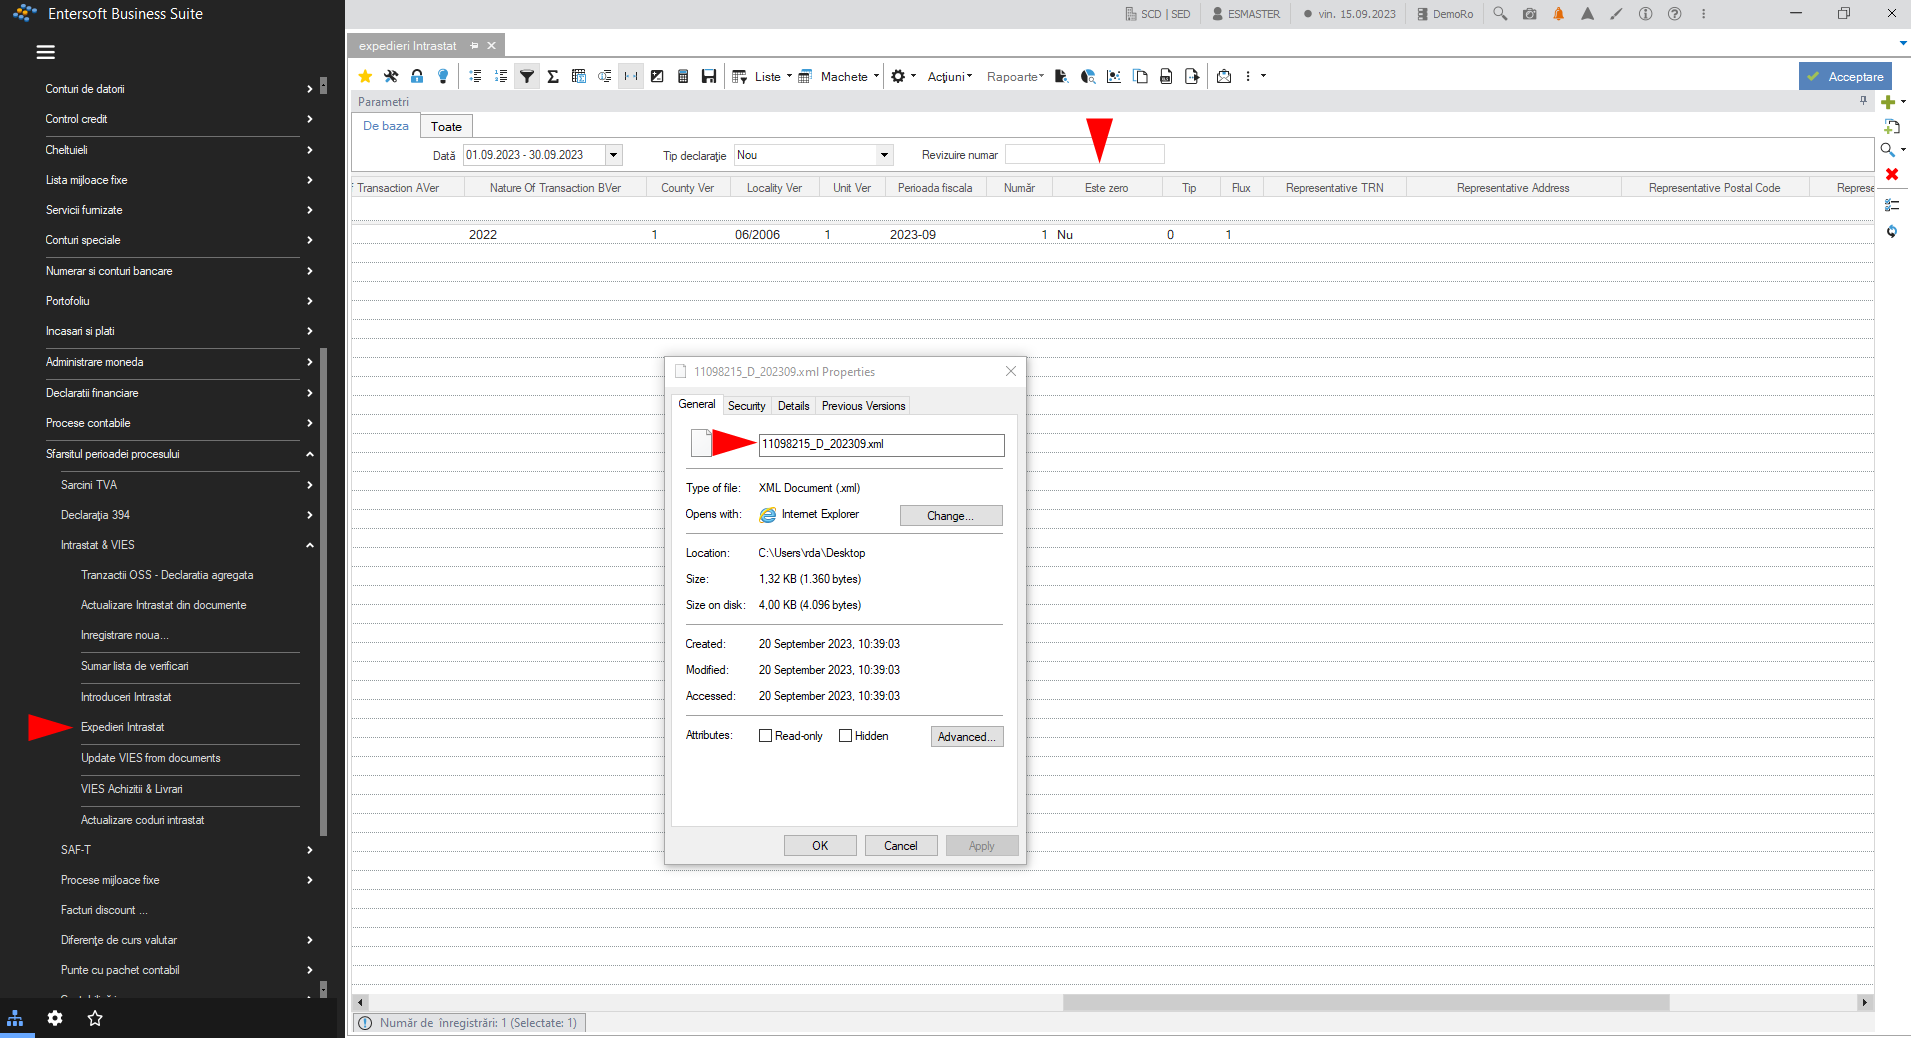
If in a month there are no transactions, the statement will be run and in the column It is zero the value will be - Yes, and the .xml file will have the field extension “AN” in its name: 11098215_AN_202305.xml
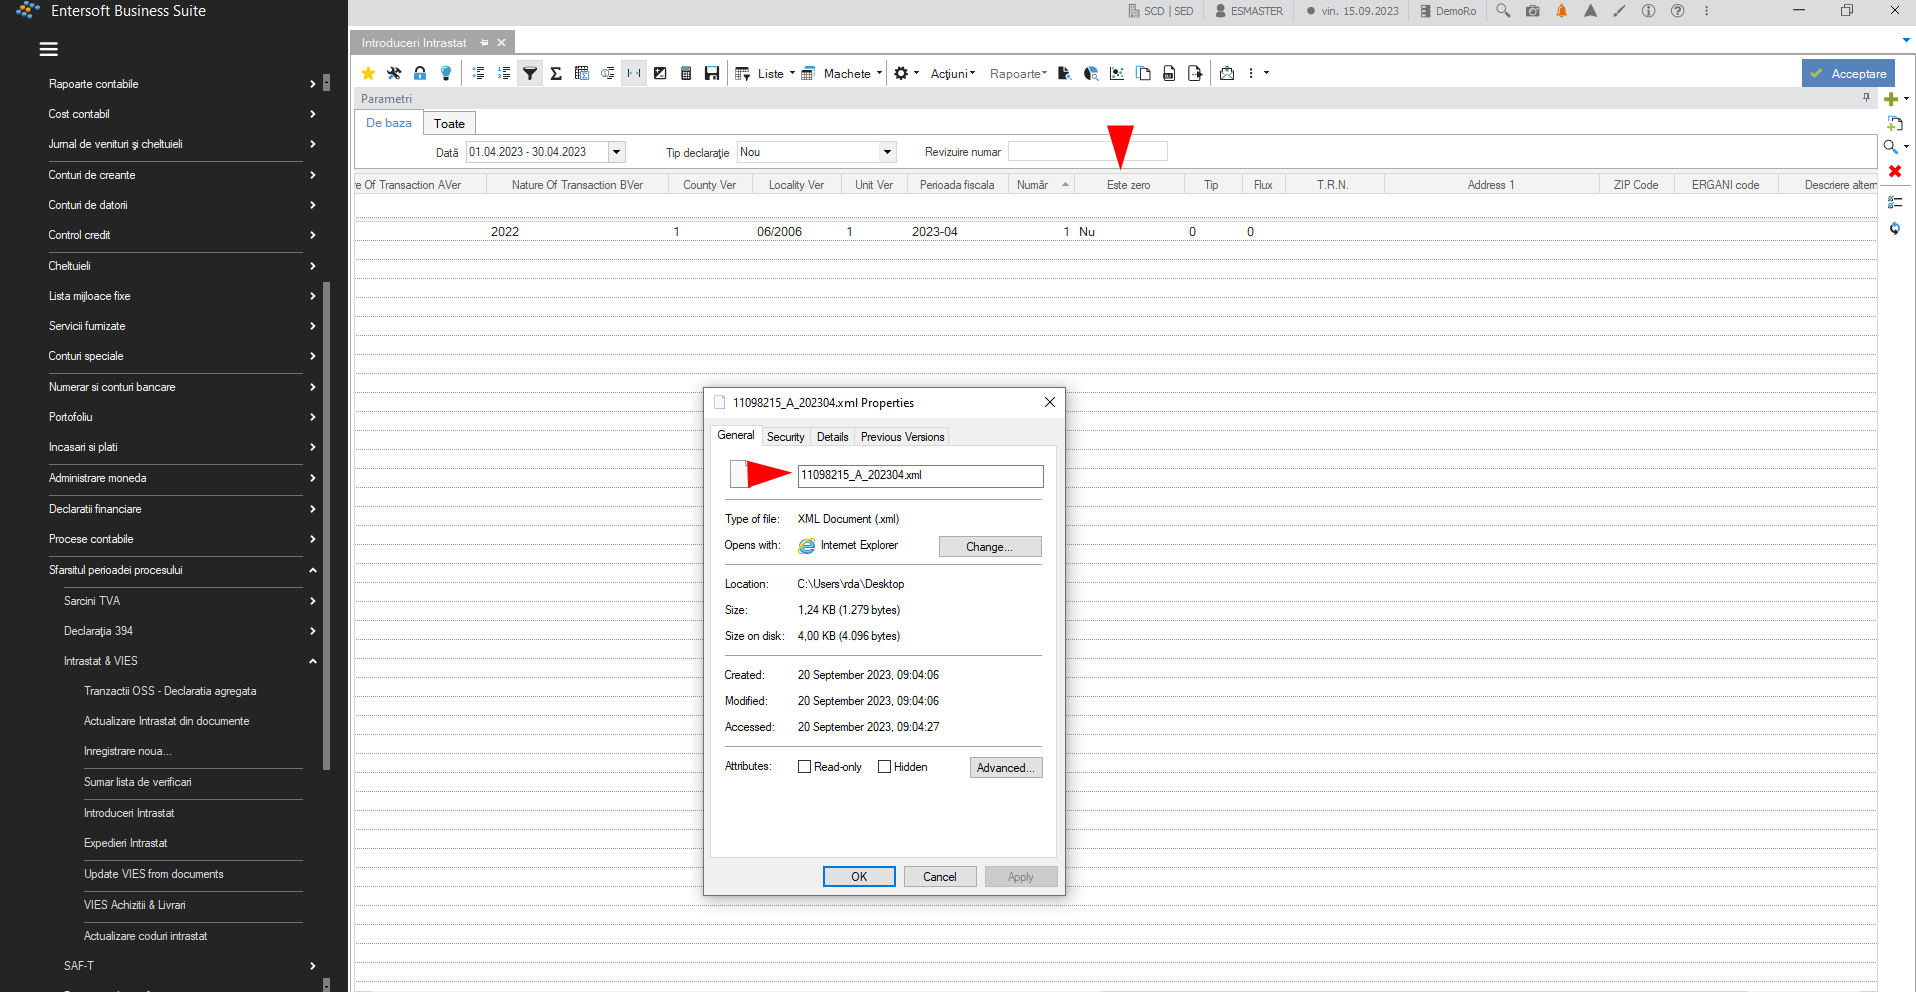
For a period where data exists, the statement will have column It is zero value - No. The file will have the extension “A” in its name.
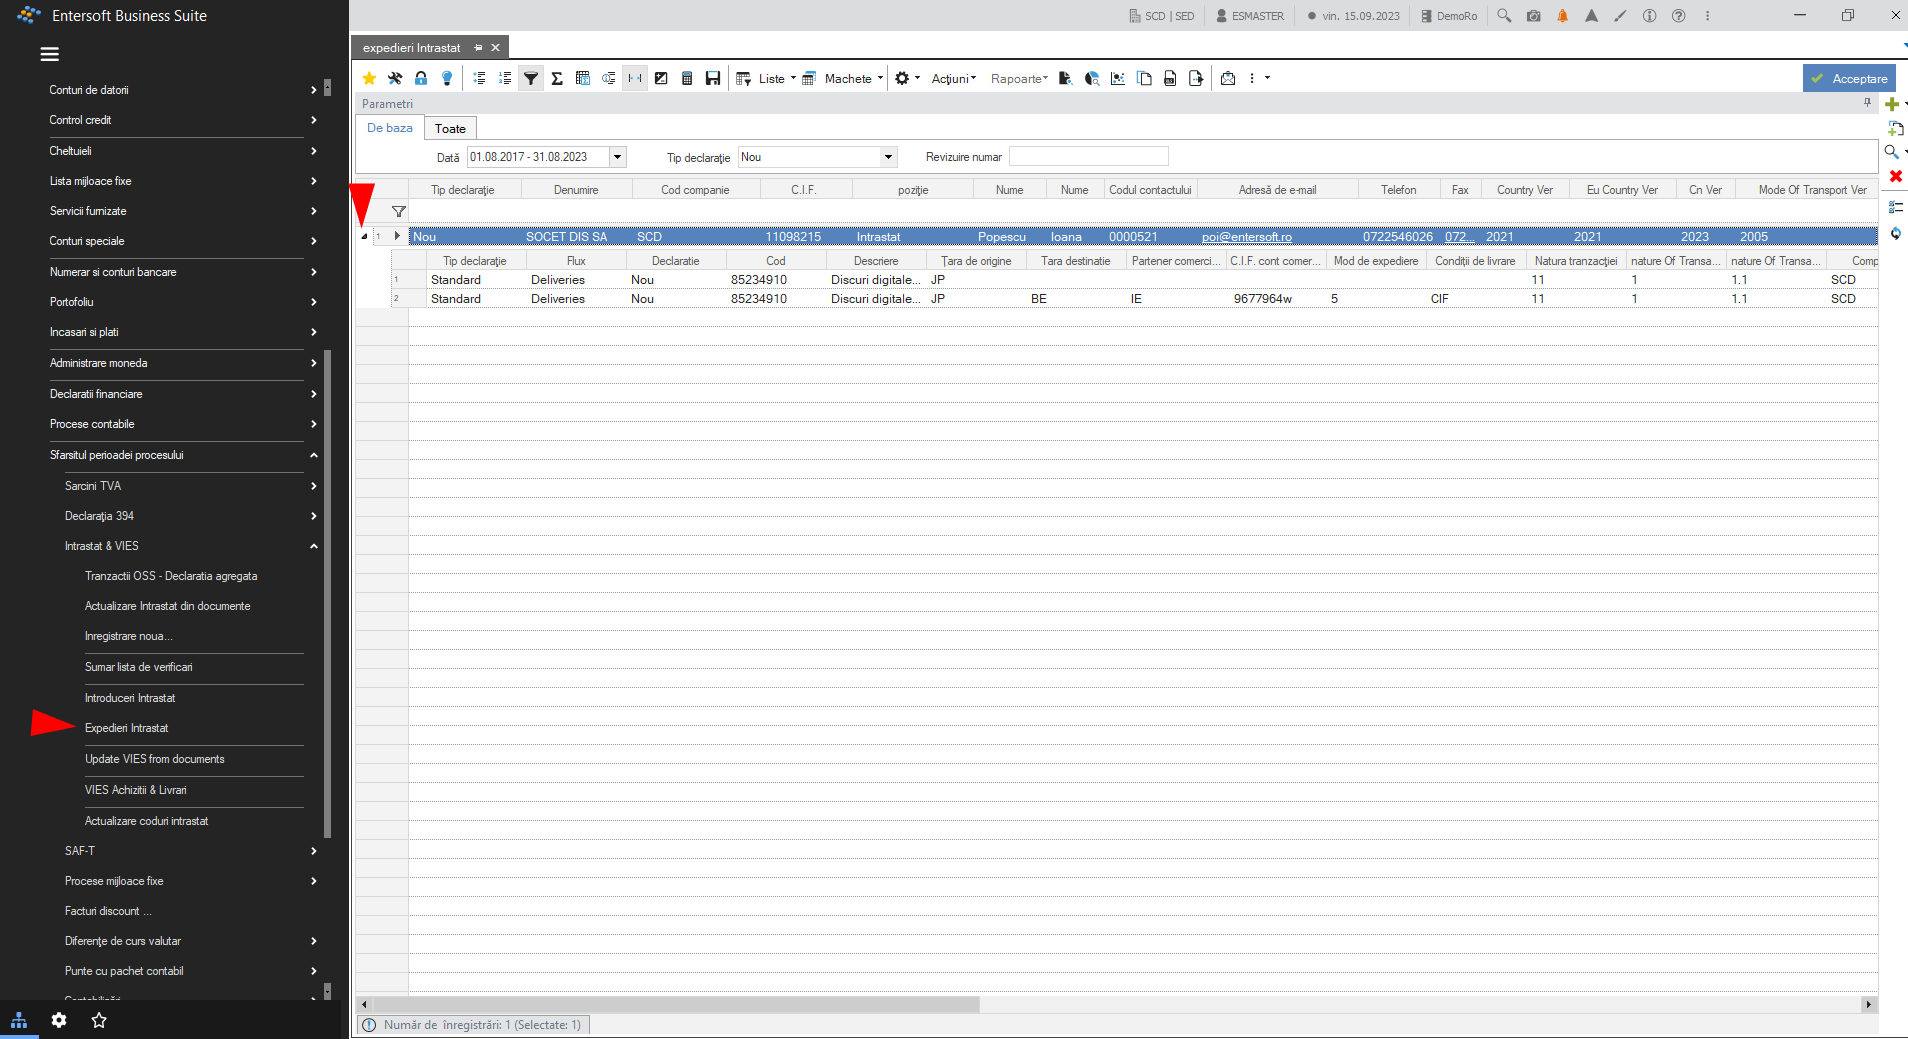
Accounting > End of process period > Intrastat and Vies / Intrastat dispatches
All Intrastat deliveries will appear in the shipment scroller:
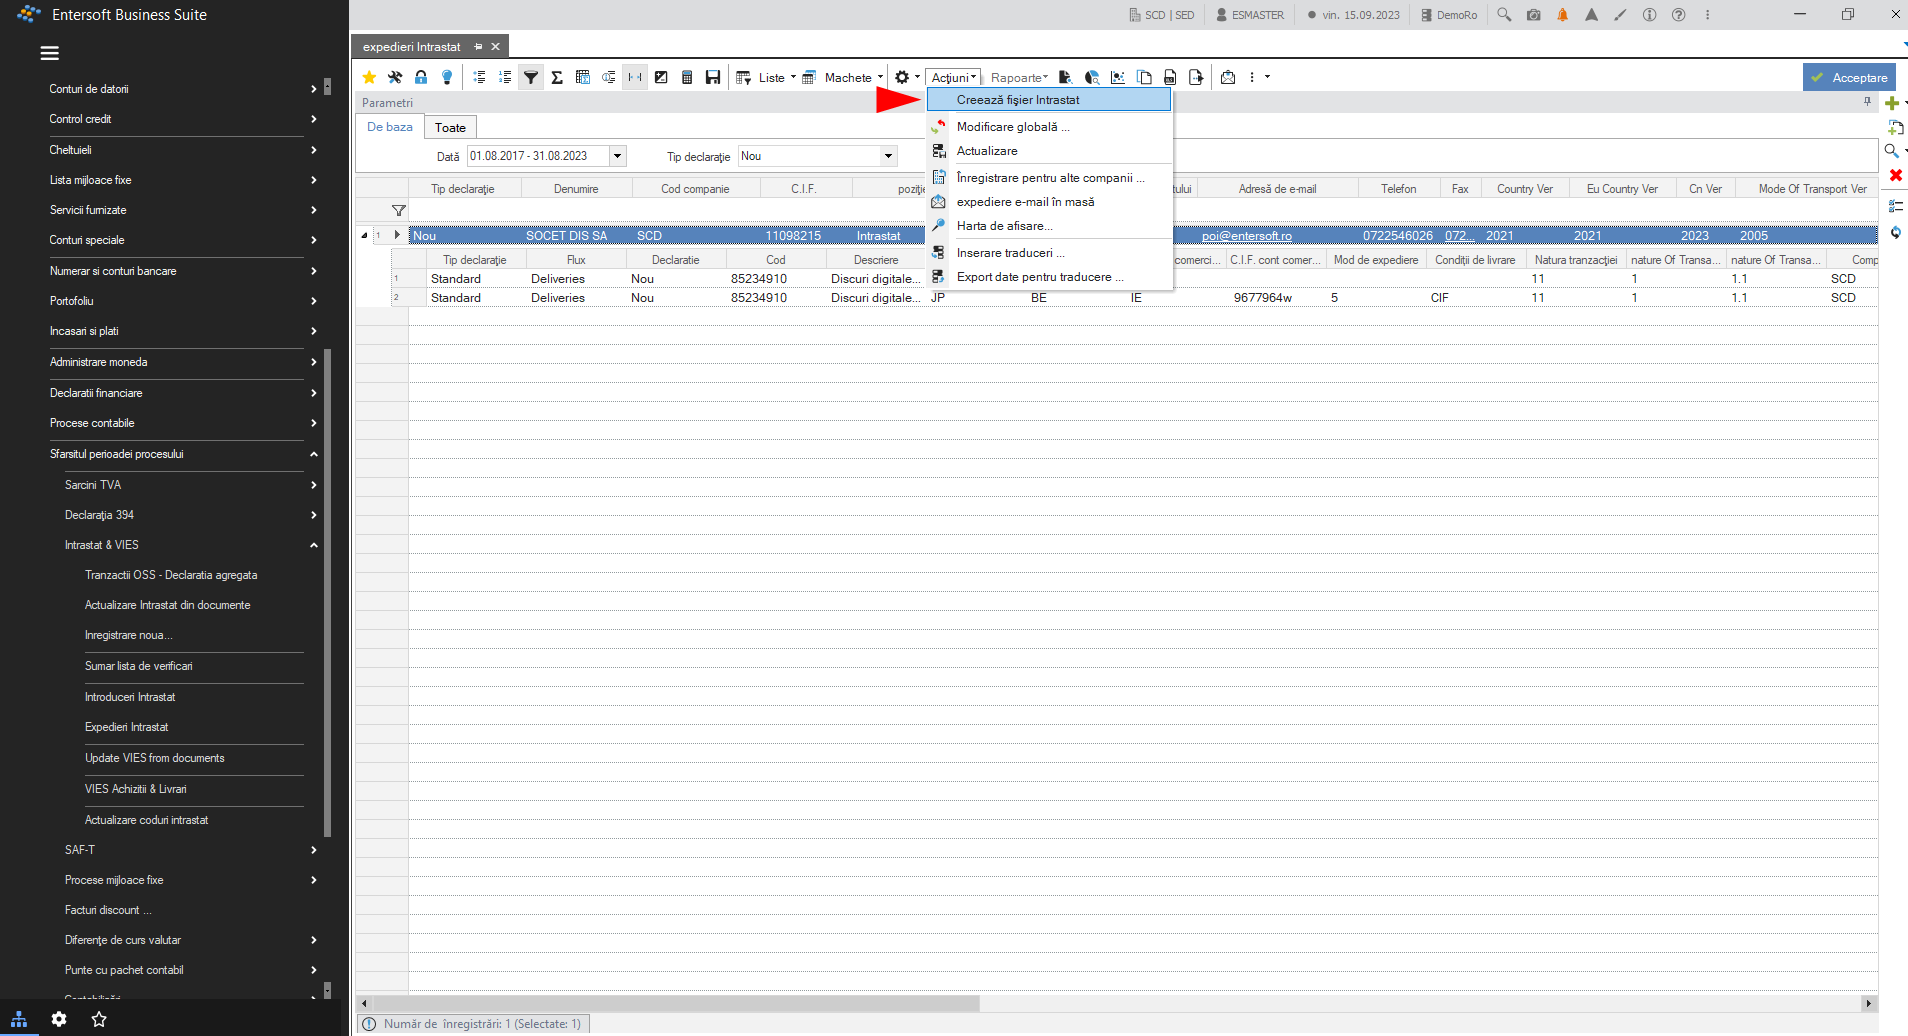
Calling Actions > Create Intrastat file will generate the Intrastat delivery file:
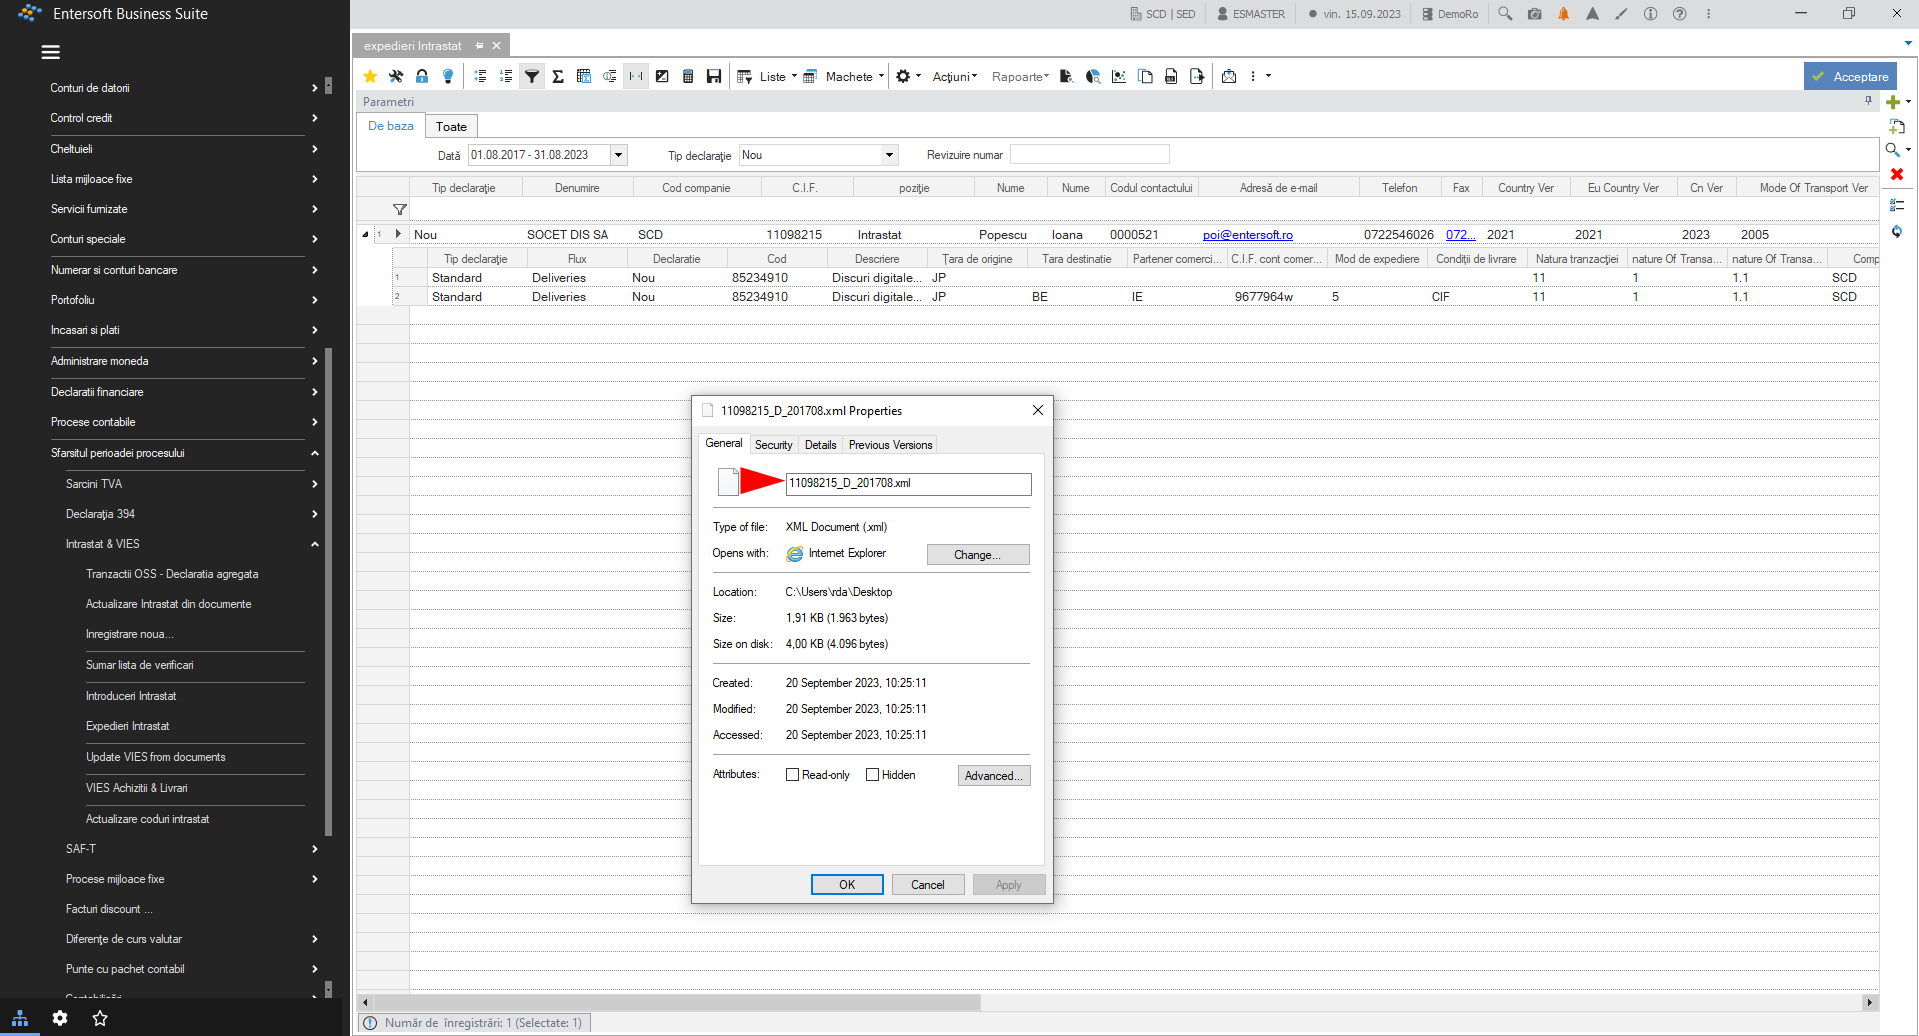
This generated the Intrastat .xml file:
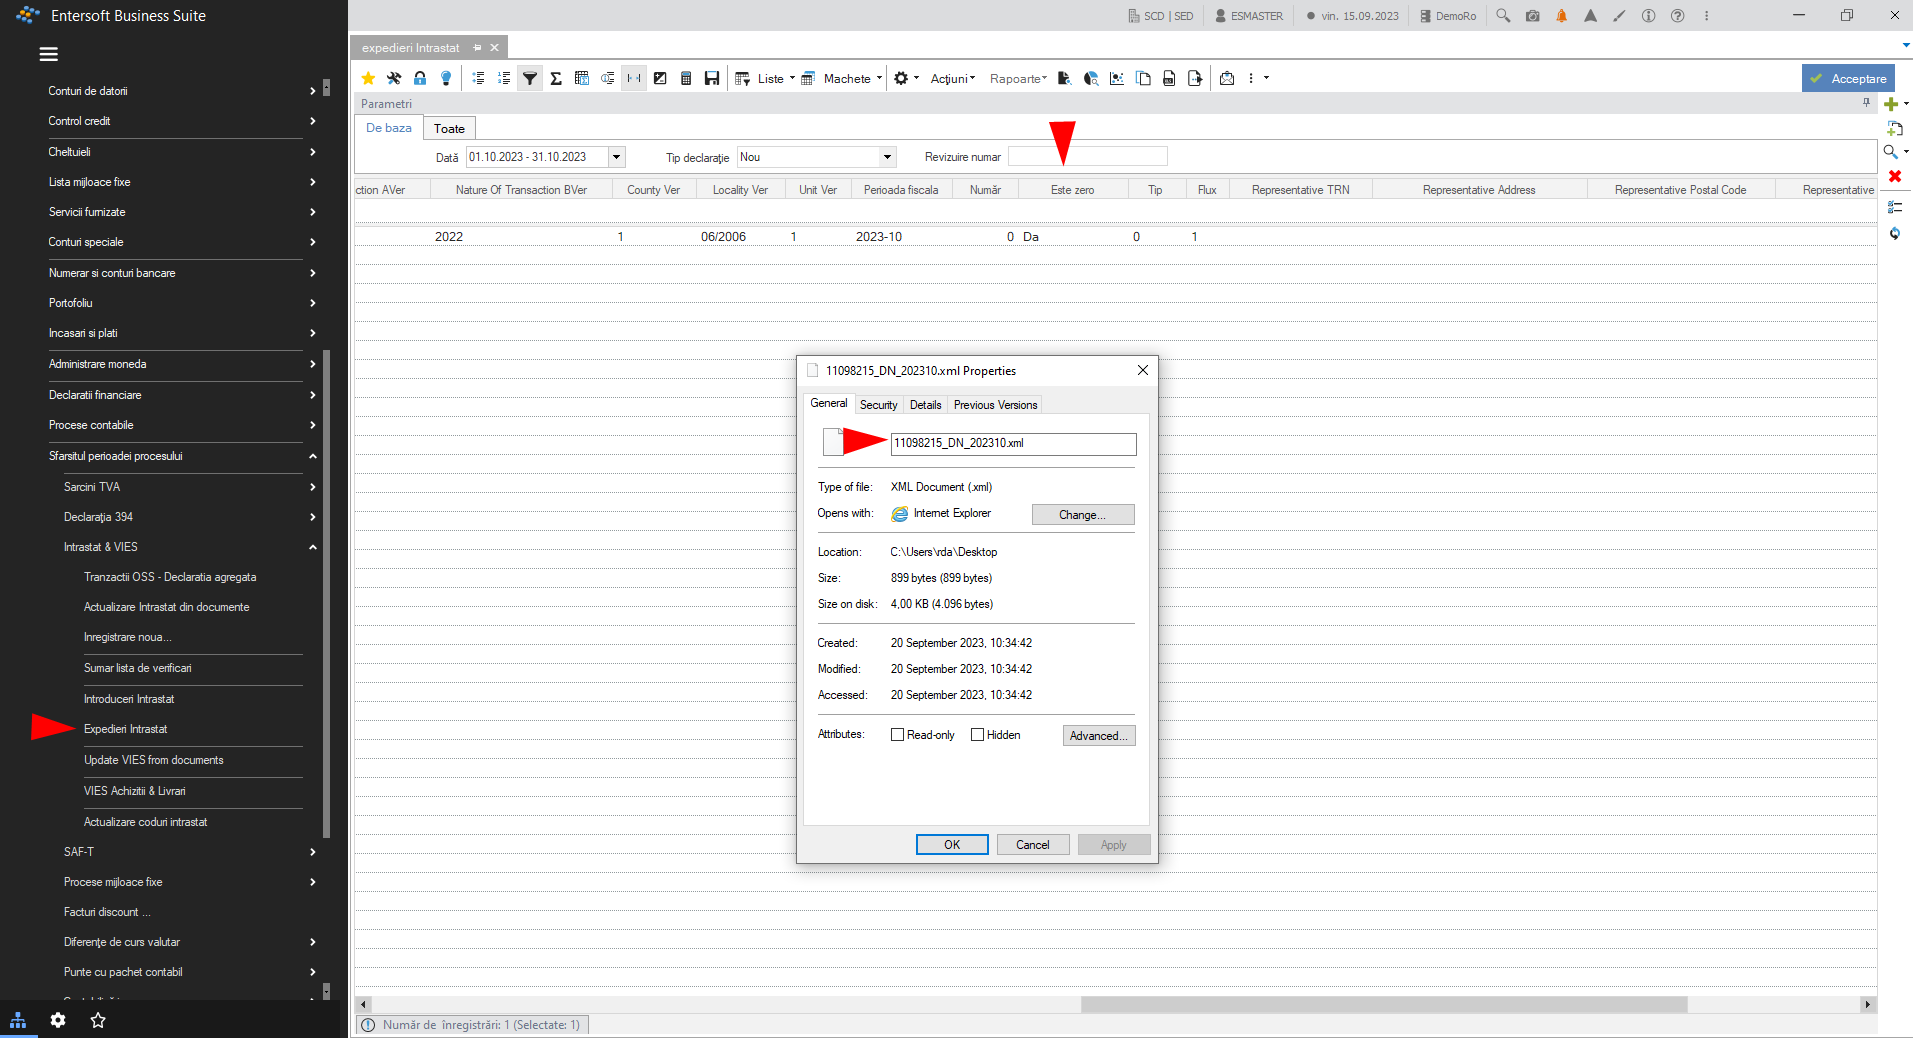
If in a month there are no transactions the statement will have in column This is zero the value will be From and the .xml file will have in field extension DN in its name:
For a period in which data exists, the statement will have It is zero - Not in the column It is zero - Not and the .xml file obtained by export will have the extension D in its name.
8. Intrastat updates
Every year the National Statistical Institute makes important changes/updates in the completion of the Intrastat statistical declaration. These are provided in a file named intrastat-nomenclatures.xlsx, on the basis of which a new file IntrastatCodes.xlsx is created for generating the Intrastat declaration in EBS-RO. You can find these files in the sub-folders corresponding to the desired year (e.g. 2024, 2025, etc.) in the folder nomenclatures, from where you can also download them.
To be able to update the information in the EBS-RO you need to perform the following steps:
Download the file IntrastatCodes.xlsx and save it in the application folder on the server, using the path below. Attention! It is important that the file be saved on the application server; if it is uploaded to the folder in the local application, the import will not be performed.
At the end, change Intrastat parameters as follows: Navigate to menu (Configuration and tools) > Customize… > Company parameters, Category: Intrastat Parameters. Parameter Intrastat Nomenclator Parameter :CN8 is filled with the value 2025 (or the current year for which you are updating).
After setting this parameter it is necessary to restart the server from the application: (Configuration and tools) > Application server connection > Restart server.
Attention! Restarting should be done when users are not in the application so as not to disrupt daily activity.